Author: j9bnyqc6hrsf

  • object.bqn

    object.bqn

    object.bqn is a library that brings prototype-based object oriented programming to BQN.

    Examples

    For full details on available features, please refer to the doc comments in the source code.

    • Empty object:

    Object⟩ ← •Import "object.bqn"
    
    oObject@
    o.Entries@ # → ⟨⟩
    • Object with initial properties:

    Object⟩ ← •Import "object.bqn"
    
    oObject"a"1, "b"2o.Entries@ # → ⟨ ⟨ "a" 1 ⟩ ⟨ "b" 2 ⟩ ⟩
    • Has/Get/Set/Delete:

    Object⟩ ← •Import "object.bqn"
    
    oObject@
    o.Has "key" # → 0
    o.Set "key""value"
    o.Get "key" # → "value"
    o.Delete "key"
    o.Has "key" # → 0
    • Methods:

    Object⟩ ← •Import "object.bqn"
    
    miloObject"name""Milo"
      "bark"‿{self 𝕊 times:
        (self.Get "name")  " says:"  {𝕩  " woof"}times ""
      }
    ⟩
    
    •Out milo.Send"bark" 3 # → "Milo says: woof woof woof"
    • Prototype inheritance:

    Object⟩ ← •Import "object.bqn"
    
    dogObject"name""Some dog"
      "bark"‿{self 𝕊 times:
        (self.Get "name")  " says:"  {𝕩  " woof"}times ""
      }
    ⟩
    miloObject"name""Milo"milo.SetPrototype dog
    
    •Out dog.Send"bark" 3 # → "Some dog says: woof woof woof"
    •Out milo.Send"bark" 3 # → "Milo says: woof woof woof"
    • Simulating classes:

    Object⟩ ← •Import "object.bqn"
    
    # Static members:
    animalObject"class name""animal"# Class constructor:
    animal.SetInitializer {{self 𝕊 name:
      self.Set "name"name
    }}
    # Instance members:
    animal.SetInstancePrototype Object"name"‿@
      "cry""**silence**"
      "perform cry"‿{self 𝕊 times:
        (self.Get "name")  " says:"  {𝕩  " "  self.Get "cry"}times ""
      }
    ⟩
    
    dogObject"class name""dog"dog.SetInitializer {{self 𝕊 name:
      selfanimal.initializer name
    }}
    # Inheritance:
    dog.SetInstancePrototype {𝕩.SetPrototype animal.instancePrototype} Object"cry""woof"
      "perform cry"‿{self 𝕊 times:
        (milo.Send"bark only" times)  ", then growls"
      }
      "bark only"‿{self 𝕊 times:
        self(animal.instancePrototype.Get "perform cry") times
      }
    ⟩
    
    milodog.New "Milo"
    
    •Out milo.Send"perform cry" 3 # → "Milo says: woof woof woof, then growls"

    Visit original content creator repository
    https://github.com/MX-Futhark/object.bqn

  • PwnedPasswordChecker

    Pwned Password Checker

    Updated 3rd March, 2018 GMT +11

    WordPress plugin that checks the password a user enters on registration, reset or profile update to see if it’s been ‘burned’ ( released in a public database breach of another website or obtained through other means and made public ) using Have I Been Pwned’s PwnedPasswords API.

    Breakdown

    1. A user enters a password to login, reset or change their password – which triggers the following WordPress hooks: 'user_profile_update_errors', 'registration_errors' or 'validate_password_reset'
    2. The plugin checks for a transient_key to see if a request is already in progress to the Have I Been Pwned API (which limits 1 request every 1.5 seconds from a single IP)
      • If there’s already a request in progress, the plugin waits 2 seconds and tries again.
      • Upon the second try, the plugin returns false and logs an error to the error_log. The user will be allowed to set the password they entered, and the password will not have been checked.
      • If there is not another request in progress the plugin starts a request and sets a transient_key to prevent other requests occurring in the meantime.
    3. The password the user entered is hashed using SHA1. Then the first five characters hash are sent to Have I Been Pwned?, in a technique referred to as k-anonymization.
      • As an example, the word password when hashed, is 5BAA61E4C9B93F3F0682250B6CF8331B7EE68FD8
      • In other words, the password is converted to a form that’s hard to reverse
      • Then it’s trimmed down to the first five characters: 5BAA6
      • And is sent to Have I Been Pwned? to check their comprehensive database.
    4. Have I Been Pwned? responds with a list of passwords with the same first characters and PwnedPasswordChecker then looks at the list to see if the password is there.
    5. If the password is found in the list an error message is shown to the user and they are informed that the password has been breached:

    That password is not secure.
    If you use it on other sites,
    you should change it immediately
    Please enter a different password.
    Learn more

    Installation

    • Download and place in a new folder within the /wp-content/plugins directory
    • Activate via wp-admin, drink lemonade.

    Todos

    • Get a few people to double-check my code and call me names.
    • Possibly find a better method of returning an issue to the user if Have I Been Pwned cannot be reached or limits are met.
    • Allow for checking of burned passwords completely locally without an external GET request. Wouldn’t be great for plugin-download-size though and would require a more manual install process.
      – Should probably use CURL instead of file_get_contents, although the latter is more likely to be available on shared hosting.
      – Replace the switch method with something else for the sake of replacing the switch method with something else.

    Cautions

    This obviously isn’t perfect. Too many requests or a server outage will return false and allow the user to set the password even if it’s burned. This plugin should be used alongside a strong password policy as a second line of defence.

    In the event that Have I Been Pwned were ever itself, pwned – this plugin could end up sending requests to an unwanted recipient. I have taken some precautions to verify that the request is going to the right place, by communicating with the API over a secure connection and limiting what Certificate Authorities are accepted when verifying the domain name, but all these precautions don’t help if the right place is itself compromised. I’d recommend following HIBP on social media so you’ll be able to act if it ever happens.

    Also, as much as the k-anonymity model, is a nifty way of limiting what’s being sent to external servers – it’s more or less security through obscurity. Narrowing down which password is yours on a list of similar passwords may be easier than you think. Even though the passwords on Have I Been Pwned are hashed, it’s important to note that the SHA1 algorithm was cracked by Google in early 2017.

    Thanks to

    Now that you’ve read this, you may as well go download WordFence instead given that it does what this plugin does, isn’t coded by a dingus and has other WordPress-hardening features included to make your site a fortress, or something.

    Visit original content creator repository
    https://github.com/BenjaminNelan/PwnedPasswordChecker

  • lambdarado_py

    Lambdarado puts together:

    • A Flask app written in Python

    • A Docker image
      that contains the app code and dependencies

    • AWS Lambda + AWS Gateway to run the app in the AWS

    • Werkzeug to test app locally


    It runs the relevant code depending on where it runs.

    On the local computer, it runs
    the a debug server, serving requests to
    127.0.0.1 with your app. You can start it directly (python3 main.py) or from a
    container (docker run ...) to test the app.

    In the AWS Cloud the requests are handled with the same app, but in a
    different way. Lambdarado creates
    a handler,
    that is compatible with the combination of API Gateway + Lambda.


    Install

    $ pip3 install lambdarado 

    Configure

    Dockerfile:

    FROM public.ecr.aws/lambda/python:3.8
    
    # ... here should be the code that creates the image ...
    
    ENTRYPOINT ["python", "main.py"]

    You build the image as usual,
    but the ENTRYPOINT is just a call to a .py file in the project root.
    And there is no CMD.

    main.py

    from lambdarado import start
    
    def get_app():
      # this function must return WSGI app, e.g. Flask
      from my_app_module import app
      return app 
      
    start(get_app)

    When starting the Lambda function instance, the get_app method will run once,
    but the main.py module will be imported twice. Make sure that the app is only created
    when get_app is called, not when main.py is imported.

    In other words, simply running python3 main.py without calling start should
    NOT do anything heavy and probably should not even declare or import the app.

    Run

    Local debug server

    Running shell command on development machine:

    $ python3 main.py
    

    This will start Werkzeug server listening to http://127.0.0.1:5000.

    Local debug server in Docker

    Command-line:

    $ docker run -p 5005:5000 docker-image-name

    This will start Werkzeug server listening to http://0.0.0.0:5000
    (inside the docker). The server is accessible as http://127.0.0.1:5005
    from the development (host) machine.

    Production server on AWS Lambda

    After deploying the same image as a Lambda function, it will serve the requests
    to the AWS Gateway with your app.

    • You should connect the AWS Gateway to your Lambda function. For the function
      to receive all HTTP requests, you may need to redirect the /{proxy+} route
      to the function and make lambda:InvokeFunction policy less restrictive

    Under the hood:

    • The awslambdaric will receive
      requests from and send requests to the Lambda service
    • The apig_wsgi will translate requests
      received by awslambdaric from the AWS Gateway. So your application doesn’t
      have to handle calls from the gateway directly. For the application, requests
      will look like normal HTTP

    Visit original content creator repository
    https://github.com/rtmigo/lambdarado_py

  • webform_selenium_behave_python

    Selenium Behave WebForm Test

    This project implements automation tests for the Selenium Web Form page using Behave (a BDD testing framework for Python), Selenium WebDriver and Allure Reports to create detailed performance reports.

    📝 Objective

    The goal of this project is to demonstrate how to use Behave and Selenium WebDriver to create and execute automated tests based on scenarios described in the Gherkin language.

    🚀 Technologies Used

    • Python – Programming language
    • Behave – Framework for Behavior-Driven Development (BDD)
    • Selenium WebDriver – Browser automation
    • Gherkin – Language for describing test scenarios

    📂 Project Structure

    The main code resides in the Behave step definition file, which connects the scenarios described in Gherkin files to Python code.

    📝 Step File Organization

    Here’s the information organized in a table format:

    Feature File Description of Scenarios Step File Step Definitions Purpose
    webform_actions_part_1.feature Scenarios for text, password, and textarea inputs. webform_actions_part_1.py Contains step definitions for handling input scenarios.
    webform_actions_part_2.feature Scenarios for dropdown boxes. webform_actions_part_2.py Contains step definitions for handling dropdown scenarios.
    webform_actions_part_3.feature Scenarios for file input, checkbox and radio buttons. webform_actions_part_3.py Contains step definitions for handling file input and buttons scenarios.
    webform_actions_part_4.feature Scenarios for color, date picker and range bar. webform_actions_part_4.py Contains step definitions for handling color, date picker and range bar scenarios.

    It includes three main steps:

    1. Given: Opens the web form page.
    2. When: Enters text into the input field.
    3. Then: Clicks the submit button.

    @given(u'the browser open Webform page')
    @when(u'insert a information in the text input field')
    @then(u'the submit button will be clicked')

    Example Gherkin Scenario

    An example of how a scenario can be described in Gherkin in the features/form_test.feature file:

    Feature: Test the Selenium Web Form
    
      Scenario: Fill and submit the form
        Given the browser open Webform page
        When insert a information in the text input field
        Then the submit button will be clicked

    Files project structure

    webform_selenium_behave_python/
    ├── allure-reports/             # Directory for Allure reports
    ├── features/                   # Tests and automation logic
    │   ├── pages/                  # Page Objects (Page Object Pattern)
    │   ├── steps/                  # Step definitions (separated by part)
    │   ├── *.feature               # Gherkin test scenarios
    ├── behave.ini                  # Behave configuration
    ├── requirements.txt            # Project dependencies
    ├── README.md                   # Project documentation
    

    ⚙️ Installation and Setup

    Follow these steps to set up and run the project:

    1. Clone this repository:

    git clone https://github.com/your-username/selenium-behave-webform.git
    cd selenium-behave-webform
    1. Create a virtual environment:

    python -m venv venv
    source venv/bin/activate  # Linux/Mac
    venv\Scripts\activate     # Windows
    1. Install the dependencies:
    pip install -r requirements.txt

    Make sure the requirements.txt file includes the following dependencies:

    behave
    selenium
    
    1. Install the WebDriver for your browser (e.g., ChromeDriver for Google Chrome). Ensure the driver is added to your system PATH.

    ▶️ Running the Tests

    To run the tests, use the following command:

    behave

    This will execute all scenarios described in the .feature files within the features directory.

    🗒️ Generating Allure Reports

    1. Install AlLure:
      Allure can be installed in various ways. Choose the method that best fits your environment:

    Option 1: Use the Allure Commandline

    Via Homebrew (macOS/Linux):

    brew install allure

    Via Chocolatey (Windows):
    First, install Chocolatey. Then:

    choco install allure

    Via Binary (manual):
    Download the zip file from Allure Releases.
    Extract the contents and add the binary directory to your PATH.

    1. Install Allure plugin for Python:
      Install the allure-behave package, which integrates Allure with Behave.
    pip install allure-behave
    1. Set up project for Allure
      Make sure Behave test results are generated in a format compatible with Allure:
    • Run Behave with the Allure Plugin: When running your Behave tests, include the -f allure_behave.formatter:AllureFormatter option to use the Allure format and -o allure-results to specify the output directory for the results.

    Example:

    behave -f allure_behave.formatter:AllureFormatter -o allure-results

    -f: Specifies the report format.

    -o: Specifies the output directory.

    • Final Structure: After running the tests, Allure results will be saved in a directory called allure-results.
    1. Generate HTML Report
      Once the results are generated, use the Allure Commandline to create the report:
    • Run the command to generate and view the report:
    allure serve allure-results

    This will open the report in your default browser. The report is served from a temporary local server.

    • To create a static report:
    allure generate allure-results -o allure-report
    • allure-results: Directory containing the raw test results.

    • allure-report: Directory where the HTML report will be saved.

    • To view the static report:

    allure open allure-report

    📚 Resources and References

    • Selenium Documentation
    • Behave Documentation
    • Guide to Writing Gherkin Scenarios

    🤝 Contributing

    Contributions are welcome! Follow these steps to contribute:

    1. Fork this repository.
    2. Create a branch for your changes (git checkout -b feature/new-feature).
    3. Commit your changes (git commit -m ‘Add new feature’).
    4. Push to your branch (git push origin feature/new-feature).
    5. Open a Pull Request.

    Made with ❤️ by Alisson (https://github.com/alisson-t-bucchi)
    Let me know if you need any additional modifications! 🚀

    Visit original content creator repository
    https://github.com/alisson-t-bucchi/webform_selenium_behave_python

  • CUDA_cuDNN_installation_on_ubuntu20.04

    Install CUDA-11.8 with cuDNN-8.7 for ubuntu(20.04) server A30 GPU


    • Steps:

      1. verify the system has a cuda-capable gpu

      2. download and install the nvidia cuda toolkit and cudnn.

      3. setup environmental variables

      4. verify the installation

    • to verify your gpu is cuda enable check

      >> lspci | grep -i nvidia
    • If you have previous installation remove it first.

       >> sudo apt purge nvidia* -y
      
       >> sudo apt remove nvidia-* -y
      
       >> sudo rm /etc/apt/sources.list.d/cuda*
      
       >> sudo apt autoremove -y && sudo apt autoclean -y
      
       >> sudo rm -rf /usr/local/cuda*
    • install other import packages

      >> sudo apt install g++ freeglut3-dev build-essential libx11-dev 	libxmu-dev libxi-dev libglu1-mesa libglu1-mesa-dev
    • first get the PPA repository driver

      >> sudo add-apt-repository ppa:graphics-drivers/ppa
      
      >> sudo apt update
    • install the nvidia driver with dependencies

       >> sudo apt install nvidia-utils-525-server nvidia-driver-525-server
    • verify that the nvidia driver installation is successful if error occurs reboot the system and try again this command

      >> nvidia-smi
    • install CUDA toolkit

       >> wget https://developer.download.nvidia.com/compute/cuda/repos/ubuntu2004/x86_64/cuda-ubuntu2004.pin
       
       >> sudo mv cuda-ubuntu2004.pin /etc/apt/preferences.d/cuda-repository-pin-600
      
       >> wget https://developer.download.nvidia.com/compute/cuda/11.8.0/local_installers/cuda-repo-ubuntu2004-11-8-local_11.8.0-520.61.05-1_amd64.deb
      
       >> sudo dpkg -i cuda-repo-ubuntu2004-11-8-local_11.8.0-520.61.05-1_amd64.deb
      
       >> sudo cp /var/cuda-repo-ubuntu2004-11-8-local/cuda-*-keyring.gpg /usr/share/keyrings/
      
       ### Update and upgrade
      
       >> sudo apt update && sudo apt upgrade -y
      
       ### installing CUDA-11.8
      
       >> sudo apt install cuda-11-8 -y
    • setup your env paths variables

      >> echo 'export PATH=/usr/local/cuda-11.8/bin:$PATH' >> ~/.bashrc
      
      >> echo 'export LD_LIBRARY_PATH=/usr/local/cuda-11.8/lib64:$LD_LIBRARY_PATH' >> ~/.bashrc
      
      >> source ~/.bashrc
    • install cuDNN v11.8
      First register here: https://developer.nvidia.com/developer-program/signup

      >> CUDNN_TAR_FILE="cudnn-linux-x86_64-8.7.0.84_cuda11-archive.tar.xz"
      
      >> sudo wget https://developer.download.nvidia.com/compute/redist/cudnn/v8.7.0/local_installers/11.8/cudnn-linux-x86_64-8.7.0.84_cuda11-archive.tar.xz
      
      >> sudo tar -xvf ${CUDNN_TAR_FILE}
      
      >> sudo mv cudnn-linux-x86_64-8.7.0.84_cuda11-archive cuda
    • copy the following files into the cuda toolkit directory.

       >> sudo cp -P cuda/include/cudnn.h /usr/local/cuda-11.8/include
      
       >> sudo cp -P cuda/lib/libcudnn* /usr/local/cuda-11.8/lib64/
      
       >> sudo chmod a+r /usr/local/cuda-11.8/lib64/libcudnn*
    • Finally, to verify the installation, check

       >> nvidia-smi
      
       >> nvcc -V

    Install ONNX Runtime (ORT)

    ONNX Runtime version CUDA cuDNN ONNX version
    1.17 The default CUDA version for ORT 1.17 is CUDA 11.8. To install CUDA 12 package please look at Install ORT. cuDNN from 8.8.1 up to 8.9.x 1.15
    1.15, 1.16, 1.17 CUDA versions from 11.6 up to 11.8 cuDNN from 8.2.4 up to 8.7.0 1.14, 1.14.1, 1.15

    INSTALL ONNX RUNTIME CPU

    pip install onnxruntime==1.15.0
    
    
    INSTALL ONNX RUNTIME GPU (CUDA 11.X)

    The default CUDA version for ORT is 11.8

    pip install onnxruntime-gpu==1.16.3
    
    
    INSTALL ONNX RUNTIME GPU (CUDA 12.X)

    For Cuda 12.x, please use the following instructions to install from ORT Azure Devops Feed

    pip install onnxruntime-gpu --extra-index-url https://aiinfra.pkgs.visualstudio.com/PublicPackages/_packaging/onnxruntime-cuda-12/pypi/simple/


    Visit original content creator repository
    https://github.com/Ribin-Baby/CUDA_cuDNN_installation_on_ubuntu20.04

  • alioliFlutterApp

    Español

    Alioli – Flutter App

    Alioli is a food app that aims to centralize different recipe and product functionalities in one place.

    Built with Flutter and Firebase, it includes the use of design patterns, NoSQL and SQLite databases, and integration with external APIs.

    Download by clicking on the following image:

    Descargar APK

    📸 Screenshots

    Screenshot 1 Screenshot 2 Screenshot 3
    Screenshot 4 Screenshot 5 Screenshot 6

    📌 Features

    With Alioli you can:

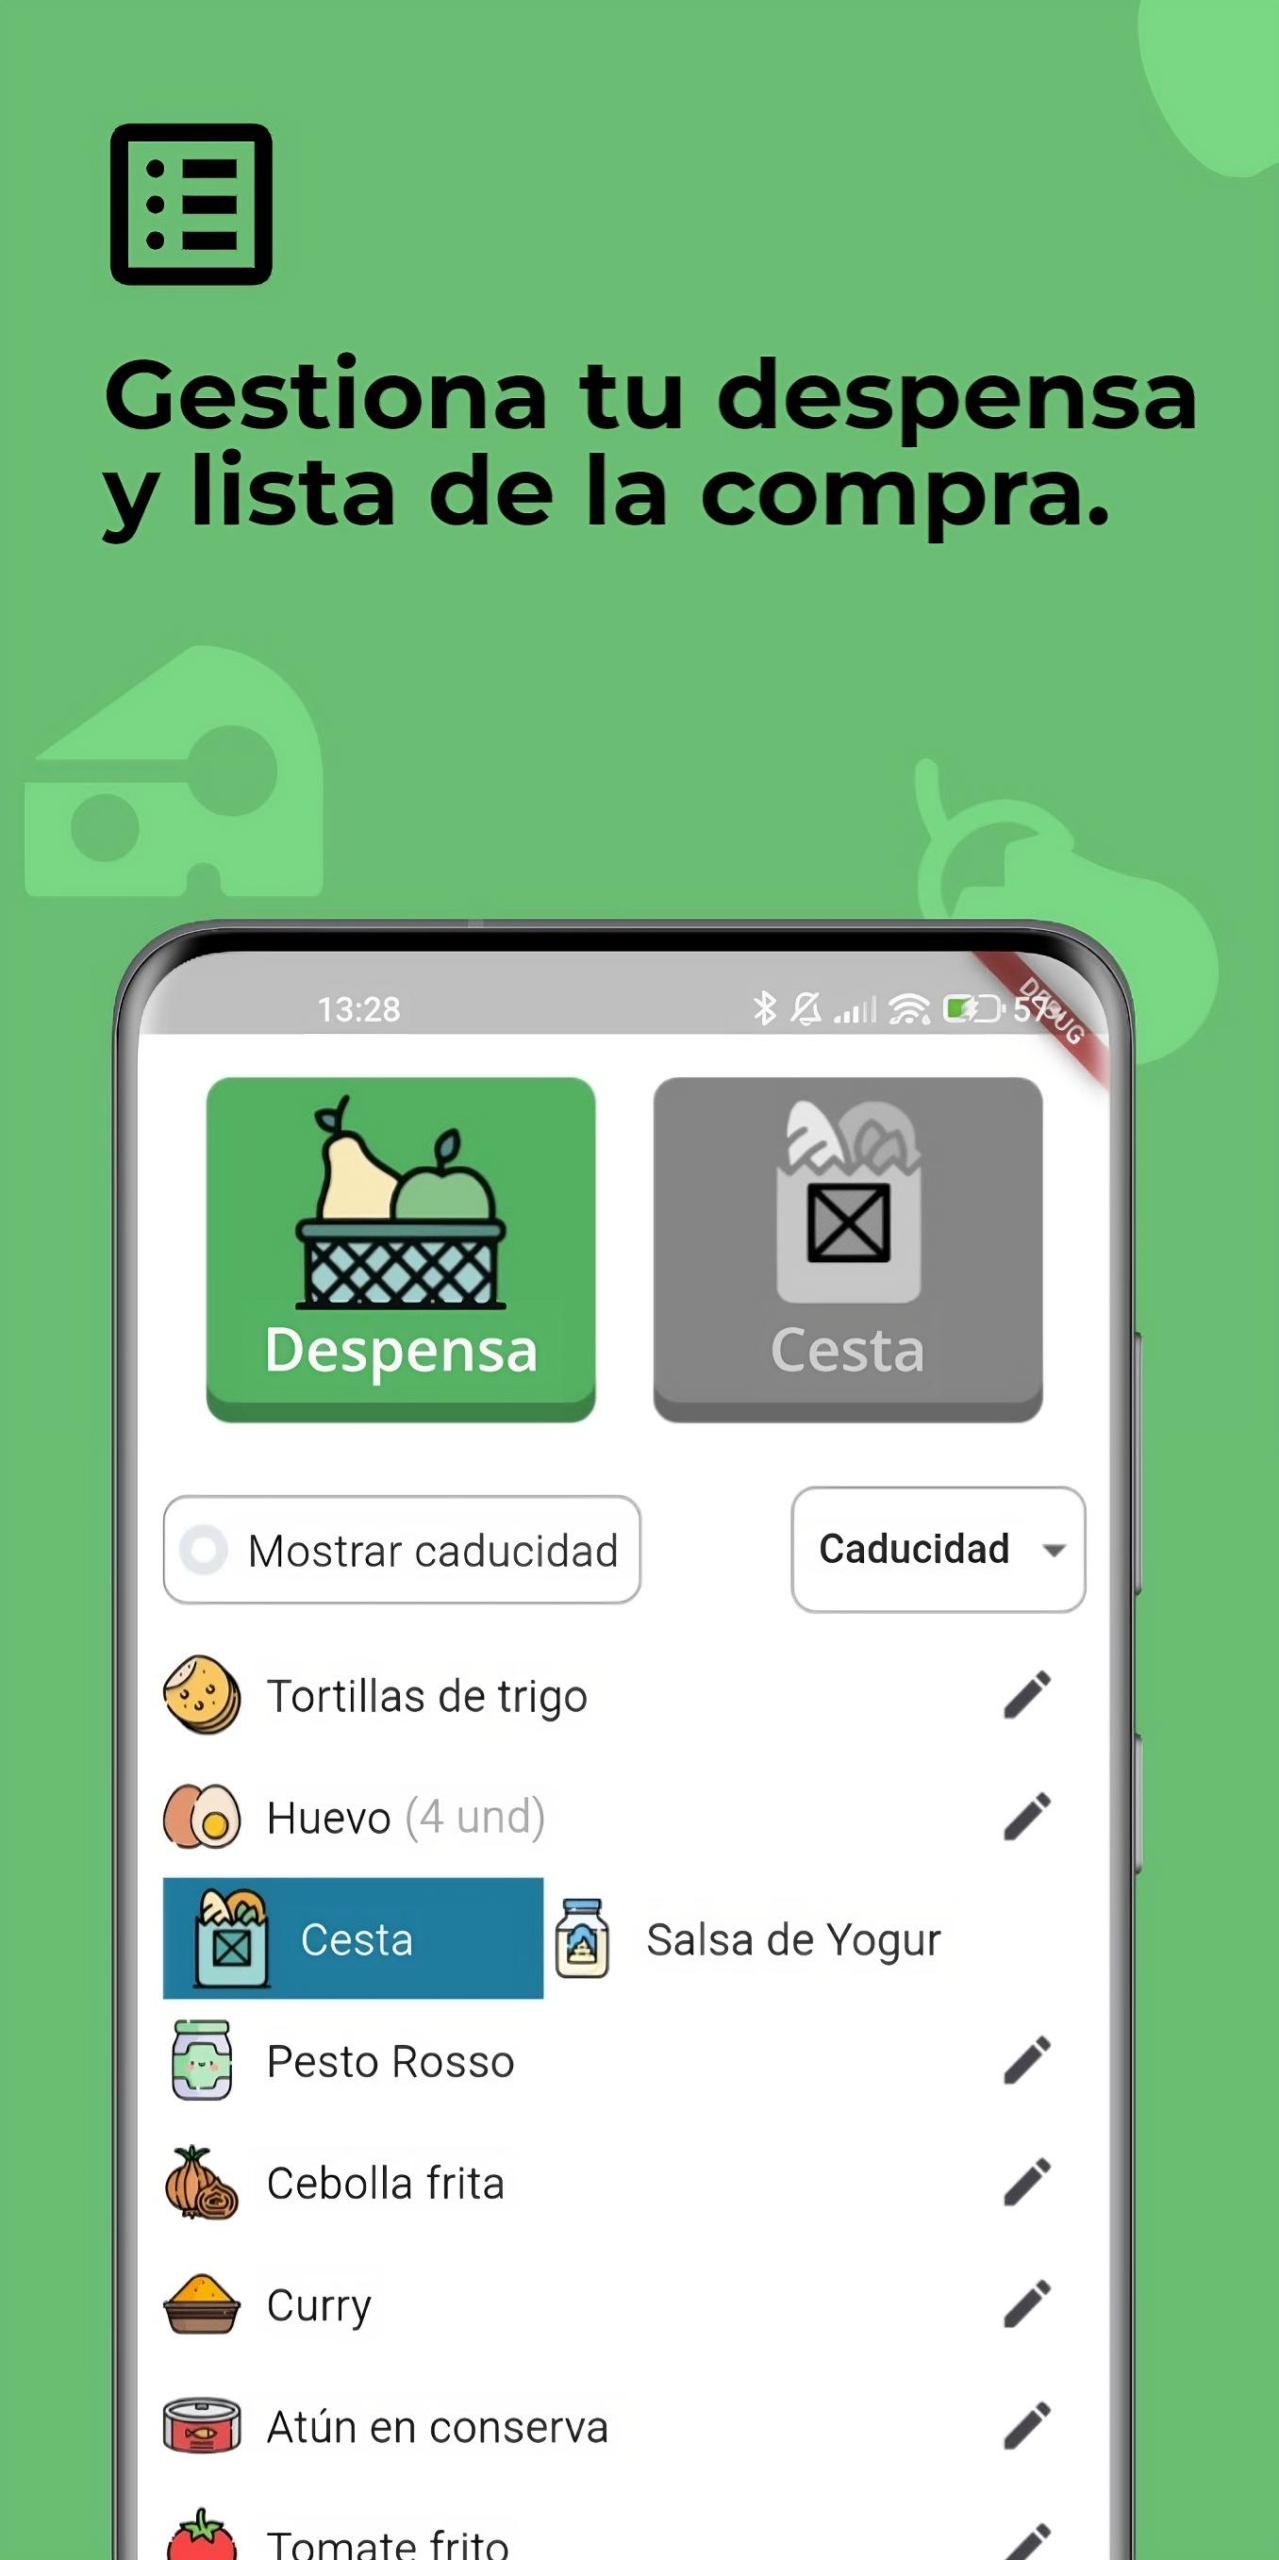
    • 🛒 Organize your pantry food list, as well as your shopping list.
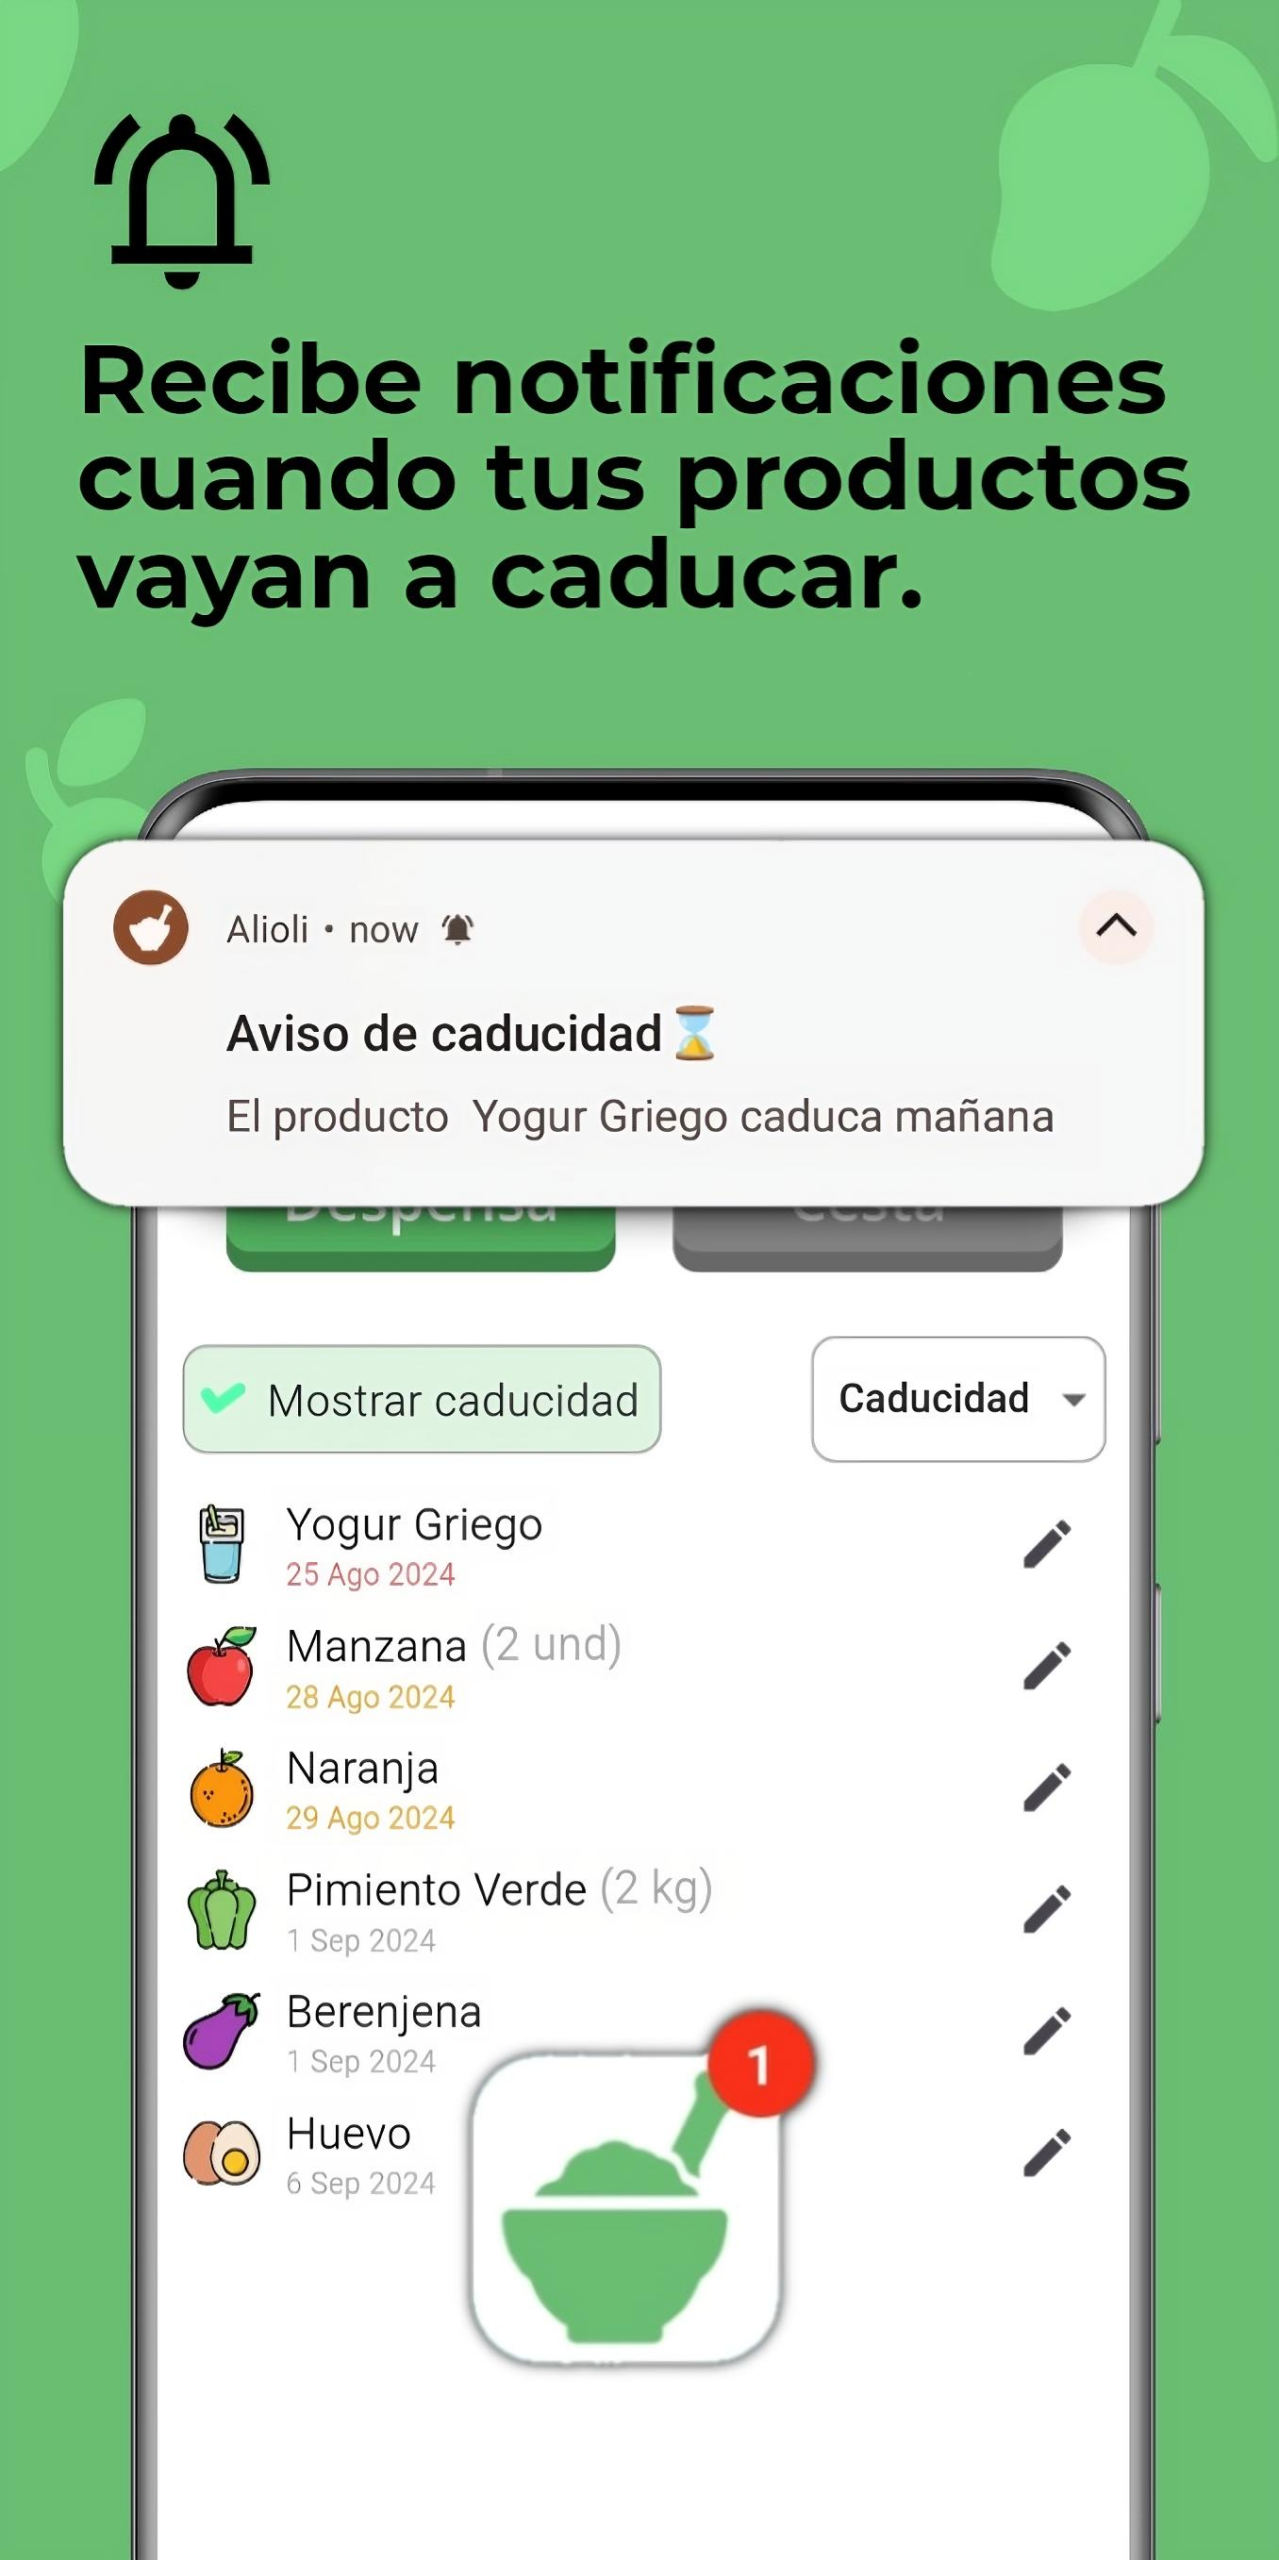
    • 📅 Receive notifications when your products are close to their expiration date.
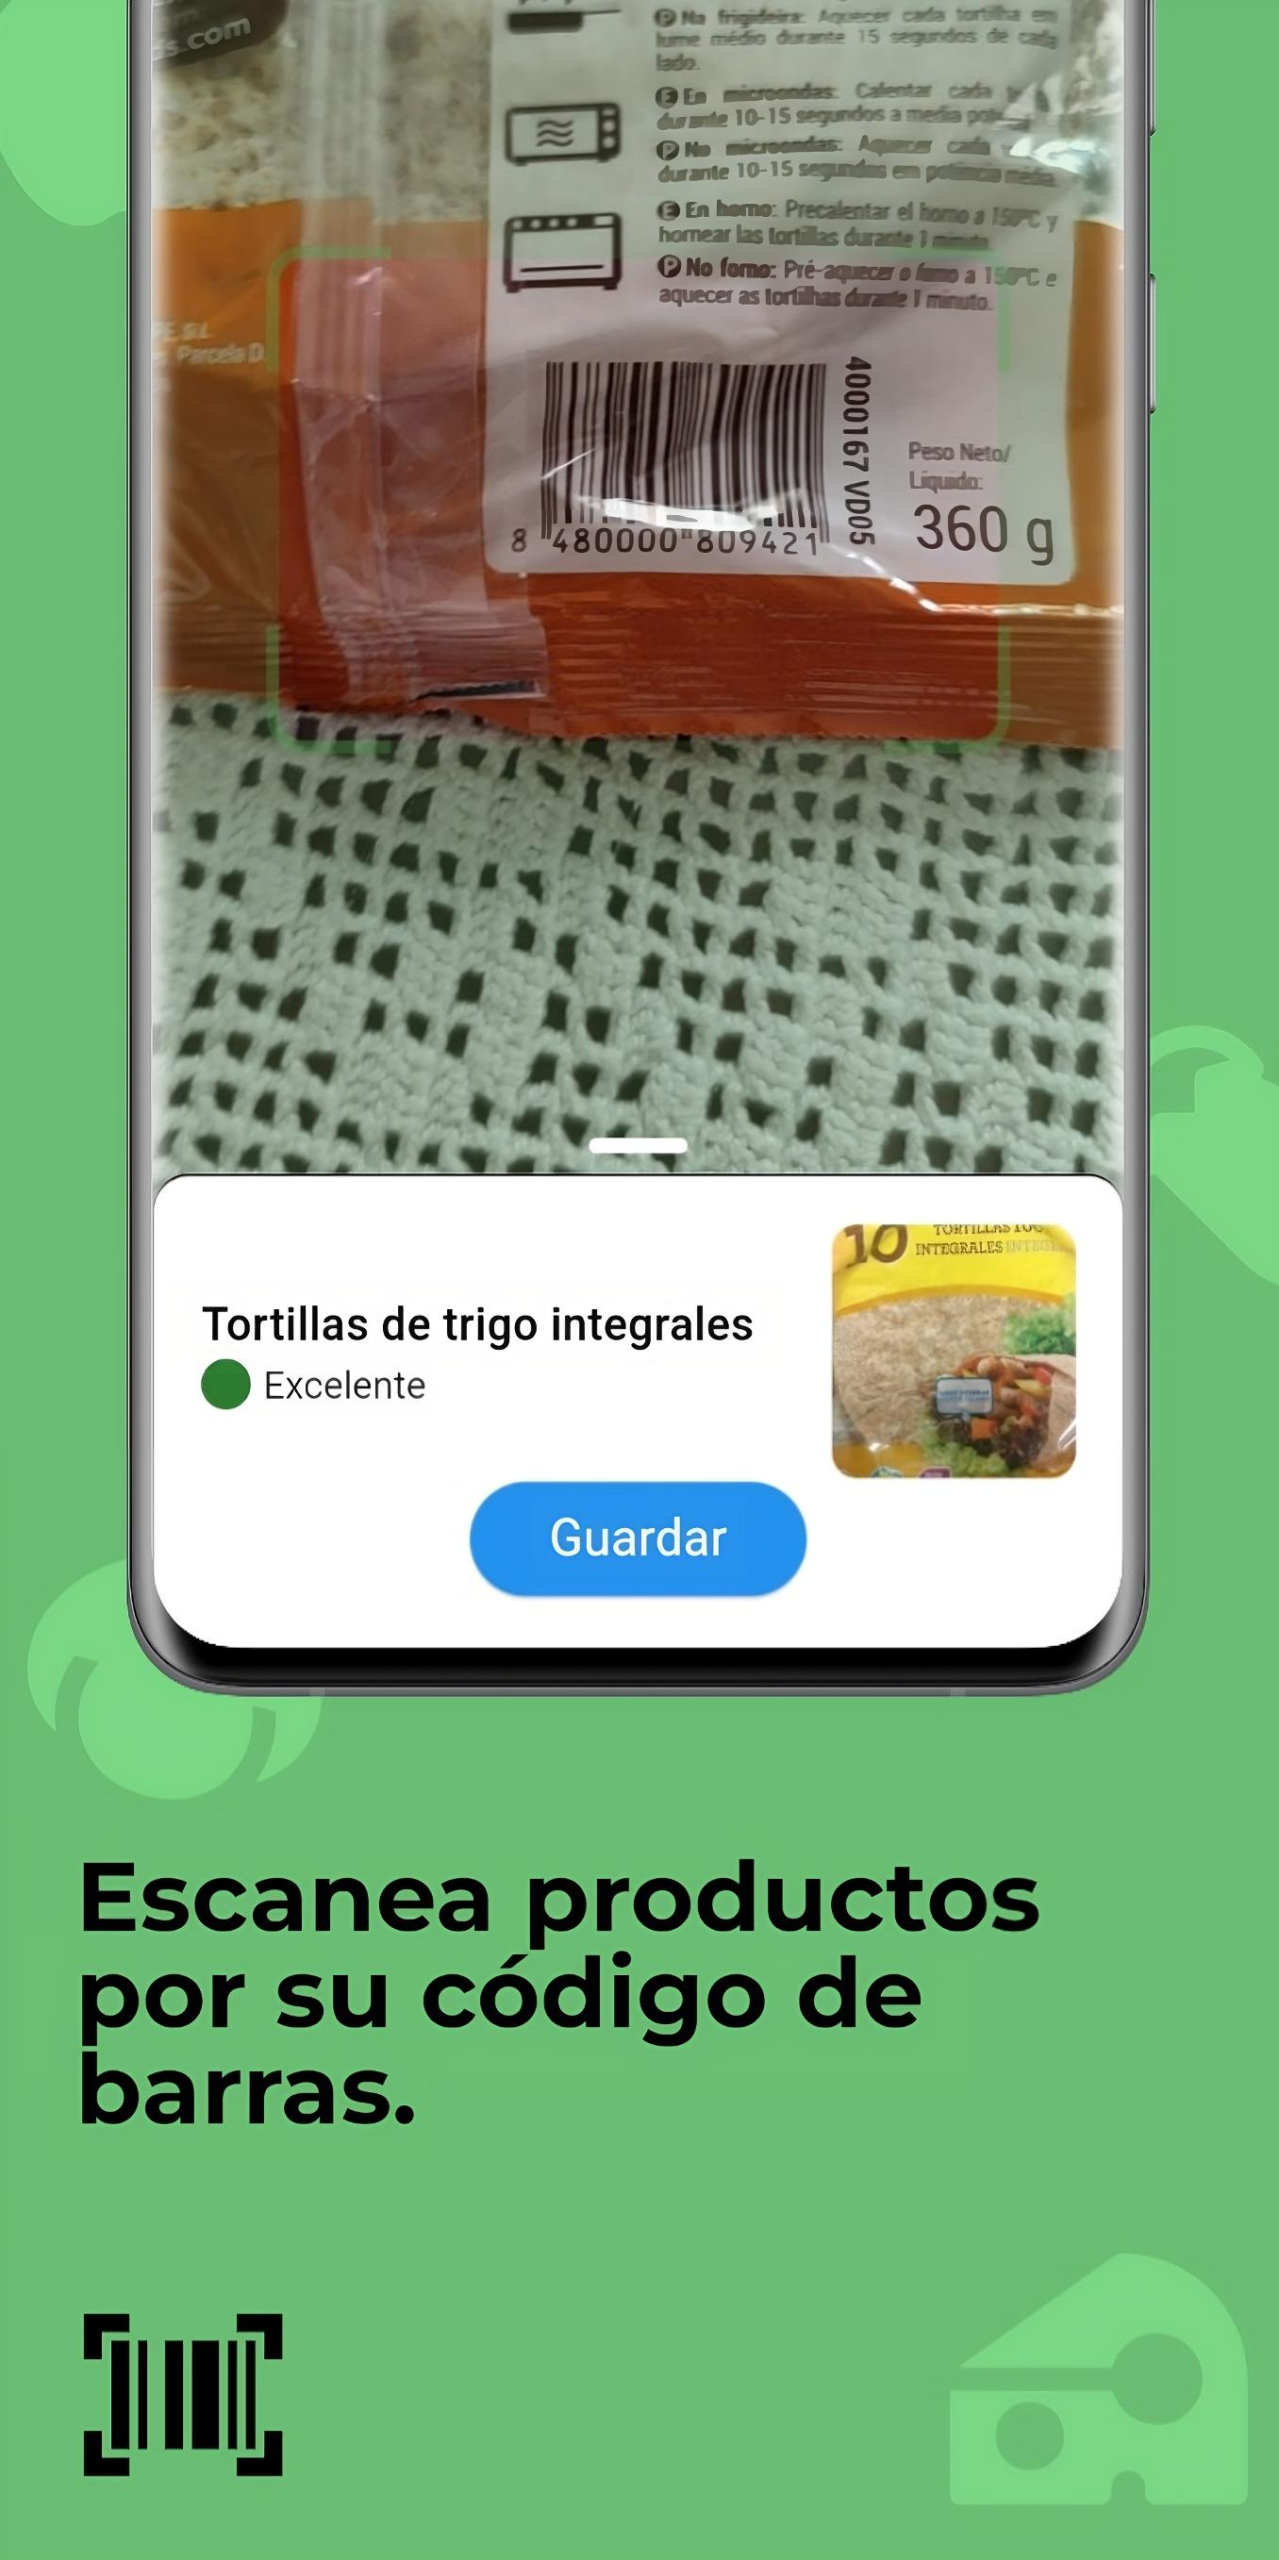
    • 🔍 Scan the barcode of the products to get a summary of their nutritional information.
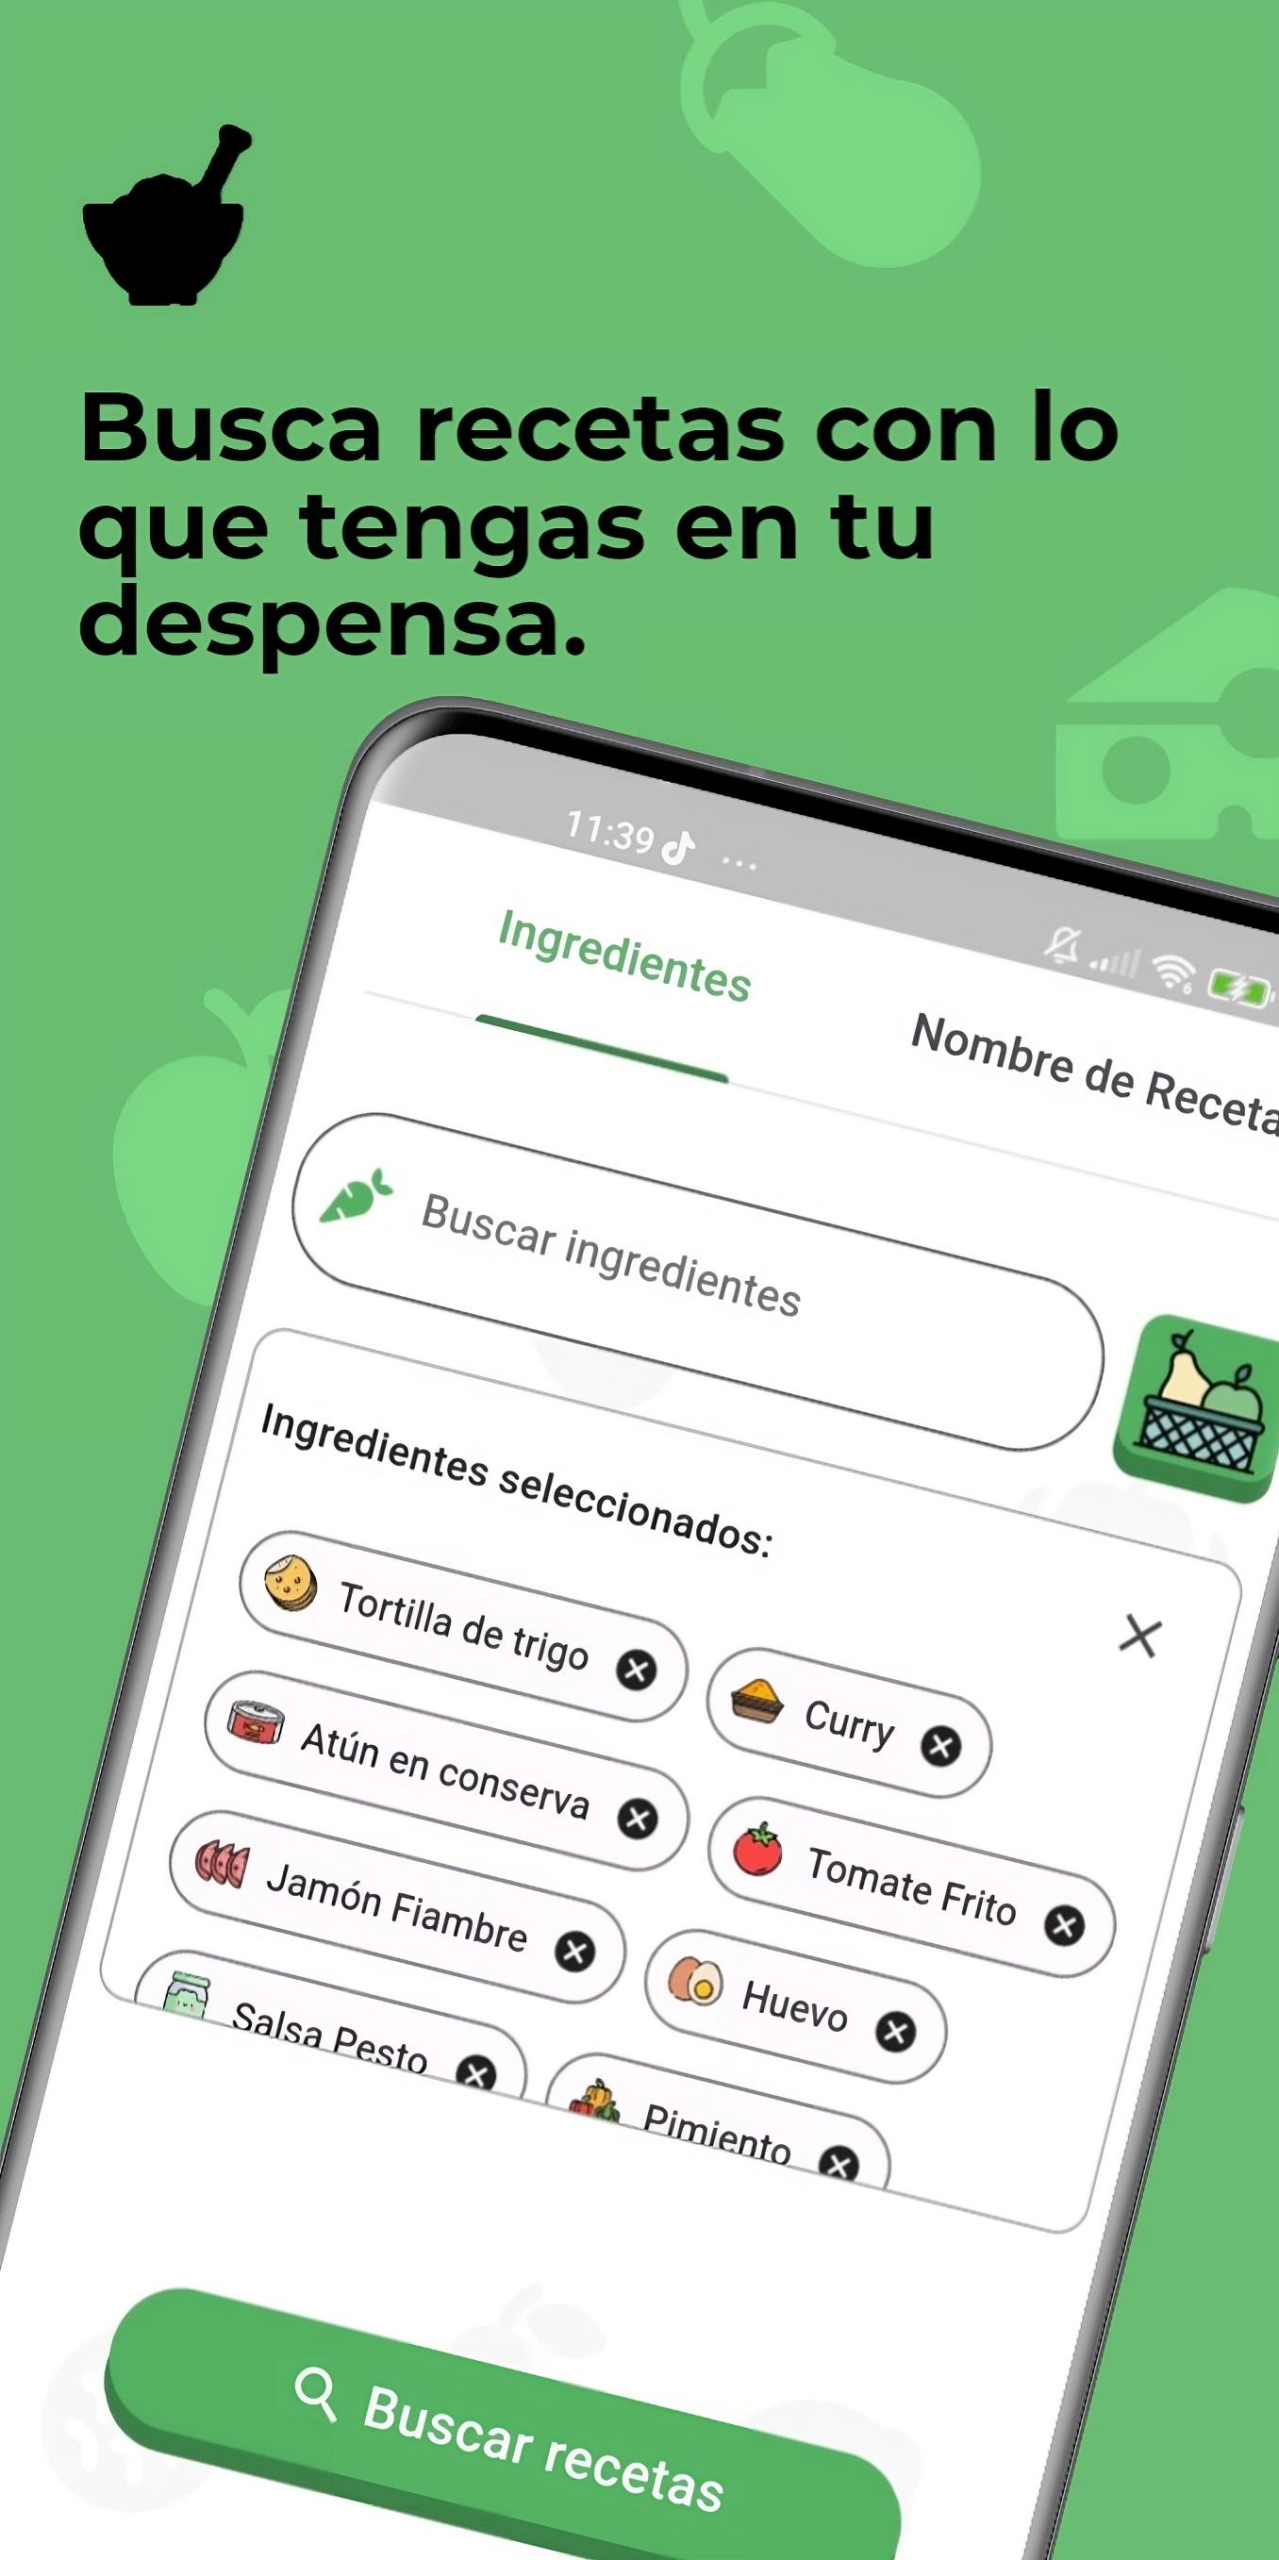
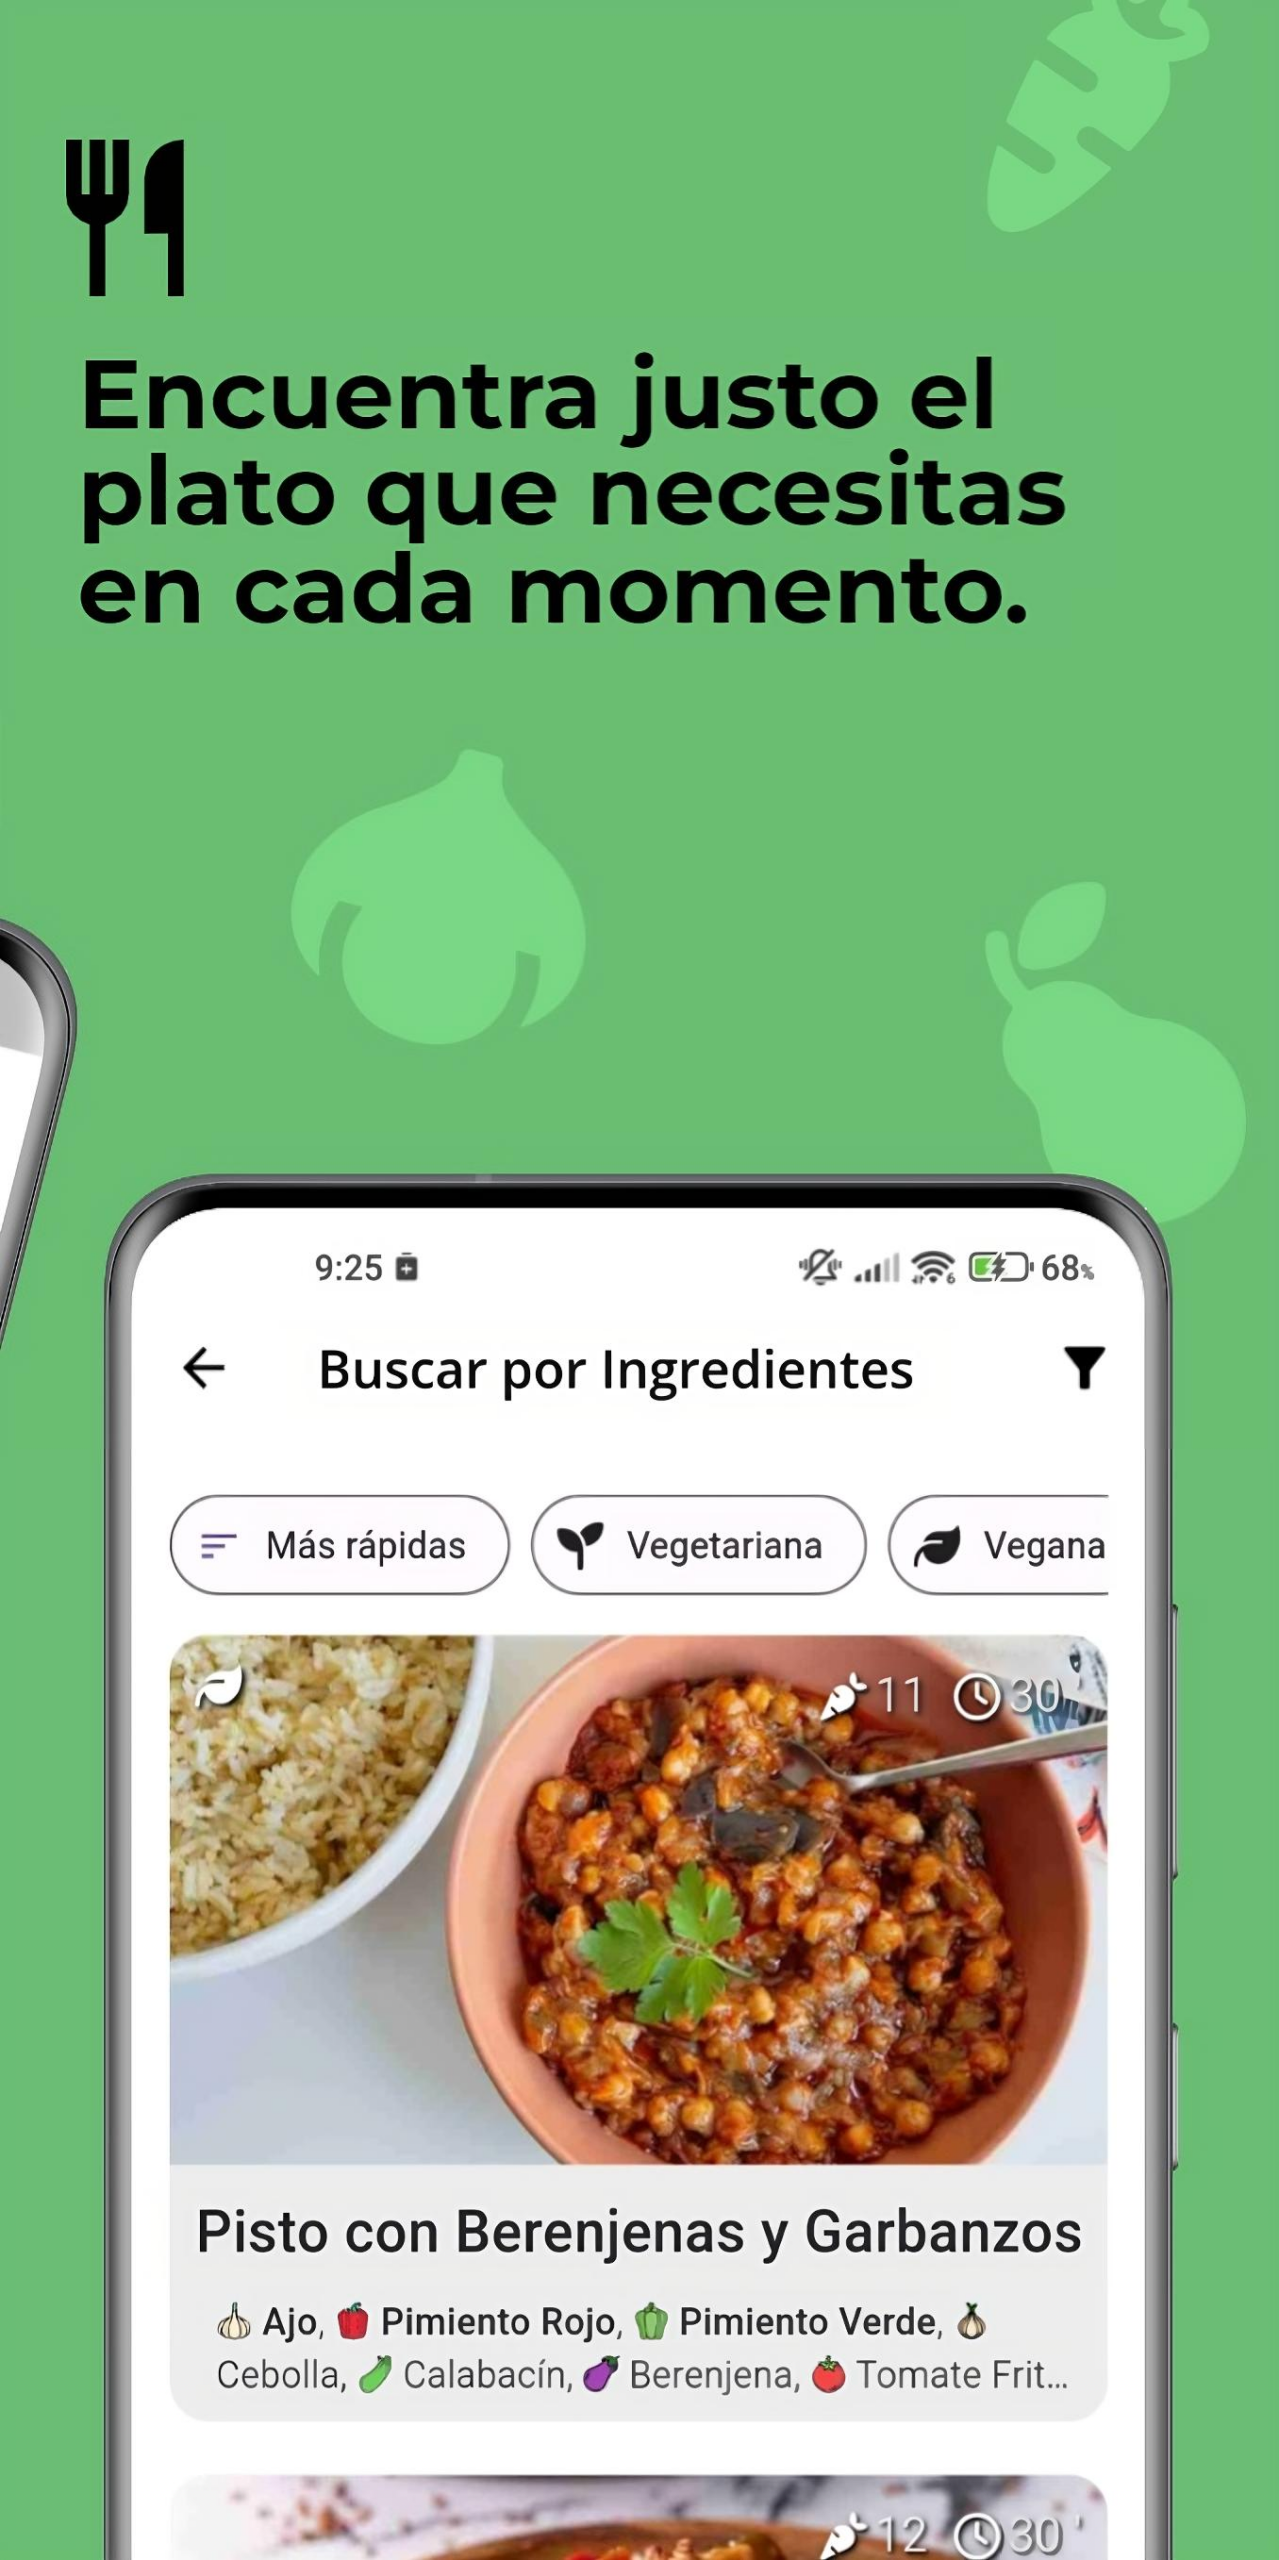
    • 🥕 Search for recipes based on the foods in your pantry, among other search criteria such as recipe name or category to which they belong.
    • 🔧 Apply a multitude of filters to searches, classifying them by vegan, vegetarian, preparation time, best rating or existence of videos among other filters.
    • 📚 Create your own personalized recipe lists.
    • ⬆️ Upload your own recipes to the platform so that they can be accessible by everyone.

    Alioli – Aplicación en Flutter

    Alioli es una aplicación sobre alimentación que trata de centralizar distintas funcionalidades sobre recetas y productos en un solo lugar.

    Realizada con Flutter y Firebase, incluye el uso de patrones de diseño, bases de datos NoSQL y SQLite e integración con apis externas.

    Descargar haciendo click sobre la siguiente imagen:

    Descargar APK

    📸 Capturas

    Screenshot 1 Screenshot 2 Screenshot 3
    Screenshot 4 Screenshot 5 Screenshot 6

    📌 Características

    Con Alioli puedes:

    • 🛒 Organizar tu lista de alimentos en despensa, así como tu lista de la compra.
    • 📅 Recibir notificaciones cuando tus productos estén próximos a su fecha de caducidad.
    • 🔍 Escanear el código de barras de los productos para obtener un resumen de su información nutricional.
    • 🥕 Buscar recetas basadas en los alimentos de tu despensa, entre otros criterios de búsqueda como nombre de la receta o categoría a la que pertenecen.
    • 🔧 Aplicar multitud de filtros a las búsquedas, clasificándolas por veganas, vegetarianas, tiempo de preparación, mejor valoración o existencia de vídeos entre otros filtros.
    • 📚 Crear tus propias listas de recetas personalizadas.
    • ⬆️ Subir tus propias recetas a la plataforma para que puedan ser accesibles por todo el mundo.
    Visit original content creator repository https://github.com/jcmh05/alioliFlutterApp
  • ollama-nvim-cli

    Ollama NeoVim CLI

    A CLI tool for chatting with Ollama models using Neovim/LunarVim as the editor.

    Features

    • Chat with Ollama models using your favorite editor
    • Save and resume chat sessions
    • Progress bar with token counting
    • Markdown formatting for responses
    • Catppuccin-themed interface

    Installation

    Using pip

    pip install ollama-nvim-cli

    From source

    git clone https://github.com/tadeasf/ollama-nvim-cli
    cd ollama-nvim-cli
    rye sync
    rye run build-binary

    Usage

    Basic usage:

    ollama-nvim-cli
    
    # Or with options
    ollama-nvim-cli --model mistral
    ollama-nvim-cli --session previous_chat.md
    ollama-nvim-cli --list

    Available options:

    • --model, -m: Specify the Ollama model to use
    • --session, -s: Continue a previous chat session
    • --list, -l: List recent chat sessions
    • --help: Show help message

    Development

    Setup Development Environment

    1. Install Rye (if not already installed):
    curl -sSf https://rye-up.com/get | bash
    1. Clone and setup project:

    git clone https://github.com/yourusername/ollama-nvim-cli
    cd ollama-nvim-cli
    rye sync

    Development Commands

    # Run the CLI in development
    rye run onc
    
    # Build binary
    rye run build-binary
    
    # Prepare for PyPI release
    rye run build-pypi

    Project Structure

    src/ollama_nvim_cli/
    ├── api/          # API clients
    ├── lib/          # Core functionality
    ├── prompt/       # UI and prompt handling
    └── cli.py        # CLI entry point
    

    Configuration

    Configuration file is automatically created at ~/.config/ollama-nvim-cli/config.yaml:

    # API endpoint for Ollama
    endpoint: "http://localhost:11434"
    
    # Default model to use
    model: "mistral"
    
    # Editor command
    editor: "lvim"
    
    # Theme configuration (Catppuccin colors)
    theme:
      user_prompt: "#a6e3a1"
      assistant: "#89b4fa"
      error: "#f38ba8"
      info: "#89dceb"

    Contributing

    1. Fork the repository
    2. Create your feature branch (git checkout -b feature/amazing-feature)
    3. Commit your changes (git commit -m 'Add amazing feature')
    4. Push to the branch (git push origin feature/amazing-feature)
    5. Open a Pull Request

    License

    GPL-3.0

    Visit original content creator repository
    https://github.com/tadeasf/ollama-nvim-cli

  • scrm

    Simple CRM

    An open source, Ruby on Rails customer relationship management platform (CRM).

    System Requirements

    (Ruby on Rails and other gem dependencies will be installed automatically by Bundler.)

    Demo

    Open Source Simple CRM Demo Video.

    Installation

    	cd scrm
    	bundle
    	rake db:migrate
    	rake db:seed
    	rails server
    

    License

    Simple CRM
    Copyright (c) 2018 Hugo Marquez and contributors.

    Permission is hereby granted, free of charge, to any person obtaining
    a copy of this software and associated documentation files (the
    “Software”), to deal in the Software without restriction, including
    without limitation the rights to use, copy, modify, merge, publish,
    distribute, sublicense, and/or sell copies of the Software, and to
    permit persons to whom the Software is furnished to do so, subject to
    the following conditions:

    The above copyright notice and this permission notice shall be
    included in all copies or substantial portions of the Software.

    THE SOFTWARE IS PROVIDED “AS IS”, WITHOUT WARRANTY OF ANY KIND,
    EXPRESS OR IMPLIED, INCLUDING BUT NOT LIMITED TO THE WARRANTIES OF
    MERCHANTABILITY, FITNESS FOR A PARTICULAR PURPOSE AND
    NONINFRINGEMENT. IN NO EVENT SHALL THE AUTHORS OR COPYRIGHT HOLDERS BE
    LIABLE FOR ANY CLAIM, DAMAGES OR OTHER LIABILITY, WHETHER IN AN ACTION
    OF CONTRACT, TORT OR OTHERWISE, ARISING FROM, OUT OF OR IN CONNECTION
    WITH THE SOFTWARE OR THE USE OR OTHER DEALINGS IN THE SOFTWARE.

    Visit original content creator repository
    https://github.com/hugomarquez/scrm

  • pyiEEGfeatures

    pyiEEGfeatures

    Python Versions Development License

    Useful functions for computing features from signals

    About

    This package supports the computation of band power obtained from EEG recordings. Supports missing data within the data.

    Installation

    The pip tool can be used to download the package

    $ pip install git+https://github.com/Mariellapanag/pyiEEGfeatures.git

    or

    $ git clone https://github.com/Mariellapanag/pyiEEGfeatures.git

    then the whole repository is being downloaded. The library root is located in the .\src folder.

    Dependencies

    For the root package

    The packages that needs to be install are located in the requirements.txt

    Documentation

    The documentation can be found here [Sphinx documentation]

    Acknowledgements

    Resources, help and support was provided within the Computational Neurology, Neuroscience & Psychiatry Lab at Newcastle University.

    The CNNP Lab is a group of interdisciplinary researchers working on Computational Neurology, Neuroscience, and Psychiatry (psychology). We apply theoretical and computational approaches to questions in the neuroscience domain. The lab members come from a colourful mix of backgrounds, ranging from computing, mathematics, statistics, and engineering to biology, psychology, neuroscience, and neurology.

    References

    License

    Released under the MIT license.

    Visit original content creator repository https://github.com/Mariellapanag/pyiEEGfeatures