Blog

  • ch1-docker

    What is in this repository

    apis in this repository

    Please, take a look at the general documentation in this section apis/

    Solution architecture topology (Docker)

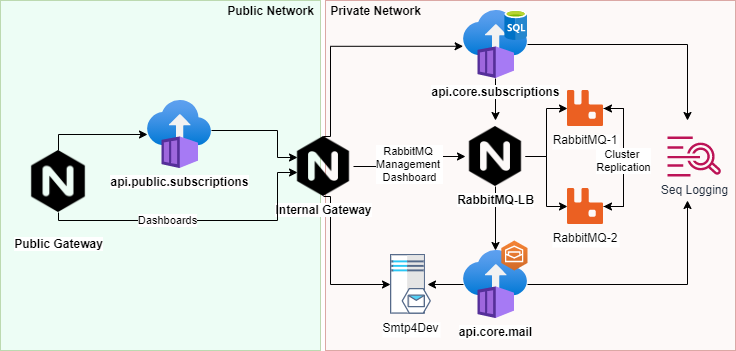
    The architecture for running this project is based on docker-compose and follows the schema bellow

    for more details you can take a look at:

    docker-compose

    Explaining the different components

    Networking

    There are two different types of networks: public and private.

    The public network

    • stands for hosting public APIs and applications that need to be reachable from the internet.

    The private network

    • stands for hosting core services (private or the most critical services so to speak).

    Services

    it’s hosted in the public network

    • it cannot reach private services.
    • it routes incomming requests thru:
      • the public api-client-subscriptions
      • the private-gateway
    • it exposes specific internal/private services
    • it takes control of what resources have been accessed
    • it authenticate internal endpoints
    • it take control over one first layer of security ( like validating auth tokens against an identity server, for instance)
    • it produces interesting logs

    The private gateway

    • it routes traffic to specific services in the private network
    • it increases control over security (when exposing internal dashboards)
    • it increases control over monitoring
    • it restricts access to the private network
    • it exposes partial private services to the public network

    The api-client-subscriptions

    • it stands for basically handling requests for subscriptions creation
    • it can reach services in the public network
    • it can reach services in the private network

    The RabbitMQ (cluster)

    • it is an Nginx load balancer
    • it is composed by two rabbitMQ servers in the cluster (rabbit-1, rabbit2)
    • it is only reachable inside the private network
    • it provides dashboards with metrics about the existing message queues
    • it provides a way of publishing new event messages without needing of external tools and API’s

    The SMTP server

    • it is a simple SMTP/Mail Inbox server
    • the SMTP port can only be reachable in the private network
    • the Mailing box is exposed thru the private and public gateways for testing purposes

    The SEQ log server

    • it’s a simple tool for monitoring logs produced by the APIs.
    • it can produce nice dashboards to take control over what’s happening the APIs
    • the dashboard service is exposed thru the private and public gateway for testing purposes

    How to build and run (Docker)

    Make sure that you have docker installed on your local machine

    https://www.docker.com/get-started

    optional: if you want to download the dotnet core SDK in order to build the APIs locally, you can download it from here: https://dotnet.microsoft.com/download

    Clone the repository

        git clone git@bitbucket.org:jsoliveira/iban-services-poc.git

    Set the current working directory

        cd infrastructure/docker

    Clean up your docker environment

        #!/bin/sh
        rm -f  ~/.docker/config.json;
        docker-compose down
        docker system prune --all
        docker network prune -f

    Startup all containers

        docker-compose -f "infrastructure/docker/docker-compose.yml" up --force-recreate --remove-orphans --build

    Startup a single container

    	# docker-compose build <api_name>;
        docker-compose -f "infrastructure/docker/docker-compose.yml" up --force-recreate --remove-orphans --build api-client-subscription;

    if you want to debug or startup an API using the dotnet core SDK please take a look at the existing API documentation in this repository apis/

    How to deploy into Kubernetes Cluster

    For demo purposes the public gateway is exposed using a NodePort service infrastructure/kubernetes/1.19.3/gateways/public-gateway/service.yml

    	kubectl kustomize  "infrastructure/kubernetes/1.19.3/" | kubectl apply -f -

    The public gateway is exposed on port 8080.

    These are the URLs available :

    http://localhost:8080/public/subscriptions/swagger/index.html

    http://localhost:8080/private/mq/

    http://localhost:8080/private/seq/

    http://localhost:8080/private/seq/

    The links below are also available thru HTTPS over port 30443

    In a production environment with multiple nodes (VM) the public gateway would be exposed thru an ingress controller or thru a LoadBalance service.


    Important Notes

    RabbitMQ cluster can take up to 2 minutes to get up and running (clustering)

    While it is initializing, if core.subscription API gets requested it will not responding until it reaches the MQ cluster

    Check the following documentation for more details: api-core-subscriptions/

    How to make sure that RabbitMQ is already up and running

    Try to reach the RabbitMQ management portal, if you don’t get a warning message then you’re good to go.

    http://localhost:8080/private/mq/

    How to check if the public API is also running

    If you see the OpenAPI documentation in the following link then it’s all set.

    http://localhost:8080/public/subscriptions/swagger/


    Interesting Links

    RabbitMQ cluster manager

    http://localhost:8080/private/mq/

    credentials : user: guest | pass: guest

    SEQ Logging dashboards

    http://localhost:8080/private/seq/

    Mail inbox dashboards

    http://localhost:8080/private/smtp/

    Public API Swagger

    http://localhost:8080/public/subscriptions/swagger/

    authentication token: any string

    you’ll need the following credentials in order to get authorized by the public gateway to access the private links above

    username: admin

    password: admin

    CI/CD Integration

    This repository has configurations to deploy container images into a container registry.

    Docker hub was used as the main container registry for the purpose of this demo)

    Bitbucket Pipelines

    Bitbucket Pipelines

    CI/CD Azure DevOps

    Azure Devops

    Visit original content creator repository https://github.com/jsoliveir/ch1-docker
  • DatePickerDialog-iOS-Swift

    DatePickerDialog 4.0 – iOS – Swift

    DatePickerDialog is an iOS drop-in classe that displays an UIDatePicker within an UIAlertView.

    Requirements

    DatePickerDialog works on iOS 7, 8 and 9, 10, 11, 12, 13 and 14. It depends on the following Apple frameworks, which should already be included with most Xcode templates:

    • Foundation
    • UIKit

    Swift Versions

    • Swift 5.3 (Current)
    • Swift 4.2 (3.0 tag)
    • Swift 4.2 (2.1 tag)
    • Swift 4.2 (2.0 tag)
    • Swift 2.3 (swift_2.3 branch)

    Installation

    CocoaPods

    You can use CocoaPods to install DatePickerDialog by adding it to your Podfile:

    platform :ios, '8.0'
    use_frameworks!
    pod 'DatePickerDialog'

    To get the full benefits import DatePickerDialog wherever you import UIKit

    import UIKit
    import DatePickerDialog

    Carthage

    Create a Cartfile that lists the framework and run carthage bootstrap. Follow the instructions to add $(SRCROOT)/Carthage/Build/iOS/DatePickerDialogFramework.framework to an iOS project.

    github "squimer/DatePickerDialog-iOS-Swift"
    

    Manually

    1. Download and drop DatePickerDialog.swift in your project.
    2. Congratulations!

    Example

    func datePickerTapped() {
    	DatePickerDialog().show(title: "DatePicker", doneButtonTitle: "Done", cancelButtonTitle: "Cancel", datePickerMode: .date) { date in
    		if let dt = date {
    			let formatter = DateFormatter()
    			formatter.dateFormat = "MM/dd/yyyy"
    			self.textField.text = formatter.string(from: dt)
    		}
    	}
    }

    Dialog parameters

    • showCancelButton: Bool – default true
    • locale: Locale? – default nil

    Example without ‘Cancel’ button:

    DatePickerDialog(showCancelButton: false).show(title: "DatePicker", doneButtonTitle: "Done", datePickerMode: .date)

    Example with custom locale:

    DatePickerDialog(locale: Locale(identifier: "es_PY")).show(title: "DatePicker", doneButtonTitle: "Done", datePickerMode: .date)

    Show parameters

    • title: String (Required)
    • doneButtonTitle: String
    • cancelButtonTitle: String
    • defaultDate: Date
    • minimumDate: Date
    • maximumDate: Date
    • datePickerMode: UIDatePickerMode (Required)
    • callback: ((date: Date) -> Void) (Required)

    Special thanks to

    License

    This code is distributed under the terms and conditions of the MIT license.

    Visit original content creator repository https://github.com/squimer/DatePickerDialog-iOS-Swift
  • sttabt

    STTABT: Sparse Token Transformer with Attention Back-Tracking [Paper]

    image

    This repository inlcudes official implementations for STTABT.

    [OpenReview] [BibTeX]

    Sparse Token Transformer with Attention Back-Tracking
    🏫🤖Heejun Lee, 🏫👽Minki Kang, 🏫🏛️Youngwan Lee, 🏫Sung Ju Hwang
    KAIST:school:, DeepAuto.ai🤖, AITRICS👽, ETRI🏛️
    Internation Conference on Learning Representation (ICLR) 2023

    Abstract

    Despite the success of Transformers in various applications from text, vision, and speech domains, they are yet to become standard architectures for mobile and edge device applications due to their heavy memory and computational requirements. While there exist many different approaches to reduce the complexities of the Transformers, such as the pruning of the weights/attentions/tokens, quantization, and distillation, we focus on token pruning, which reduces not only the complexity of the attention operations, but also the linear layers, which have non-negligible computational costs. However, previous token pruning approaches often remove tokens during the feed-forward stage without consideration of their impact on later layers’ attentions, which has a potential risk of dropping out important tokens for the given task. To tackle this issue, we propose an attention back-tracking method that tracks the importance of each attention in a Transformer architecture from the outputs to the inputs, to preserve the tokens that have a large impact on the final predictions. We experimentally validate the effectiveness of the method on both NLP and CV benchmarks, using Transformer architectures for both domains, and the results show that the proposed attention back-tracking allows the model to better retain the full models’ performance even at high sparsity rates, significantly outperforming all baselines. Qualitative analysis of the examples further shows that our method does preserve semantically meaningful tokens.

    Experiments

    ViT Concrete Masking

    #training
    python -m main.vit_concrete_end2end --n-gpus $NGPU --imagenet-root /path/to/ILSVRC2012/
    #ploting
    python -m main.plot.vit_concrete_with_dyvit
    python -m main.plot.vit_concrete_flops
    python -m main.visualize.vit

    LVViT concrete samples

    End2end.

    python -m main.vit_concrete_end2end --factor 4 --n-gpus 3 --model lvvit-small --master-port 14431 --auto-resume --p-logits "-1.5 -1.0 -0.5 0.0 1.0"

    Skip approx.

    python -m main.vit_concrete_end2end --factor 4 --n-gpus 1 --model lvvit-small --master-port 14431 --auto-resume --p-logits "-1.5 -1.0 -0.5 0.0 1.0" --skip-approx --batch-size 32

    GLUE Tasks

    WIP… Please check trainer folder.

    main.approx_glue_plot
    main.concrete_glue_plot
    main.ltp_glue_plot
    

    Citation

    @inproceedings{
        lee2023sttabt,
        title={Sparse Token Transformer with Attention Back Tracking},
        author={Heejun Lee and Minki Kang and Youngwan Lee and Sung Ju Hwang},
        booktitle={International Conference on Learning Representations},
        year={2023},
        url={https://openreview.net/forum?id=VV0hSE8AxCw}
    }
    Visit original content creator repository https://github.com/gmlwns2000/sttabt
  • CineABC

    Cine ABC

    Projeto feito para um trabalho da faculdade que consiste em criar um sistema de cinema requerido por uma empresa.

    Tecnologias   |   
    Projeto   |   
    Proposta

    Imagem

    🎓 Tecnologias

    Esse projeto foi desenvolvido com as seguintes tecnologias:

    • Java e JavaFX
    • Metodologia: Scrum
    • SDK 17 e JDK 20
    • Figma
    • Git e Github

    📔 Projeto

    Sistema de cinema + controle de vendas (parte da administração)
    Obs: Não responsivo. Resolução: 1366 x 768.

    💌 Proposta

    A empresa Cine ABC deseja automatizar sua bilheteria, para isso, está contratando sua empresa de desenvolvimento de software para a construção desse sistema.
    Hoje suas vendas são controladas através de planilha eletrônica, onde cada aba representa qual Filme está sendo exibido em determinado horário.
    Esse projeto deverá desenvolver um software, na linguagem Java Desktop, que auxilie a empresa Cine ABC a melhorar seu controle de vendas de ingresso:

    O software solicitado deverá conter no mínimo as seguintes funcionalidades:

    • Cadastrar Filme: essa funcionalidade deverá permitir com que os funcionários do cinema consigam cadastrar quais filmes serão exibidos.
    • Cadastrar Sala: Essa funcionalidade irá permitir com que o funcionário cadaste as salas que irão exibir os filmes.
    • Cadastrar Sessão: essa funcionalidade deverá permitir com que o funcionário do cinema cadastre o dia e hora que um filme será exibido, bem como em qual sala será utilizada.
    • Vender Ingresso: essa funcionalidade deverá permitir com que o usuário selecione um filme e a sessão que gostaria de ir, bem como qual poltrona irá ocupar além de informar se irá pagar meia entrada ou inteira.
    • Imprimir Ingresso: essa funcionalidade deverá permitir com que o usuário imprima em tela o comprovante do ingresso comprado por ele.
    • Estatística de Vendas: montar um relatório apresentando qual o filme teve mais ingressos vendidos, qual sessão teve maior e menor ocupação de poltronas.

    By: Isaluh – feat: Marcos e Augusto 🤍

    Visit original content creator repository
    https://github.com/Isaluh/CineABC

  • SimpleStateMachine

    SimpleStateMachine

    SimpleStateMachine is a header-only C++ library to implement statemachines.

    Installation

    Clone the repo and copy the header file where ever you need it.

    git clone https://github.com/gibbets/SimpleStateMachine.git

    Usage

    #include "simpelstatemachine.hpp"
    
    /*
    1. Define your States
    2. Create a list of allowed transitions
    3. Create your state machine
    4. Define actions when entering or leaving a state
    */
    
    enum states { start, running, end };
    
    /*
    This defines two allowed transitions: from start to running, and from running to end;
    */
    std::pair<states, states> firstTransition(states::start, states::running);
    std::pair<states, states> anotherTransition(states::running, states::end);
    std::vector<std::pair<states, states> myTransistions;
    myTransistions.push_back(firstTransition);
    myTransistions.push_back(anotherTransistion);
    
    ssm::statemachine<states> myStatemachine(myTransistion, states::start);
    
    //Set an action whenever we are entering the running state
    myStatemachine.setEnterAction(states::running, 
        [] () { std::cout << "Enter running state";});
    
    //Set an action whenever we are leaving the running state
    myStatemachine.setExitAction(states::running, 
        [] () { std::cout << "Leaving running state";});
    
    //Set an action when we we are moving from running to end
    myStatemachine.setTransitionAction(std::make_pair(states::running, states::end), 
        []() { std::cout << "Going from running to end"; });
    
    //Perform a transition to running
    myStatemachine.performTransitionTo(states::running);
    
    //New state is running
    myStatemachine.getCurrentState();
    
    //Perform a transition to start
    myStatemachine.performTransitionTo(states::start);
    
    //State is still running, because from running to start is not allowed
    myStatemachine.getCurrentState();

    Contributing

    Pull requests are welcome. For major changes, please open an issue first to discuss what you would like to change.

    Please make sure to update tests as appropriate.

    Visit original content creator repository
    https://github.com/gibbets/SimpleStateMachine

  • spark-store

    Spark App Store

    star fork

    Spark Store aims to collect Linux apps for the convieniece of Linux new comers

    The collecting process needs everyone’s help

    We set up this APP Store and collect APPs/tools that everyone need widely. Also we pack Windows apps with wine.

    All packages will be shared in our repository for users to get freely.

    Distrobution supported:Deepin 20 ; Ubuntu 22.04 LTS / Ubuntu 20.04 LTS(May stop support in the future) ; UniontechOS Home 21

    About OpenKylin and deepin 23

    The adaptation work is scheduled after their official release.

    You can track our Issue resoving progress here https://gitee.com/deepin-community-store/spark-store/board

    We hope people who see here can also join our team,development help or submit applications are welcomed

    If you want to submit an APP to share with others,Please Click here

    🙌 A simple start

    If you simply want to install the Spark Store,just enter the [Release] page, find the version you want and install.

    If you are using Debian11/Ubuntu 20.04, you will need extra dependency package. Available here


    Compile and developement

    For Deepin V20/UOS 21/ Debian 11

    sudo apt install git qt5-default debhelper pkg-config qtchooser libqt5core5a libqt5gui5 libqt5widgets5 libqt5network5 libqt5concurrent5 libdtkcore-dev libdtkgui-dev  libdtkwidget-dev qttools5-private-dev libnotify-dev qtwebengine5-dev
    

    Ubuntu 22.04

    sudo apt install git qtbase5-dev debhelper pkg-config qtchooser libqt5core5a libqt5gui5 libqt5widgets5 libqt5network5 libqt5concurrent5 libdtkcore-dev libdtkgui-dev  libdtkwidget-dev qttools5-private-dev libnotify-dev qtwebengine5-dev
    

    Then

    git clone https://gitee.com/deepin-community-store/spark-store.git
    cd spark-store
    dpkg-buildpackage

    🚀 Coorperation

    We use Gitee as our code hosting platform. Please click here to contact us.

    https://gitee.com/deepin-community-store/spark-store

    Rocket Chat

    https://chat.shenmo.tech/

    PWA Client:

    spk://store/chat/store.spark-app.feedback

    (Copy and paste to search bar or in browser address bar after installing Spark Store)

    Visit original content creator repository https://github.com/shenmo7192/spark-store
  • magento-config-cache-lock

    Visit original content creator repository
    https://github.com/meanbee/magento-config-cache-lock

  • lametric-daily-standup-reminder

    LaMetric Daily Standup Reminder

    Version Build Status Made With License Contribution

    Send a reminder notification to all local LaMetric devices when the daily standup is due.

    Screenshot

    Vision

    The package is an example project for the lametric-notification-broadcast package.

    Every day at a given time, a message is send to all LaMetric devices in a local network, to remind everybody that the daily standup is due.

    That’s the only feature of this package.

    Requirements

    Installation

    Packagist Entry https://packagist.org/packages/pixelbrackets/lametric-daily-standup-reminder/

    • Add a cronjob, see »Usage«

    Source

    https://gitlab.com/pixelbrackets/lametric-daily-standup-reminder/

    Mirror https://github.com/pixelbrackets/lametric-daily-standup-reminder/

    Usage

    1. Set up a cronjob pointing to cron.php and pass a URL to the broadcast service service, for example every day at ten o’clock with the service available at http://localhost.local/hook
      0 10 * * * LAMETRIC_BROADCAST_URL="http://localhost.local/hook" php /var/www/lametric/cron.php > /dev/null 2>&1

    License

    GNU General Public License version 2 or later

    The GNU General Public License can be found at http://www.gnu.org/copyleft/gpl.html.

    Author

    Dan Untenzu (mail@pixelbrackets.de / @pixelbrackets)

    Changelog

    See ./CHANGELOG.md

    Contribution

    This script is Open Source, so please use, patch, extend or fork it.

    Contributions are welcome!

    Visit original content creator repository https://github.com/pixelbrackets/lametric-daily-standup-reminder
  • yami

    YAMI – Yet Another Mouse Interface

    YAMI

    YAMI is a mouse interface that enables serial PC mice to be used on AMIGA or ATARI ST computers.

    YAMI is released under GPL v3.

    Features

    • Allows to connect a serial PC mouse to the Amiga or Atari ST mouse connector.
    • Supports Logitech and Microsoft protocol.
    • Supports up to three mouse buttons.
    • Hardware support for the mouse wheel (both X and Y axis). Amiga only, requires software with mouse wheel support.
    • Joystick mode: Joysticks can be parallel connected (using a Y cable).
    • No drivers required for standard mouse operation. Mouse is available even in games, demos and the boot menu.
    • Matured firmware that proved its reliability over years.
    • Made of cheap components that are easy to get at electronic stores. All chips are available in DIP packages, no SMD soldering required.
    • Schematics and Source Code available at Codeberg.

    Important!

    YAMI is only designed for serial PC mouses. This kind of mouse is extremely hard to find nowadays. Some PS/2 mice can be used on a serial line with a PS/2-to-serial adapter. If you are using a PS/2 mouse, make sure that your mouse does actually support such an adapter! A good hint is that the mouse came with such an adapter enclosed.

    Today’s computer mouses only support USB (and a few maybe PS/2 with an adapter). Sadly, you cannot use these with YAMI. Don’t even think about connecting a USB mouse to a PS/2 adapter, and the PS/2 adapter to a serial adapter. You will most likely destroy your hardware that way.

    NEVER NEVER EVER connect an Amiga or Atari mouse to YAMI. You will kill that mouse if you do so. Also do not connect Amiga or Atari joysticks to YAMI, and do not connect other serial devices to YAMI. Just because it plugs, doesn’t mean that it also plays.

    In other words, if you want to be on the safe side, only connect a serial mouse to YAMI.

    Actually, I had planned a YAMI2 that was designed to support USB mice. Anyhow handling USB data traffic requires more sophisticated hardware and software. The dying Amiga platform wasn’t much of a motivation for me to start the project.

    Assembling the Hardware

    YAMI is easily assembled if you know how to read schematics and use a soldering iron. You will find the schematic diagram and a bill of material in the “schematics” directory.

    If you use an Atari ST, or if you won’t use the mouse wheel on your Amiga, you can spare the connector named “JOY”, which saves you some tedious wiring.

    The YAMI hardware does some voltage tricks. Please make sure that you build the YAMI hardware exactly after the schematics. If you fail to do so, and if you’re lucky you will only damage your mouse and your YAMI hardware. With bad luck you will also destroy your Amiga or Atari vintage computer though, so be extra careful.

    Check everything at least twice and then once more, before you connect YAMI for the first time.

    Flashing YAMI to the PIC processor

    There are two ways to flash the YAMI firmware to the PIC processor: You can either program the PIC before, or you can in-circuit program the PIC after assembling the YAMI hardware. In any case, you need a PIC programmer (e.g. PICkit).

    For in-circuit programming with a PICkit you just need a spare DB9 male and female connector, and a few wires. They need to be connected like this:

    • PICkit Pin 1 (/MCLR) is connected to Pin 4 of the female DB9 connector
    • PICkit Pin 2 (VDD) is connected to Pin 7 of the male DB9 connector
    • PICkit Pin 3 (GND) is connected to Pin 8 of the male DB9 connector
    • PICkit Pin 4 (PGD) is connected to Pin 2 of the male DB9 connector
    • PICkit Pin 5 (PGC) is connected to Pin 1 of the male DB9 connector

    This adapter is connected to the PICkit, the female connector is connected to YAMI’s “Serial” port, and the male connector is connected to YAMI’s “Mouse” port. Make sure the adapter is properly connected before plugging it in.

    Configure the MPLAB IPE to power the target circuit with 5 Volts. Also turn off the “Erase All before program” option in the settings menu.

    In the “dumps” directory, you will find hex dumps that are ready for being flashed into the PIC processor.

    • yami.hex – contains the YAMI firmware.

    You also need to flash one of these EEPROM dumps, depending on your needs:

    • yami-eeprom-amiga.hex – AMIGA version
    • yami-eeprom-atari.hex – ATARI ST version

    Using YAMI

    Using YAMI is fairly easy.

    Connect your serial PC mouse (or a PS/2 mouse with the included serial adapter) to the SERIAL port of YAMI.

    Turn off your Amiga/Atari (yes, in the good old days, computers had to be turned off for that), then connect YAMI’s MOUSE connector to the mouse port of your computer. Optionally, also plug the JOY connector to the joystick port of your Amiga.

    Now turn on your computer. The PC mouse should work right from the start. No drivers are required. At least unless you want to use the mouse wheel.

    For the mouse wheel, you need to install the “YamiCX” commodity. You can find the source code in the “yamiCX” directory, and a compiled binary on AmiNet.

    Please do not expect the mouse wheel comfort of modern computers. AmigaOS was never designed for it, so only a few applications actually make use of it.

    The Atari ST does not support mouse wheels, due to hardware limitations.

    Joystick Mode

    YAMI offers a special joystick mode. To use it, you will need a DB9 Y cable for each joystick. Connect the Y cable to the joystick port of your computer. On the one end of the Y cable, you connect the joystick, and on the other end you connect the appropriate YAMI port. You can also connect a second Y cable to the mouse port of your computer, in order to connect a second joystick.

    Now, if you want to use the joystick, just press on its fire button. YAMI will detect that, and will turn off the mouse signals. You can start using the joystick now, without YAMI interfering.

    If you want to use the mouse again, just move it. YAMI will immediately resume its work.

    Please only use simple switched joysticks (like the good old Competition Pro). Do not use analog joysticks or other funny sticks. They might interfere with YAMI if you use the mouse, and they might even damage YAMI!

    Building YAMI from Source

    The source code can be assembled using GPUtils. Assembling the source files is easy:

    cd source
    gpasm yami.asm
    gpasm yami-eeprom-amiga.asm
    gpasm yami-eeprom-atari.asm
    

    FAQ

    • Can I purchase an assembled and ready-to-use YAMI from you?

      Unfortunately not. I have already sold the last stock of YAMI many years ago. I also don’t have any PCBs left.

    • What happens if I accidentally use the Atari ST version on an Amiga (or vice versa)?

      Mouse movements will be uncontrollable, but besides that, it won’t damage your hardware.

    • The Mouse Wheel is not working properly on my Amiga. Why?

      Make sure you have YamiCX installed and running. It converts mouse wheel movements to the proper system events. Also keep in mind that AmigaOS has never been designed for mouse wheels. Only a few programs make actual use for it.

    • Is there also a keyboard interface?

      Actually, yes. I was working on YAKI, and it had some cool features (like reprogrammable keys). However there also have been some very annoying bugs. I was never really able to fix them because I had reached the memory limit of the PIC processor.

    Disclaimer

    I was myself using my YAMI interface for a decade, and I am still using it today when I get in a nostalgic mood. It proved to be very reliable, and a good companion to my Amiga. There were also a number of YAMI interfaces sold in the past, and I had never received a complaint. So I am very confident that the design of YAMI is safe.

    Anyhow please be aware that this hardware has the potential to damage your good old vintage computer, especially if you use a fancy mouse, or if you make a mistake assembling the hardware or flashing the firmware.

    You got the YAMI schematics, source codes and binaries free of charge. It’s a gift, and it’s even licensed under GNU Public License v3. It’s meant as a favor to all the Amiga and Atari lovers out there.

    You use all this information as is, on your own risk and without any guarantees expressed or implied.

    If you do not exactly know how to read the schematics, purchase the required components, build the hardware and flash the firmware, please ask someone who does.

    Visit original content creator repository https://github.com/shred/yami
  • isom-layout

    Self-Organizing maps layout – SOM npm version

    Thumb

    After Self-Organizing Graphs: A Neural Network Perspective of Graph Layout by Bernd Meyer.

    Usage

    npm install `isom-layout`;
    
    import som from 'isom-layout';
    
    const graph = {
      nodes: [
        { id: 0, data: ...},
        { id: 1, data: ...},
        ...
      ],
      edges: [
        { source: 0, target: 1, data: ...},
        ...
      ]
    };
    
    // if your nodes have no initial positions
    som.randomize(graph, bounds);
    
    // modifies coord in-place
    som(graph, {
      // other options, see below
      bounds: bounds,  // [xmin, ymin, xmax, ymax],
      onUpdate: () => {
        // do your rendering here
      },
      onEnd: () => {
        // converged
      }
    });

    Options

    To understand the options you need to know a bit about how algorithm works. Basically, it

    1. picks random points in the graph space
    2. finds the closest node to this random location
    3. using kind of BFS it continiously pulls the nodes and its neighbours in the direction of the random point.
    4. while sweeps are repeated, cooling effect takes place, reducing the pulling force
    5. also the radius gets gradually reduced so that during the last stage smaller areas of graph are getting changed

    som(graph, options)

    • maxIterations Maximum algorithm sweeps. default 2000
    • adaption Initial force value. default 0.8
    • radius Maximum graph-theoretical distance of the nodes involved in one sweep. default 3
    • coolingFactor Cooling speed, see the cooling equation, default 2
    • iterationsPerRadiusStep How fast the radius is decreased. default 70
    • iterationsPerUpdate How many iterations to perform between the “ticks”, default 10 – for demo purposes. For the default params it means that the algorithm will re-render every 10ms, 200 renders in total
    • updateDelay Delay between the update groups. default 0
    • onUpdate Update callback. Put your rendering here
    • onEnd Complete callback
    • bounds Coordinate space boundaries. [xmin,ymin,xmax,ymax]. If not provided, algorithm will attempt to calculate them from the current nodes positions. So either bounds or initial coordinates have to be provided
    • dontRandomize Don’t re-shuffle the node positions. default false

    Notes

    My impression – useless. The only thing it shows more or less is the nodes with highest degrees. Maybe it can be good on simple chains. You can endlessly tweak the parametres, but it doesn’t give you a nice comprehensible layout. So this a mere exercise in understanding the parameters and nature of the algorithms like this one.

    Also funny observation: it works as if an impatient person was untangling a threadball by randomly pulling the outstanding knots and strings.

    License

    MIT

    Visit original content creator repository https://github.com/w8r/isom-layout