Search several torrent sites for torrents and download one or more of them at once using only the terminal. For example searching for specific episodes from a series using regex as a filter.
Note that this doesn’t actually download the files that the torrent contains, only the .torrent file.
Supports both magnet links and regular .torrent files.
Python2 is not supported.
Usage
Download single torrents
mtorrentd [-h] [-d DOWNLOAD_DIR] torrent

positional arguments:
  torrent

optional arguments:
  -h, --help            show this help message and exit
  -d DOWNLOAD_DIR, --download_dir DOWNLOAD_DIR

`mtorrentd <https://site.com/torrents/torrentname.torrent>`
or
`mtorrentd <magnet:?xt>`
Search through torrent sites
mtorrentd [-h] {sometracker,othertracker,thirdtracker} ...

Download multiple torrents

positional arguments:
  {sometracker,othertracker,thirdtracker}
    sometracker           No login required.
    othertracker          No login required.
    thirdtracker          Login required.

optional arguments:
  -h, --help            show this help message and exit
mtorrentd sometracker [-h] [-r REGEX_STRING] [-x] [-p PAGES]
                                 [-d DOWNLOAD_DIR]
                                 search_string

positional arguments:
  search_string

optional arguments:
  -h, --help            show this help message and exit
  -r REGEX_STRING, --regex_string REGEX_STRING
                        If necessary, filter the list of torrents down with a
                        regex string
  -x, --pretend
  -p PAGES, --pages PAGES
  -d DOWNLOAD_DIR, --download_dir DOWNLOAD_DIR
mtorrentd thirdtracker [-h] [-r REGEX_STRING] [-x] [-p PAGES]
                           [-d DOWNLOAD_DIR] [--username [USERNAME]]
                           [--password [PASSWORD]]
                           search_string

positional arguments:
  search_string

optional arguments:
  -h, --help            show this help message and exit
  -r REGEX_STRING, --regex_string REGEX_STRING
                        If necessary, filter the list of torrents down with a
                        regex string
  -x, --pretend
  -p PAGES, --pages PAGES
  -d DOWNLOAD_DIR, --download_dir DOWNLOAD_DIR
  --username [USERNAME]
  --password [PASSWORD]
Pretend download
The -x parameter is set so the torrents doesn’t actually download, it will only print out information about the torrents that were found with the search criteria.
Then enter your botpassword credentials in config.py using any text editor. E.g. user_name: “test” and bot_password: “q62noap7251t8o3nwgqov0c0h8gvqt20”
Use
Run:
poetry run python main.py
This will promp you for each lexeme where 2 parts was successfully found.
It defaults to fetching 10 lexemes with a minimum length from the working language specified in the config.py. It has been tested with Danish and Swedish
Thanks
Big thanks to Nikki and Mahir for helping
with the SPARQL query that makes this possible and Finn Nielsen and Jan Ainali for feedback on the program and documentation.
I then mocked up a few different designs until I was satisfied with both the look and the feasibility of scope. These were created using Procreate on the iPad Pro 10.5″.
Technologies
HTML
CSS
JavaScript
jQuery
“SVG Path Builder” by Anthony Dugios
Cloudflare (CDN for naomijustin.com)
Bootstrap
PHP
Youtube iFrame Player API
Illustrations
Landing Page
Favicon, Logo and Portrait image I created using Procreate on the iPad Pro 10.5″.
Kubernetes Response Engine based on Event-Driven Workflow using Argo Events & Argo Workflows
We presented in previous blog posts the concept called Kubernetes Response Engine, to do so we have used serverless platforms running on top of Kubernetes such as Kubeless, OpenFaaS, and Knative. In a nutshell, this engine aims to provide to users automatic action against threats detected by Falco.
If you want to get more details about the concept and how we use serverless platforms for this concept, please follow the links below:
Recently, a community member, Edvin, came with the great idea to use a Cloud Native Workflow system to implement same kind of scenario. Following that, he implemented it by using Tekton and Tekton Trigger. To get more details about his work, please follow this repository.
After that, we realized that we can use Argo Events and Argo Workflows to do the same thing. This repository provides an overview of how we can use these tools to implement a Kubernetes Response Engine
Let’s start with quick a introduction of the tooling.
Falco, the open source cloud native runtime security project, is one of the leading open source Kubernetes threat detection engines. Falco was created by Sysdig in 2016 and is the first runtime security project to join CNCF as an incubation-level project.
Argo Workflows is an open source container-native workflow engine for orchestrating parallel jobs on Kubernetes. Argo Workflows are declared through a Kubernetes CRD (Custom Resource Definition).
Argo Events is an event-driven workflow automation framework for Kubernetes which helps you trigger K8s objects, Argo Workflows, Serverless workloads, and others by events from variety of sources like webhook, s3, schedules, messaging queues, gcp pubsub, sns, sqs, etc.
Prerequisites
minikube v1.19.0 or kind v0.10.0
helm v3.5.4+g1b5edb6
kubectl v1.21.0
argo v3.0.2
ko v0.8.2
Demo
Let’s start with explaining a little bit what we want to achieve in this demo. Basically, Falco, the container runtime security tool, is going to detect an unexpected behaviour at host level, then it will trigger an alert and send it to Falcosidekick. Falcosidekick has Webhook output type we can configure to notify the event source of Argo Events. Then, Argo Events will trigger the argoWorkFlowTrigger type of trigger of Argo Workflows, and this workflow will create a pod delete pod in charge of terminating the compromised pod.
Now, let’s start with creating our local Kubernetes cluster.
Minikube
minikube start
Kind
If you rather use kind.
# kind config file
cat <<'EOF' >> kind-config.yaml.yamlkind: ClusterapiVersion: kind.x-k8s.io/v1alpha4nodes:- role: control-plane image: kindest/node:v1.20.2 extraMounts: # allow Falco to use devices provided by the kernel module - hostPath: /dev containerPath: /dev # allow Falco to use the Docker unix socket - hostPath: /var/run/docker.sock containerPath: /var/run/docker.sock- role: worker image: kindest/node:v1.20.2 extraMounts: # allow Falco to use devices provided by the kernel module - hostPath: /dev containerPath: /dev # allow Falco to use the Docker unix socket - hostPath: /var/run/docker.sock containerPath: /var/run/docker.sock- role: worker image: kindest/node:v1.20.2 extraMounts: # allow Falco to use devices provided by the kernel module - hostPath: /dev containerPath: /dev # allow Falco to use the Docker unix socket - hostPath: /var/run/docker.sock containerPath: /var/run/docker.sockEOF# start the kind cluster
kind create cluster --config=./config-kind.yaml
Kind is verified on on linux client only.
Install Argo Events and Argo Workflows
Then, install Argo Events and Argo Workflows components.
# Argo Events Installation
$ kubectl create namespace argo-events
namespace/argo-events created

$ kubectl apply \
    --filename https://raw.githubusercontent.com/argoproj/argo-events/stable/manifests/install.yaml
customresourcedefinition.apiextensions.k8s.io/eventbus.argoproj.io created
customresourcedefinition.apiextensions.k8s.io/eventsources.argoproj.io created
customresourcedefinition.apiextensions.k8s.io/sensors.argoproj.io created
serviceaccount/argo-events-sa created
clusterrole.rbac.authorization.k8s.io/argo-events-aggregate-to-admin created
clusterrole.rbac.authorization.k8s.io/argo-events-aggregate-to-edit created
clusterrole.rbac.authorization.k8s.io/argo-events-aggregate-to-view created
clusterrole.rbac.authorization.k8s.io/argo-events-role created
clusterrolebinding.rbac.authorization.k8s.io/argo-events-binding created
deployment.apps/eventbus-controller created
deployment.apps/eventsource-controller created
deployment.apps/sensor-controller created

$ kubectl --namespace argo-events apply \
    --filename https://raw.githubusercontent.com/argoproj/argo-events/stable/examples/eventbus/native.yaml
eventbus.argoproj.io/default created

# Argo Workflows Installation
$ kubectl create namespace argo
namespace/argo created

$ kubectl apply -n argo -f https://raw.githubusercontent.com/argoproj/argo-workflows/stable/manifests/quick-start-postgres.yaml
customresourcedefinition.apiextensions.k8s.io/clusterworkflowtemplates.argoproj.io created
customresourcedefinition.apiextensions.k8s.io/cronworkflows.argoproj.io created
customresourcedefinition.apiextensions.k8s.io/workfloweventbindings.argoproj.io created
customresourcedefinition.apiextensions.k8s.io/workflows.argoproj.io created
customresourcedefinition.apiextensions.k8s.io/workflowtemplates.argoproj.io created
serviceaccount/argo created
serviceaccount/argo-server created
serviceaccount/github.com created
role.rbac.authorization.k8s.io/argo-role created
role.rbac.authorization.k8s.io/argo-server-role created
role.rbac.authorization.k8s.io/submit-workflow-template created
role.rbac.authorization.k8s.io/workflow-role created
clusterrole.rbac.authorization.k8s.io/argo-clusterworkflowtemplate-role created
clusterrole.rbac.authorization.k8s.io/argo-server-clusterworkflowtemplate-role created
clusterrole.rbac.authorization.k8s.io/kubelet-executor created
rolebinding.rbac.authorization.k8s.io/argo-binding created
rolebinding.rbac.authorization.k8s.io/argo-server-binding created
rolebinding.rbac.authorization.k8s.io/github.com created
rolebinding.rbac.authorization.k8s.io/workflow-default-binding created
clusterrolebinding.rbac.authorization.k8s.io/argo-clusterworkflowtemplate-role-binding created
clusterrolebinding.rbac.authorization.k8s.io/argo-server-clusterworkflowtemplate-role-binding created
clusterrolebinding.rbac.authorization.k8s.io/kubelet-executor-default created
configmap/artifact-repositories created
configmap/workflow-controller-configmap created
secret/argo-postgres-config created
secret/argo-server-sso created
secret/argo-workflows-webhook-clients created
secret/my-minio-cred created
service/argo-server created
service/minio created
service/postgres created
service/workflow-controller-metrics created
deployment.apps/argo-server created
deployment.apps/minio created
deployment.apps/postgres created
deployment.apps/workflow-controller created
Let’s verify if everything is working before we move on to the next step.
$ kubectl get pods --namespace argo-events
NAME                                      READY   STATUS    RESTARTS   AGE
eventbus-controller-7666b44ff7-k8bjf      1/1     Running   0          6m6s
eventbus-default-stan-0                   2/2     Running   0          5m33s
eventbus-default-stan-1                   2/2     Running   0          5m21s
eventbus-default-stan-2                   2/2     Running   0          5m19s
eventsource-controller-7fd7674cb4-jj9sn   1/1     Running   0          6m6s
sensor-controller-59b64579c9-5fbrv        1/1     Running   0          6m6s

$ kubectl get pods --namespace argo
NAME                                  READY   STATUS    RESTARTS   AGE
argo-server-5b86d9f84b-zl5nj          1/1     Running   3          5m32s
minio-58977b4b48-dnnwx                1/1     Running   0          5m32s
postgres-6b5c55f477-dp9n2             1/1     Running   0          5m32s
workflow-controller-d9cbfcc86-tm2kf   1/1     Running   2          5m32s
Install Falco and Falcosidekick
Let’s install Falco and Falcosidekick.
$ helm upgrade --install falco falcosecurity/falco \
--namespace falco \
--create-namespace \
-f hacks/values.yaml

Release "falco" does not exist. Installing it now.
NAME: falco
LAST DEPLOYED: Thu May  6 22:43:52 2021
NAMESPACE: falco
STATUS: deployed
REVISION: 1
NOTES:
Falco agents are spinning up on each node in your cluster. After a few
seconds, they are going to start monitoring your containers looking for
security issues.


No further action should be required.
If you are using kind the easiest way is to use ebpf.enabled=true.
This way you don’t have to install any extra drivers.
This only works on linux.
Let’s verify if all components for falco are up and running.
$ kubectl get pods --namespace falco
NAME                                  READY   STATUS    RESTARTS   AGE
falco-falcosidekick-9f5dc66f5-nmfdp   1/1     Running   0          68s
falco-falcosidekick-9f5dc66f5-wnm2r   1/1     Running   0          68s
falco-zwxwz                           1/1     Running   0          68s
Install Webhook and Sensor
Now, we are ready to set up our workflow by creating the event source and the trigger.
# Create event source
$ kubectl apply -f webhooks/webhook.yaml
eventsource.argoproj.io/webhook created
$ kubectl get eventsources --namespace argo-events
NAME AGE
webhook 11s
$ kubectl get pods --namespace argo-events
NAME READY STATUS RESTARTS AGE
eventbus-controller-7666b44ff7-k8bjf 1/1 Running 0 18m
eventbus-default-stan-0 2/2 Running 0 17m
eventbus-default-stan-1 2/2 Running 0 17m
eventbus-default-stan-2 2/2 Running 0 17m
eventsource-controller-7fd7674cb4-jj9sn 1/1 Running 0 18m
sensor-controller-59b64579c9-5fbrv 1/1 Running 0 18m
webhook-eventsource-z9bg6-6769c7bbc8-c6tff 1/1 Running 0 45s # <-- Pod listens webhook event.# necessary RBAC permissions for trigger and the pod-delete container
$ kubectl apply -f hacks/workflow-rbac.yaml
serviceaccount/operate-workflow-sa created
clusterrole.rbac.authorization.k8s.io/operate-workflow-role created
clusterrolebinding.rbac.authorization.k8s.io/operate-workflow-role-binding created
$ kubectl apply -f hacks/delete-pod-rbac.yaml
serviceaccount/falco-pod-delete created
clusterrole.rbac.authorization.k8s.io/falco-pod-delete-cluster-role created
clusterrolebinding.rbac.authorization.k8s.io/falco-pod-delete-cluster-role-binding created
# Create trigger
$ kubectl apply -f sensors/sensors-workflow.yaml
sensor.argoproj.io/webhook created
$ kubectl get sensors --namespace argo-events
NAME AGE
webhook 5s
$ kubectl get pods --namespace argo-events
NAME READY STATUS RESTARTS AGE
eventbus-controller-7666b44ff7-k8bjf 1/1 Running 0 25m
eventbus-default-stan-0 2/2 Running 0 25m
eventbus-default-stan-1 2/2 Running 0 25m
eventbus-default-stan-2 2/2 Running 0 25m
eventsource-controller-7fd7674cb4-jj9sn 1/1 Running 0 25m
sensor-controller-59b64579c9-5fbrv 1/1 Running 0 25m
webhook-eventsource-z9bg6-6769c7bbc8-c6tff 1/1 Running 0 8m11s
webhook-sensor-44w7w-7dcb9f886d-bnh8f 1/1 Running 0 74s # <- Pod will create workflow.
We use google/ko project to build and push container images, but you don’t have to do this, we already built an image and pushed it to the registry. If you want to build your own image, install google/ko project and run the command below after having changed the image version inside sensors/sensors-workflow.yaml
�KO_DOCKER_REPO=devopps ko publish . --push=true -B
Install argo CLI
There is one more thing we need to do, this is installation of argo CLI for managing worklows.
$ # Download the binary
curl -sLO https://github.com/argoproj/argo/releases/download/v3.0.2/argo-darwin-amd64.gz

# Unzip
gunzip argo-darwin-amd64.gz

# Make binary executable
chmod +x argo-darwin-amd64

# Move binary to path
mv ./argo-darwin-amd64 /usr/local/bin/argo

# Test installation
argo version
Argo Worfklows UI
Argo Workflows v3.0 comes with a new UI that now also supports Argo Events! The UI is also more robust and reliable.
You can basically reach out the UI from localhost with doing port-forward the Kubernetes service. There is also needed for using argo CLI properly.
$ kubectl -n argo port-forward svc/argo-server 2746:2746
Forwarding from 127.0.0.1:2746 -> 2746
Forwarding from [::1]:2746 -> 2746
Test
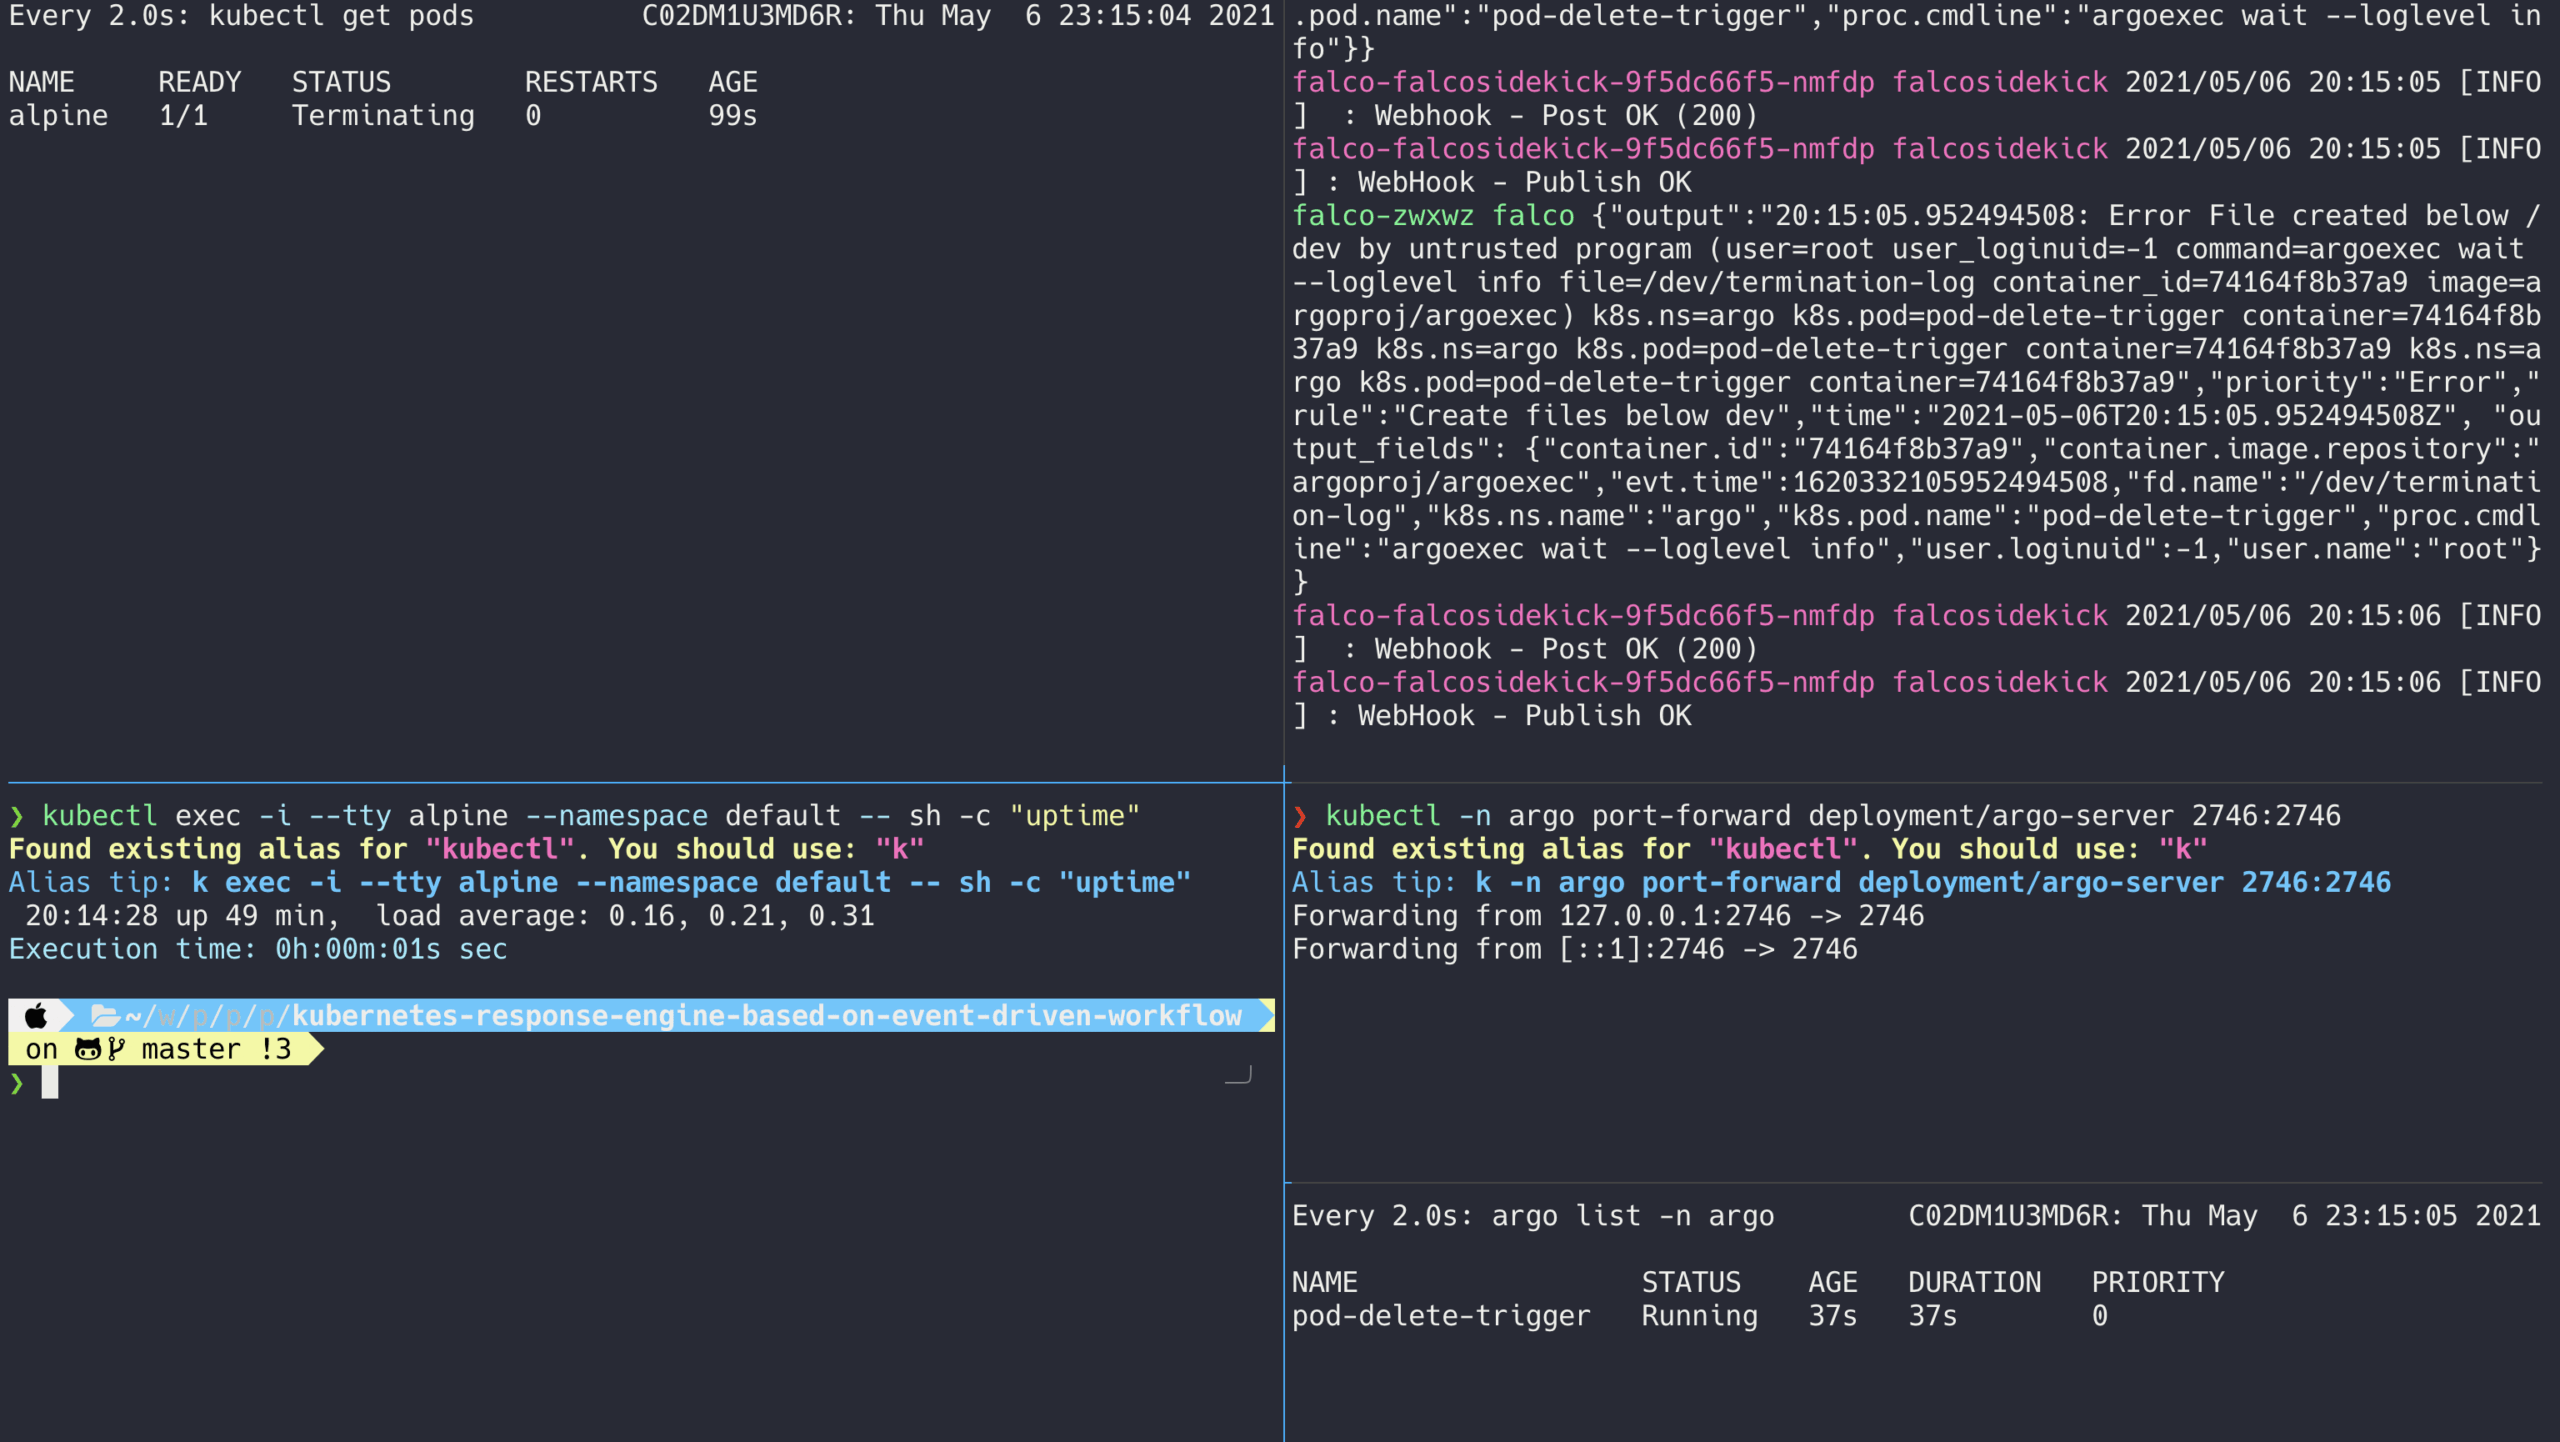
Now, let’s test the whole environment. We are going to create an alpine based container, then we’ll exec into it. At moment we’ll exec into the container, Falco will detect it and you should see the status of the Pod as Terminating.
$ kubectl run alpine --namespace default --image=alpine --restart='Never' -- sh -c "sleep 600"
pod/alpine created
$ kubectl exec -i --tty alpine --namespace default -- sh -c "uptime"# this will trigger the event
You should see the similar outputs like the following screen:
Furthermore
The Falcosidekick and Argo Events are both CloudEvents compliant. CloudEvents is a specification for describing event data in a common way. CloudEvents seeks to dramatically simplify event declaration and delivery across services, platforms, and beyond!
You can basically achieve the same demo by using CloudEvents instead of Webhook to trigger an action in the Argo Workflows. If you are curios about how CloudEvents and Falco can be related with each other, there is a new blog post on Falco Blog named Kubernetes Response Engine, Part 3: Falcosidekick + Knative, you should definitely check that out.
Kubernetes Response Engine based on Event-Driven Workflow using Argo Events & Argo Workflows
We presented in previous blog posts the concept called Kubernetes Response Engine, to do so we have used serverless platforms running on top of Kubernetes such as Kubeless, OpenFaaS, and Knative. In a nutshell, this engine aims to provide to users automatic action against threats detected by Falco.
If you want to get more details about the concept and how we use serverless platforms for this concept, please follow the links below:
Recently, a community member, Edvin, came with the great idea to use a Cloud Native Workflow system to implement same kind of scenario. Following that, he implemented it by using Tekton and Tekton Trigger. To get more details about his work, please follow this repository.
After that, we realized that we can use Argo Events and Argo Workflows to do the same thing. This repository provides an overview of how we can use these tools to implement a Kubernetes Response Engine
Let’s start with quick a introduction of the tooling.
Falco, the open source cloud native runtime security project, is one of the leading open source Kubernetes threat detection engines. Falco was created by Sysdig in 2016 and is the first runtime security project to join CNCF as an incubation-level project.
Argo Workflows is an open source container-native workflow engine for orchestrating parallel jobs on Kubernetes. Argo Workflows are declared through a Kubernetes CRD (Custom Resource Definition).
Argo Events is an event-driven workflow automation framework for Kubernetes which helps you trigger K8s objects, Argo Workflows, Serverless workloads, and others by events from variety of sources like webhook, s3, schedules, messaging queues, gcp pubsub, sns, sqs, etc.
Prerequisites
minikube v1.19.0 or kind v0.10.0
helm v3.5.4+g1b5edb6
kubectl v1.21.0
argo v3.0.2
ko v0.8.2
Demo
Let’s start with explaining a little bit what we want to achieve in this demo. Basically, Falco, the container runtime security tool, is going to detect an unexpected behaviour at host level, then it will trigger an alert and send it to Falcosidekick. Falcosidekick has Webhook output type we can configure to notify the event source of Argo Events. Then, Argo Events will trigger the argoWorkFlowTrigger type of trigger of Argo Workflows, and this workflow will create a pod delete pod in charge of terminating the compromised pod.
Now, let’s start with creating our local Kubernetes cluster.
Minikube
minikube start
Kind
If you rather use kind.
# kind config file
cat <<'EOF' >> kind-config.yaml.yamlkind: ClusterapiVersion: kind.x-k8s.io/v1alpha4nodes:- role: control-plane image: kindest/node:v1.20.2 extraMounts: # allow Falco to use devices provided by the kernel module - hostPath: /dev containerPath: /dev # allow Falco to use the Docker unix socket - hostPath: /var/run/docker.sock containerPath: /var/run/docker.sock- role: worker image: kindest/node:v1.20.2 extraMounts: # allow Falco to use devices provided by the kernel module - hostPath: /dev containerPath: /dev # allow Falco to use the Docker unix socket - hostPath: /var/run/docker.sock containerPath: /var/run/docker.sock- role: worker image: kindest/node:v1.20.2 extraMounts: # allow Falco to use devices provided by the kernel module - hostPath: /dev containerPath: /dev # allow Falco to use the Docker unix socket - hostPath: /var/run/docker.sock containerPath: /var/run/docker.sockEOF# start the kind cluster
kind create cluster --config=./config-kind.yaml
Kind is verified on on linux client only.
Install Argo Events and Argo Workflows
Then, install Argo Events and Argo Workflows components.
# Argo Events Installation
$ kubectl create namespace argo-events
namespace/argo-events created

$ kubectl apply \
    --filename https://raw.githubusercontent.com/argoproj/argo-events/stable/manifests/install.yaml
customresourcedefinition.apiextensions.k8s.io/eventbus.argoproj.io created
customresourcedefinition.apiextensions.k8s.io/eventsources.argoproj.io created
customresourcedefinition.apiextensions.k8s.io/sensors.argoproj.io created
serviceaccount/argo-events-sa created
clusterrole.rbac.authorization.k8s.io/argo-events-aggregate-to-admin created
clusterrole.rbac.authorization.k8s.io/argo-events-aggregate-to-edit created
clusterrole.rbac.authorization.k8s.io/argo-events-aggregate-to-view created
clusterrole.rbac.authorization.k8s.io/argo-events-role created
clusterrolebinding.rbac.authorization.k8s.io/argo-events-binding created
deployment.apps/eventbus-controller created
deployment.apps/eventsource-controller created
deployment.apps/sensor-controller created

$ kubectl --namespace argo-events apply \
    --filename https://raw.githubusercontent.com/argoproj/argo-events/stable/examples/eventbus/native.yaml
eventbus.argoproj.io/default created

# Argo Workflows Installation
$ kubectl create namespace argo
namespace/argo created

$ kubectl apply -n argo -f https://raw.githubusercontent.com/argoproj/argo-workflows/stable/manifests/quick-start-postgres.yaml
customresourcedefinition.apiextensions.k8s.io/clusterworkflowtemplates.argoproj.io created
customresourcedefinition.apiextensions.k8s.io/cronworkflows.argoproj.io created
customresourcedefinition.apiextensions.k8s.io/workfloweventbindings.argoproj.io created
customresourcedefinition.apiextensions.k8s.io/workflows.argoproj.io created
customresourcedefinition.apiextensions.k8s.io/workflowtemplates.argoproj.io created
serviceaccount/argo created
serviceaccount/argo-server created
serviceaccount/github.com created
role.rbac.authorization.k8s.io/argo-role created
role.rbac.authorization.k8s.io/argo-server-role created
role.rbac.authorization.k8s.io/submit-workflow-template created
role.rbac.authorization.k8s.io/workflow-role created
clusterrole.rbac.authorization.k8s.io/argo-clusterworkflowtemplate-role created
clusterrole.rbac.authorization.k8s.io/argo-server-clusterworkflowtemplate-role created
clusterrole.rbac.authorization.k8s.io/kubelet-executor created
rolebinding.rbac.authorization.k8s.io/argo-binding created
rolebinding.rbac.authorization.k8s.io/argo-server-binding created
rolebinding.rbac.authorization.k8s.io/github.com created
rolebinding.rbac.authorization.k8s.io/workflow-default-binding created
clusterrolebinding.rbac.authorization.k8s.io/argo-clusterworkflowtemplate-role-binding created
clusterrolebinding.rbac.authorization.k8s.io/argo-server-clusterworkflowtemplate-role-binding created
clusterrolebinding.rbac.authorization.k8s.io/kubelet-executor-default created
configmap/artifact-repositories created
configmap/workflow-controller-configmap created
secret/argo-postgres-config created
secret/argo-server-sso created
secret/argo-workflows-webhook-clients created
secret/my-minio-cred created
service/argo-server created
service/minio created
service/postgres created
service/workflow-controller-metrics created
deployment.apps/argo-server created
deployment.apps/minio created
deployment.apps/postgres created
deployment.apps/workflow-controller created
Let’s verify if everything is working before we move on to the next step.
$ kubectl get pods --namespace argo-events
NAME                                      READY   STATUS    RESTARTS   AGE
eventbus-controller-7666b44ff7-k8bjf      1/1     Running   0          6m6s
eventbus-default-stan-0                   2/2     Running   0          5m33s
eventbus-default-stan-1                   2/2     Running   0          5m21s
eventbus-default-stan-2                   2/2     Running   0          5m19s
eventsource-controller-7fd7674cb4-jj9sn   1/1     Running   0          6m6s
sensor-controller-59b64579c9-5fbrv        1/1     Running   0          6m6s

$ kubectl get pods --namespace argo
NAME                                  READY   STATUS    RESTARTS   AGE
argo-server-5b86d9f84b-zl5nj          1/1     Running   3          5m32s
minio-58977b4b48-dnnwx                1/1     Running   0          5m32s
postgres-6b5c55f477-dp9n2             1/1     Running   0          5m32s
workflow-controller-d9cbfcc86-tm2kf   1/1     Running   2          5m32s
Install Falco and Falcosidekick
Let’s install Falco and Falcosidekick.
$ helm upgrade --install falco falcosecurity/falco \
--namespace falco \
--create-namespace \
-f hacks/values.yaml

Release "falco" does not exist. Installing it now.
NAME: falco
LAST DEPLOYED: Thu May  6 22:43:52 2021
NAMESPACE: falco
STATUS: deployed
REVISION: 1
NOTES:
Falco agents are spinning up on each node in your cluster. After a few
seconds, they are going to start monitoring your containers looking for
security issues.


No further action should be required.
If you are using kind the easiest way is to use ebpf.enabled=true.
This way you don’t have to install any extra drivers.
This only works on linux.
Let’s verify if all components for falco are up and running.
$ kubectl get pods --namespace falco
NAME                                  READY   STATUS    RESTARTS   AGE
falco-falcosidekick-9f5dc66f5-nmfdp   1/1     Running   0          68s
falco-falcosidekick-9f5dc66f5-wnm2r   1/1     Running   0          68s
falco-zwxwz                           1/1     Running   0          68s
Install Webhook and Sensor
Now, we are ready to set up our workflow by creating the event source and the trigger.
# Create event source
$ kubectl apply -f webhooks/webhook.yaml
eventsource.argoproj.io/webhook created
$ kubectl get eventsources --namespace argo-events
NAME AGE
webhook 11s
$ kubectl get pods --namespace argo-events
NAME READY STATUS RESTARTS AGE
eventbus-controller-7666b44ff7-k8bjf 1/1 Running 0 18m
eventbus-default-stan-0 2/2 Running 0 17m
eventbus-default-stan-1 2/2 Running 0 17m
eventbus-default-stan-2 2/2 Running 0 17m
eventsource-controller-7fd7674cb4-jj9sn 1/1 Running 0 18m
sensor-controller-59b64579c9-5fbrv 1/1 Running 0 18m
webhook-eventsource-z9bg6-6769c7bbc8-c6tff 1/1 Running 0 45s # <-- Pod listens webhook event.# necessary RBAC permissions for trigger and the pod-delete container
$ kubectl apply -f hacks/workflow-rbac.yaml
serviceaccount/operate-workflow-sa created
clusterrole.rbac.authorization.k8s.io/operate-workflow-role created
clusterrolebinding.rbac.authorization.k8s.io/operate-workflow-role-binding created
$ kubectl apply -f hacks/delete-pod-rbac.yaml
serviceaccount/falco-pod-delete created
clusterrole.rbac.authorization.k8s.io/falco-pod-delete-cluster-role created
clusterrolebinding.rbac.authorization.k8s.io/falco-pod-delete-cluster-role-binding created
# Create trigger
$ kubectl apply -f sensors/sensors-workflow.yaml
sensor.argoproj.io/webhook created
$ kubectl get sensors --namespace argo-events
NAME AGE
webhook 5s
$ kubectl get pods --namespace argo-events
NAME READY STATUS RESTARTS AGE
eventbus-controller-7666b44ff7-k8bjf 1/1 Running 0 25m
eventbus-default-stan-0 2/2 Running 0 25m
eventbus-default-stan-1 2/2 Running 0 25m
eventbus-default-stan-2 2/2 Running 0 25m
eventsource-controller-7fd7674cb4-jj9sn 1/1 Running 0 25m
sensor-controller-59b64579c9-5fbrv 1/1 Running 0 25m
webhook-eventsource-z9bg6-6769c7bbc8-c6tff 1/1 Running 0 8m11s
webhook-sensor-44w7w-7dcb9f886d-bnh8f 1/1 Running 0 74s # <- Pod will create workflow.
We use google/ko project to build and push container images, but you don’t have to do this, we already built an image and pushed it to the registry. If you want to build your own image, install google/ko project and run the command below after having changed the image version inside sensors/sensors-workflow.yaml
�KO_DOCKER_REPO=devopps ko publish . --push=true -B
Install argo CLI
There is one more thing we need to do, this is installation of argo CLI for managing worklows.
$ # Download the binary
curl -sLO https://github.com/argoproj/argo/releases/download/v3.0.2/argo-darwin-amd64.gz

# Unzip
gunzip argo-darwin-amd64.gz

# Make binary executable
chmod +x argo-darwin-amd64

# Move binary to path
mv ./argo-darwin-amd64 /usr/local/bin/argo

# Test installation
argo version
Argo Worfklows UI
Argo Workflows v3.0 comes with a new UI that now also supports Argo Events! The UI is also more robust and reliable.
You can basically reach out the UI from localhost with doing port-forward the Kubernetes service. There is also needed for using argo CLI properly.
$ kubectl -n argo port-forward svc/argo-server 2746:2746
Forwarding from 127.0.0.1:2746 -> 2746
Forwarding from [::1]:2746 -> 2746
Test
Now, let’s test the whole environment. We are going to create an alpine based container, then we’ll exec into it. At moment we’ll exec into the container, Falco will detect it and you should see the status of the Pod as Terminating.
$ kubectl run alpine --namespace default --image=alpine --restart='Never' -- sh -c "sleep 600"
pod/alpine created
$ kubectl exec -i --tty alpine --namespace default -- sh -c "uptime"# this will trigger the event
You should see the similar outputs like the following screen:
Furthermore
The Falcosidekick and Argo Events are both CloudEvents compliant. CloudEvents is a specification for describing event data in a common way. CloudEvents seeks to dramatically simplify event declaration and delivery across services, platforms, and beyond!
You can basically achieve the same demo by using CloudEvents instead of Webhook to trigger an action in the Argo Workflows. If you are curios about how CloudEvents and Falco can be related with each other, there is a new blog post on Falco Blog named Kubernetes Response Engine, Part 3: Falcosidekick + Knative, you should definitely check that out.
This is not a final release. Please refer to issues 🪲 if any error found or improvement was made.
+ Components
- ILI9486(L) based display
- Touch screen controller XPT2046
+ Setup
In my case STM32 uses FSMC 16bit and SPI via DMA to communicate with the display.
There are few things you need to do before the startup:
1.Since the driver uses HAL, make sure you already defined FSMC, SPI and PENIRQ pins in CubeMX.
2.There are functions that you need to define yourown. I’d recommend you doing this inside of spi.c file.
- HAL_SPI_DC_SELECT() - SPI_NSS pin LOW
- HAL_SPI_DC_DESELECT() - SPI_NSS pin HIGH
- HAL_SPI_TxRx() - Transfer and receive data
3.Once PENIRQ pin interrupt happens touchEventHandler() should be called. You need to change pin name and group to ones you’ve set in CubeMX.
4.If you plan to use built in fonts check header file and uncomment USE_DRIVER_FONTS.
+ Example
main.cpp
/* Includes ------------------------------------------------------------------*/#include"main.h"#include"dma.h"#include"spi.h"#include"gpio.h"#include"fsmc.h"/* Private includes ----------------------------------------------------------*//* USER CODE BEGIN Includes */#include"ili9486_fsmc_16b.h"/* USER CODE END Includes *//* Private variables ---------------------------------------------------------*//* USER CODE BEGIN PV */ILI9486_Display_Driverddr;
/* USER CODE END PV *//* Private user code ---------------------------------------------------------*//* USER CODE BEGIN 0 */voidPENIRQ_Callback_IT() {
ddr.touchEventHandler();
}
/* USER CODE END 0 */intmain(void)
{
/* USER CODE BEGIN 2 */ddr.begin();
// etc...
}
+ Credits
Project uses some functions from Adafruit-GFX library.
An still in development library for driving Epaper display from Waveshare. It’s built from the ground up using the public SDK FreeRTOS only.
It has been successfully tested on an ESP12E-based board with a 1.54″ V2 EPaper screen. However it should work for any screen size with minor changes.
An still in development library for driving Epaper display from Waveshare. It’s built from the ground up using the public SDK FreeRTOS only.
It has been successfully tested on an ESP12E-based board with a 1.54″ V2 EPaper screen. However it should work for any screen size with minor changes.
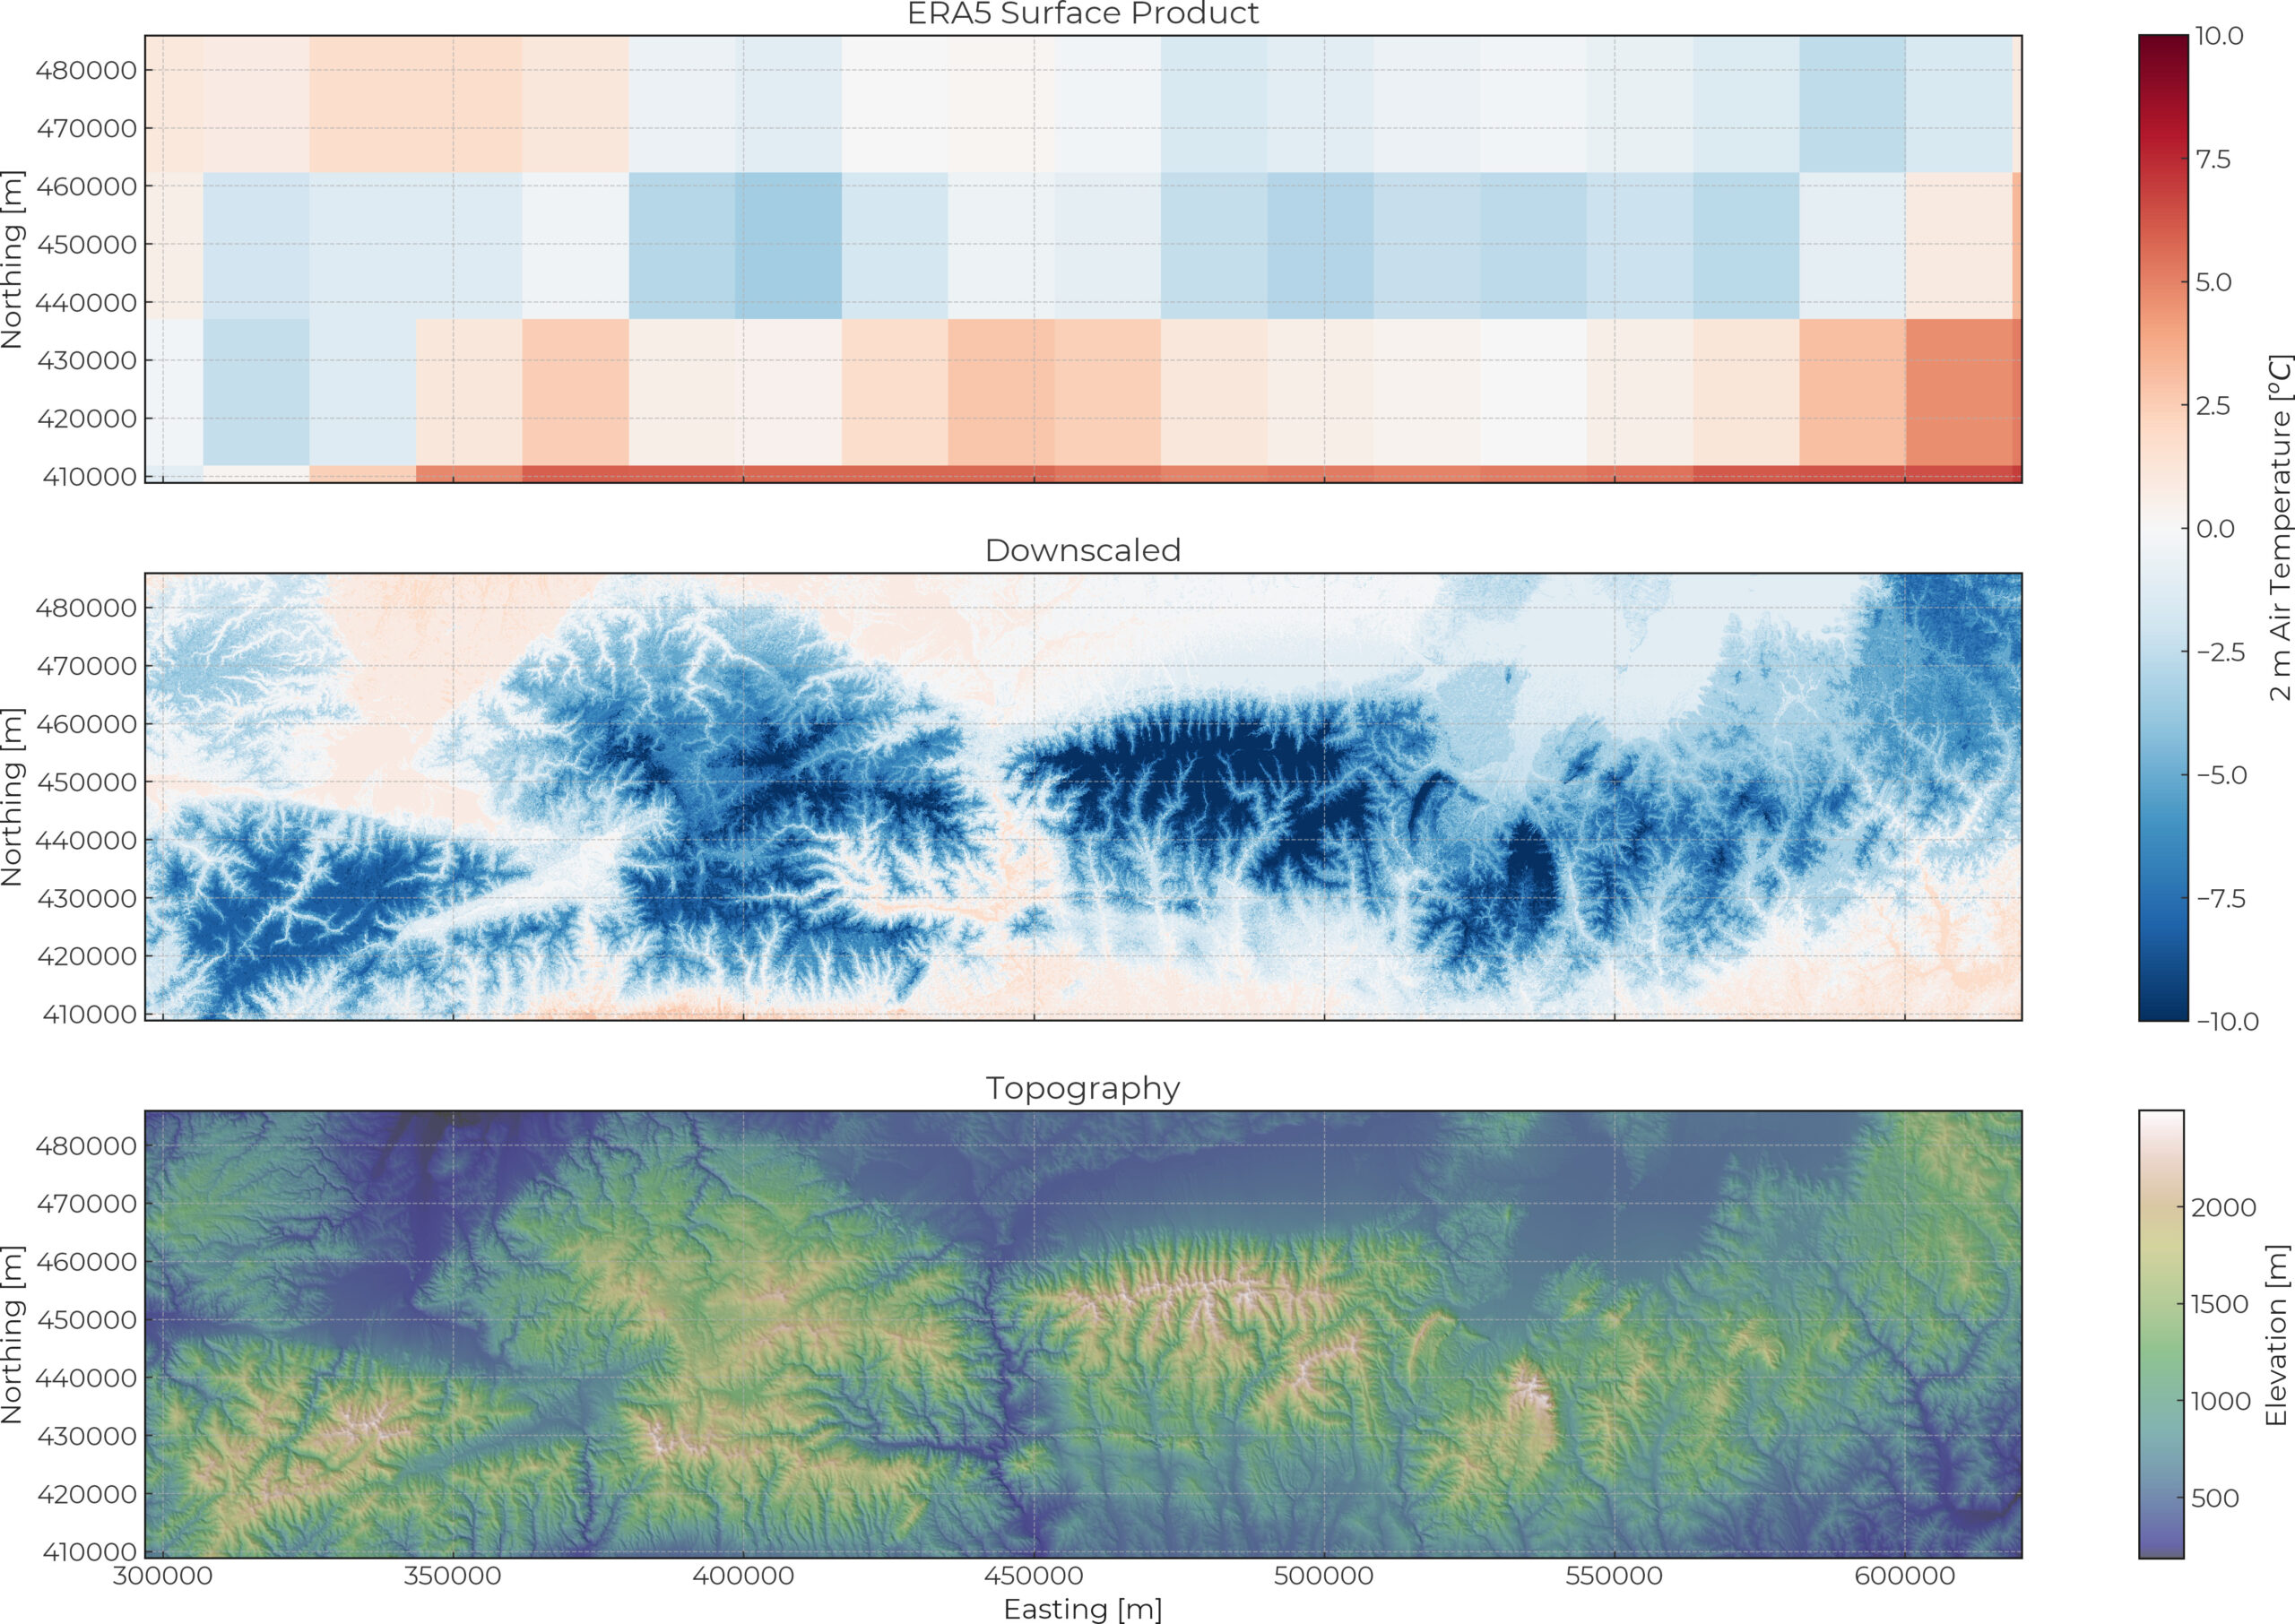
Python version of Toposcale packaged as a Pypi library. Toposcale is an original idea of Joel Fiddes to perform topography-based downscaling of climate data to the hillslope scale.
Filhol et al., (2023). TopoPyScale: A Python Package for Hillslope Climate Downscaling. Journal of Open Source Software, 8(86), 5059, https://doi.org/10.21105/joss.05059
And the original method it relies on:
Fiddes, J. and Gruber, S.: TopoSCALE v.1.0: downscaling gridded climate data in complex terrain, Geosci. Model Dev., 7, 387–405, https://doi.org/10.5194/gmd-7-387-2014, 2014.
Fiddes, J. and Gruber, S.: TopoSUB: a tool for efficient large area numerical modelling in complex topography at sub-grid scales, Geosci. Model Dev., 5, 1245–1257, https://doi.org/10.5194/gmd-5-1245-2012, 2012.
Climate data from future projections (CORDEX) (TBD)
DEM from local source, or fetch from public repository: SRTM, ArcticDEM, ASTER
Run TopoScale
compute derived values (from DEM)
toposcale (k-mean clustering)
interpolation (bilinear, inverse square dist.)
Output
Cryogrid format
FSM format
CROCUS format
Snowmodel format
basic netcfd
For each method, have the choice to output either the abstract cluster points, or the gridded product after interpolation
Validation toolset
validation to local observation timeseries
plotting
Gap filling algorithm
random forest temporal gap filling (TBD)
Validation (4) and Gap filling (4) are future implementation.
Installation
We have now added an environments.yml file to handle versions of depencencies that are tested with the current codebase, to use this run:
conda env create -f environment.yml
Alternatively you can follow this method for dependencies (to be deprecated):
conda create -n downscaling python ipython
conda activate downscaling

# Recomended way to install dependencies:
conda install -c conda-forge xarray matplotlib scikit-learn pandas numpy netcdf4 h5netcdf rasterio pyproj dask rioxarray
# install forked version of Topocalc compatible with Python >3.9 (tested with 3.13)
pip install pip@git+https://github.com/ArcticSnow/topocalc
Then install the code:
# OPTION 1 (Pypi release):
pip install TopoPyScale

# OPTION 2 (development):
cd github  # navigate to where you want to clone TopoPyScale
git clone git@github.com:ArcticSnow/TopoPyScale.git
pip install -e TopoPyScale    #install a development version

#----------------------------------------------------------
#            OPTIONAL: if using jupyter lab
# add this new Python kernel to your jupyter lab PATH
python -m ipykernel install --user --name downscaling

# Tool for generating documentation from code docstring
pip install lazydocs
Then you need to setup your cdsapi with the Copernicus API key system. Follow this tutorial after creating an account with Copernicus. On Linux, create a file nano ~/.cdsapirc with inside:
Configure the file config.ini to fit your problem (see config.yml for an example)
Run TopoPyScale
importpandasaspdfromTopoPyScaleimporttopoclassastcfrommatplotlibimportpyplotasplt# ========= STEP 1 ==========# Load Configurationconfig_file='./config.yml'mp=tc.Topoclass(config_file)
# Compute parameters of the DEM (slope, aspect, sky view factor)mp.get_era5()
mp.compute_dem_param()
# ========== STEP 2 ===========# Extract DEM parameters for points of interest (centroids or physical points)mp.extract_topo_param()
# ----- Option 1:# Compute clustering of the input DEM and extract cluster centroids#mp.extract_dem_cluster_param()# plot clusters#mp.toposub.plot_clusters_map()# plot sky view factor#mp.toposub.plot_clusters_map(var='svf', cmap=plt.cm.viridis)# ------ Option 2:# inidicate in the config file the .csv file containing a list of point coordinates (!!! must same coordinate system as DEM !!!)#mp.extract_pts_param(method='linear',index_col=0)# ========= STEP 3 ==========# compute solar geometry and horizon anglesmp.compute_solar_geometry()
mp.compute_horizon()
# ========= STEP 4 ==========# Perform the downscalingmp.downscale_climate()
# ========= STEP 5 ==========# explore the downscaled dataset. For instance the temperature difference between each point and the first one
(mp.downscaled_pts.t-mp.downscaled_pts.t.isel(point_id=0)).plot()
plt.show()
# ========= STEP 6 ==========# Export output to desired formatmp.to_netcdf()
TopoClass will create a file structure in the project folder (see below). TopoPyScale assumes you have a DEM in GeoTiFF, and a set of climate data in netcdf (following ERA5 variable conventions).
TopoPyScale can easier segment the DEM using clustering (e.g. K-mean), or a list of predefined point coordinates in pts_list.csv can be provided. Make sure all parameters in config.ini are correct.


 https://github.com/lipkau/PSIni