This C++ library provides Codable protocol from Swift.
It may be useful if you have C++ server for iOS or macOS application.
Library methods have very similar syntax to Swift’s version.
Documentation
Before using encoding and decoding methods and Codable class, you must import 2 headers:
#include"Codable.h"
#include"JSON.h"
If you want to make class Codable as you do in Swift, you must choose Codable class as a base class.
For example, if you have class PhoneBook, then its Codable version will look like this:
classPhoneBook: publicCodable {};
Also you must provide class with implementations of 2 virtual methods as you do in Swift and 1 initializer without arguments:
After that we can encode everything we want. In the example above we encode contacts of phone book.
The contacts variable has type vector<Contact>. Contact class also must have Codable class as a base class.
Notice that this library supports only vectors for JSON arrays. Simple arrays won’t be eligible for that.
Decoding has the same logic:
We must provide decoder with any variable with type we want to decode. In our case it is vector<Contact>().
The second argument in both encoding and decoding methods is key for field in JSON. It must match with key in client-application in Swift. So, we made our Phonebook class Codable. Now we can encode it using JSONEncoder as easy as in Swift
ZSH exoskeleton for the command line “date” utility
Expand the ability of date to handle natural language time references (in English), using only the shell built-ins.
The command line utility date from GNU coreutils is familiar to everyone who uses the Linux command line.
When used with the command line flag -d it can parse strings which contain properly formatted datetime constructs and if successful, output the resulting datetime to the standard output, formatted as per additional formatting flags if supplied.
So date -d "next thursday 8:30 pm" will output something like “Thu 09 Feb 2023 08:30:00 PM”
Question: Can date be made a bit more “intelligent” by wrapping it in a command line preprocessor, based only on the built-ins available to the Linux shell (for example bash, or better yet ZSH)?
In other words, can it not explode if the string was instead: "Two years from now, on halloween, at 730 in the morning"?
This repository is an attempt to answer Yes to the above question. The dated command line utility is written in and for zsh and uses zsh built-in machinery (almost exclusivelly) before handing the preprocessed text to date -d. So, if called at the time of this writing,
dated "Two years from now, on halloween, at 730 in the morning"
will respond with Fri 31 Oct 2025 07:30:00 AM EDT ,
or even for the floating Thanksgiving or Easter:
dated "on Thanksgiving day in 2040 at 8 in the evening"
the output will be Thu 22 Nov 2040 08:00:00 PM EST
Please, see the help dated -h or date d --help for more examples.
 SYNOPSIS: dated [--help|-h|] ...<string> [formating options of date]

   - 'dated <string>' Parse <string> to a valid time reference and send to 'date -d'
   - 'dated -h|--help' will print this text
   - any and all additional arguments are passed as-is to 'date -d' to control formating

The text in <string> is parsed and formated into a valid datetime input for 'date -d'.
It is quite difficult for computers to parse our spoken time references and using only built-in tools
(i.e. date -d from coreutils) presents a huge challenge when parsing arbitrary datetime text.
There are dedicated, complex NLP tools that work better but they are not perfect either.

EXAMPLES:
"Set for Tuesday"       - this is valid.
"for 2023/5/24 at 8pm"   - also OK.
"March the 3rd in the evening."  - is OK
"on March 16 at 7 in the morning in a couple of years" - OK
"on New years eve, 10 years from now" - OK
"two years from now on halloween at 730 in the morning"  - works too
"3rd of March 2024 at 23 hours 13 minutes" - OK
       ( "...for next week"
Also   | "...in 3 hours"
valid: { "...tomorrow morning"  (see source code for "morning" & other adjustable definitions)
       | "...in 33 hours and 5 minutes"
       ( "...January 23 quarter past 7 in the evening
Custom:  "...at the usual time" allows privacy and customization (see code for ideas)
In some edge cases, successful parsing gives incorrect datetime. Some practice needed to avoid those
But WHY?
The problem this was built to solve can be easily explained by looking at Spoken, a set of zsh scripts to record Joplin text notes and to-do’s via speech, from the microphone. The td utility in the repository records audio from the microphone, transcribes it to text using whisper.cpp, a derivative of Open AI’s Wisper and then parses the transcribed, free-form text for a datetime reference so that it can set an automatic notification alarm for the Joplin to-do task. This is performed by using the code functionality of dated.
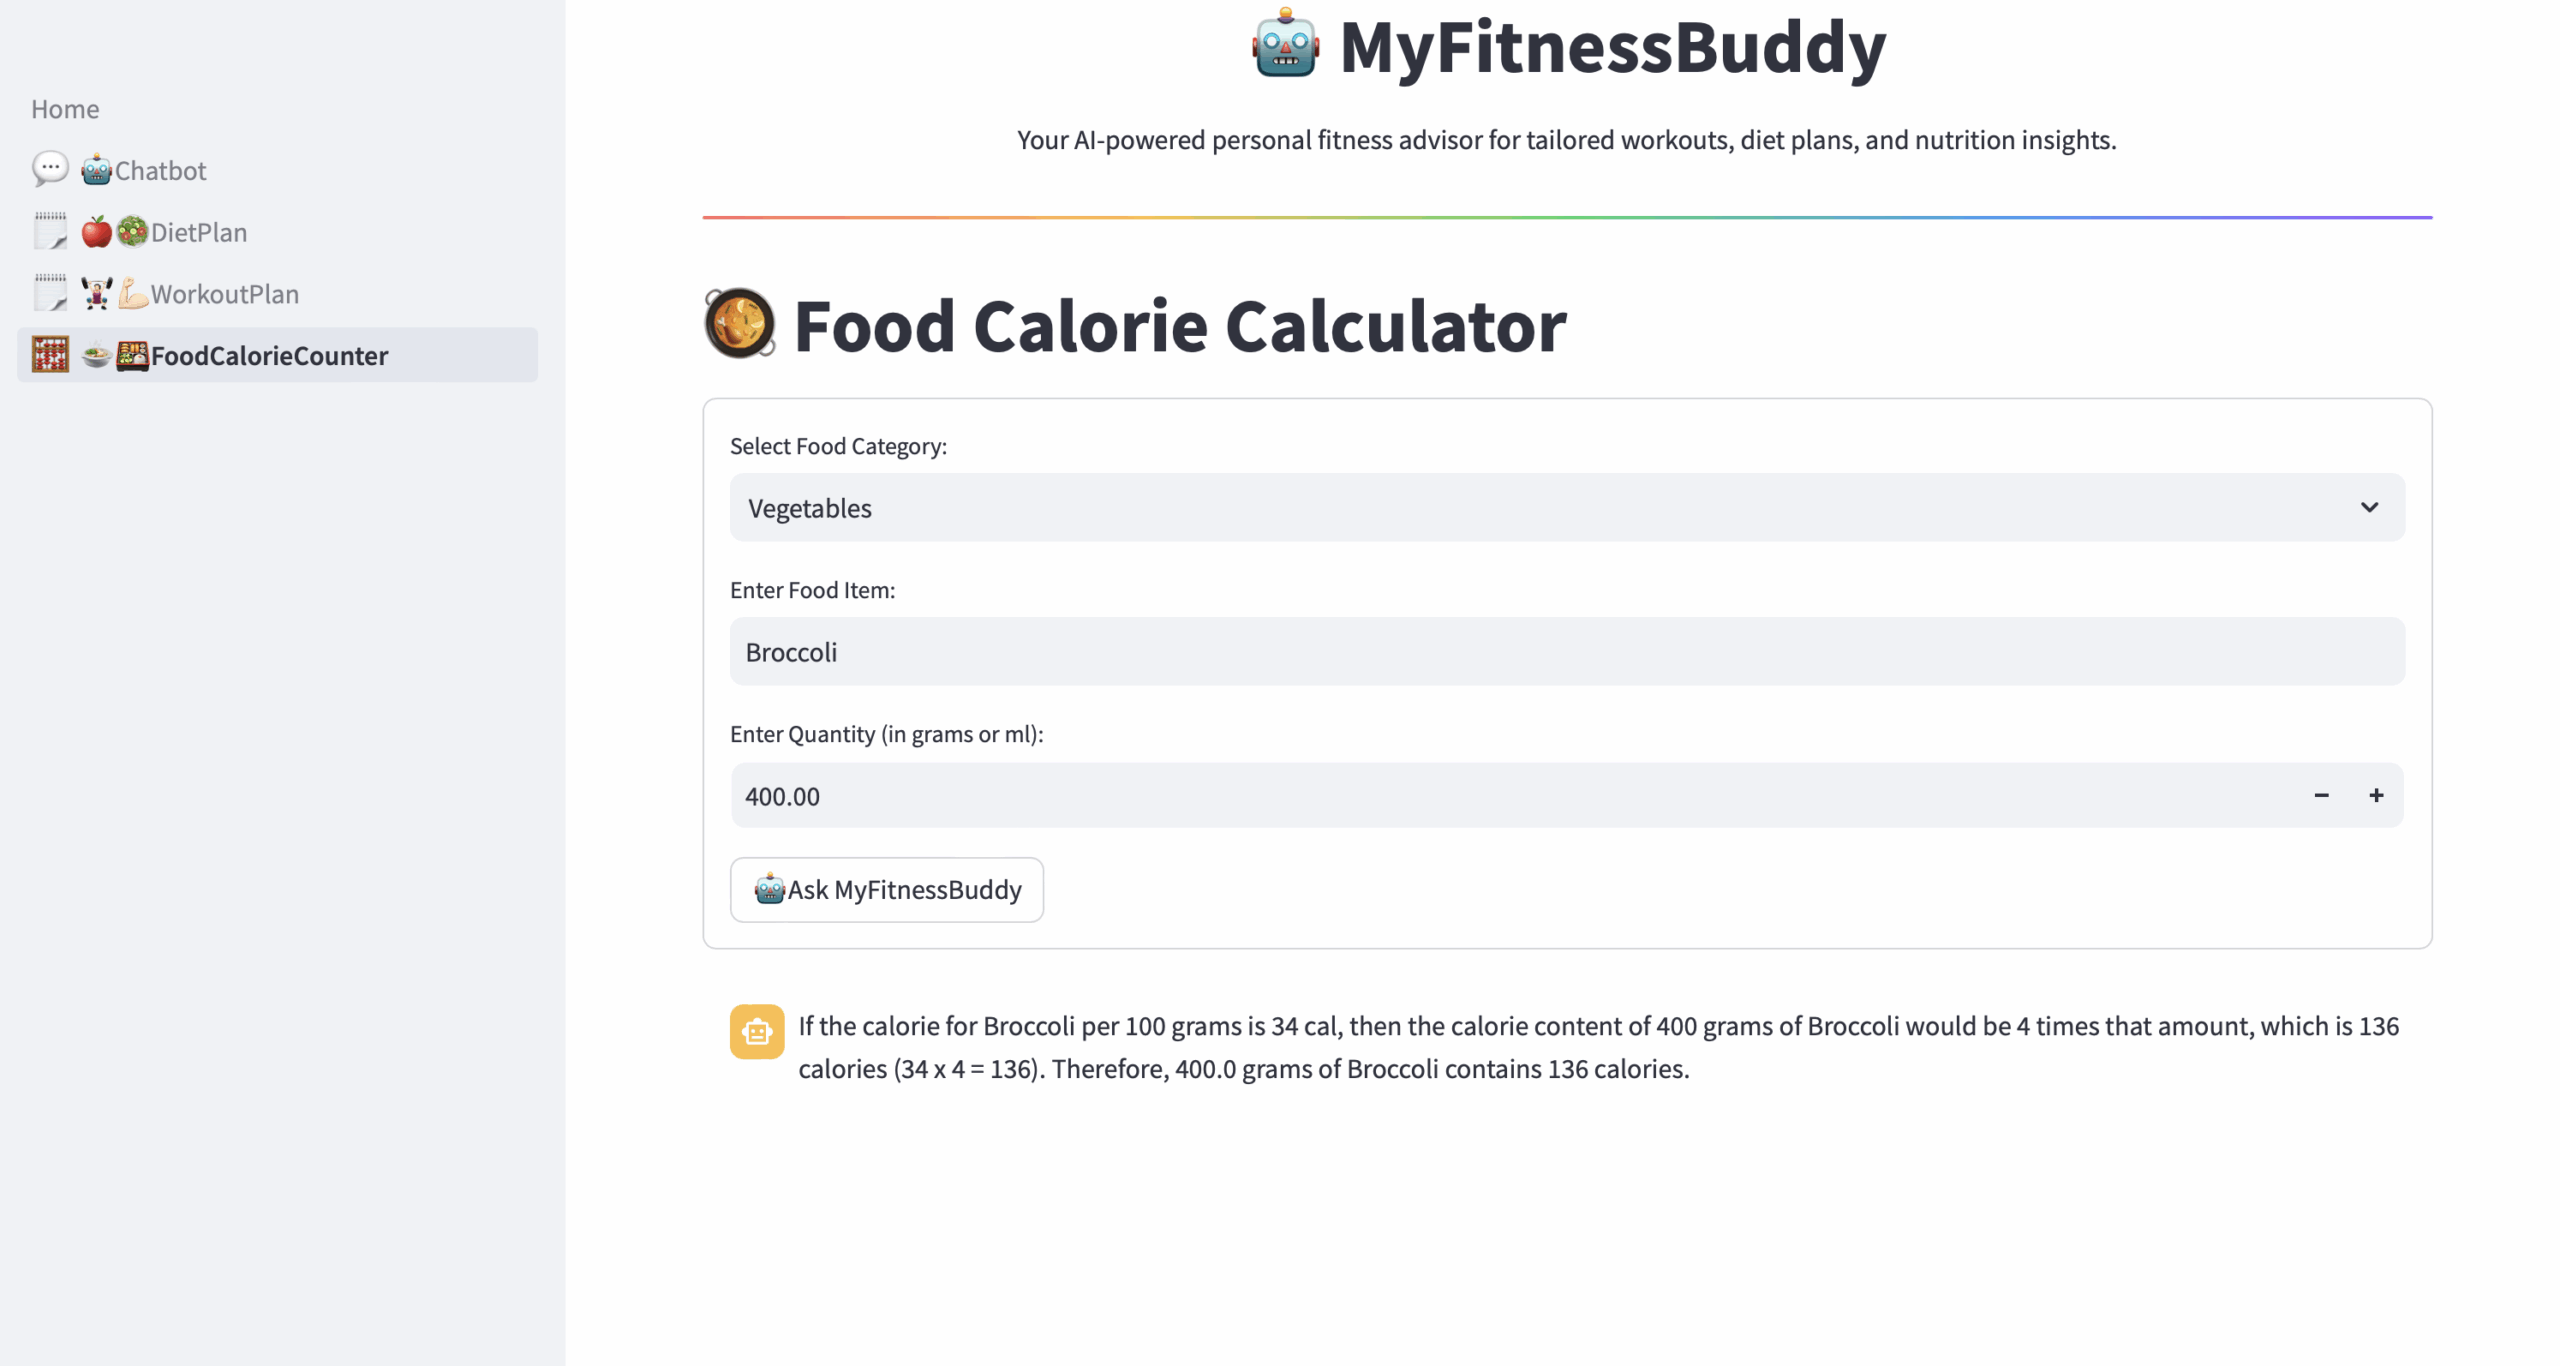
Personalized Fitness Guidance: MyFitnessBuddy is a GenAI Fitness Advisor App that provides customized workout routines, diet plans, and a food calorie calculator, addressing the limitations of generic fitness apps.
Advanced Retrieval-Augmented Generation: It leverages a hybrid approach combining Retrieval-Augmented Generation (RAG) and Graph Retrieval-Augmented Generation (GRAG) to deliver accurate and context-aware responses to user queries.
Showcasing Innovation at RAGHack: Developed for the RAGHack hackathon, MyFitnessBuddy demonstrates the power of RAG technologies in creating engaging and effective AI-driven fitness solutions using Azure AI and popular frameworks.
Architecture and Implementation:
Architecture Overview:
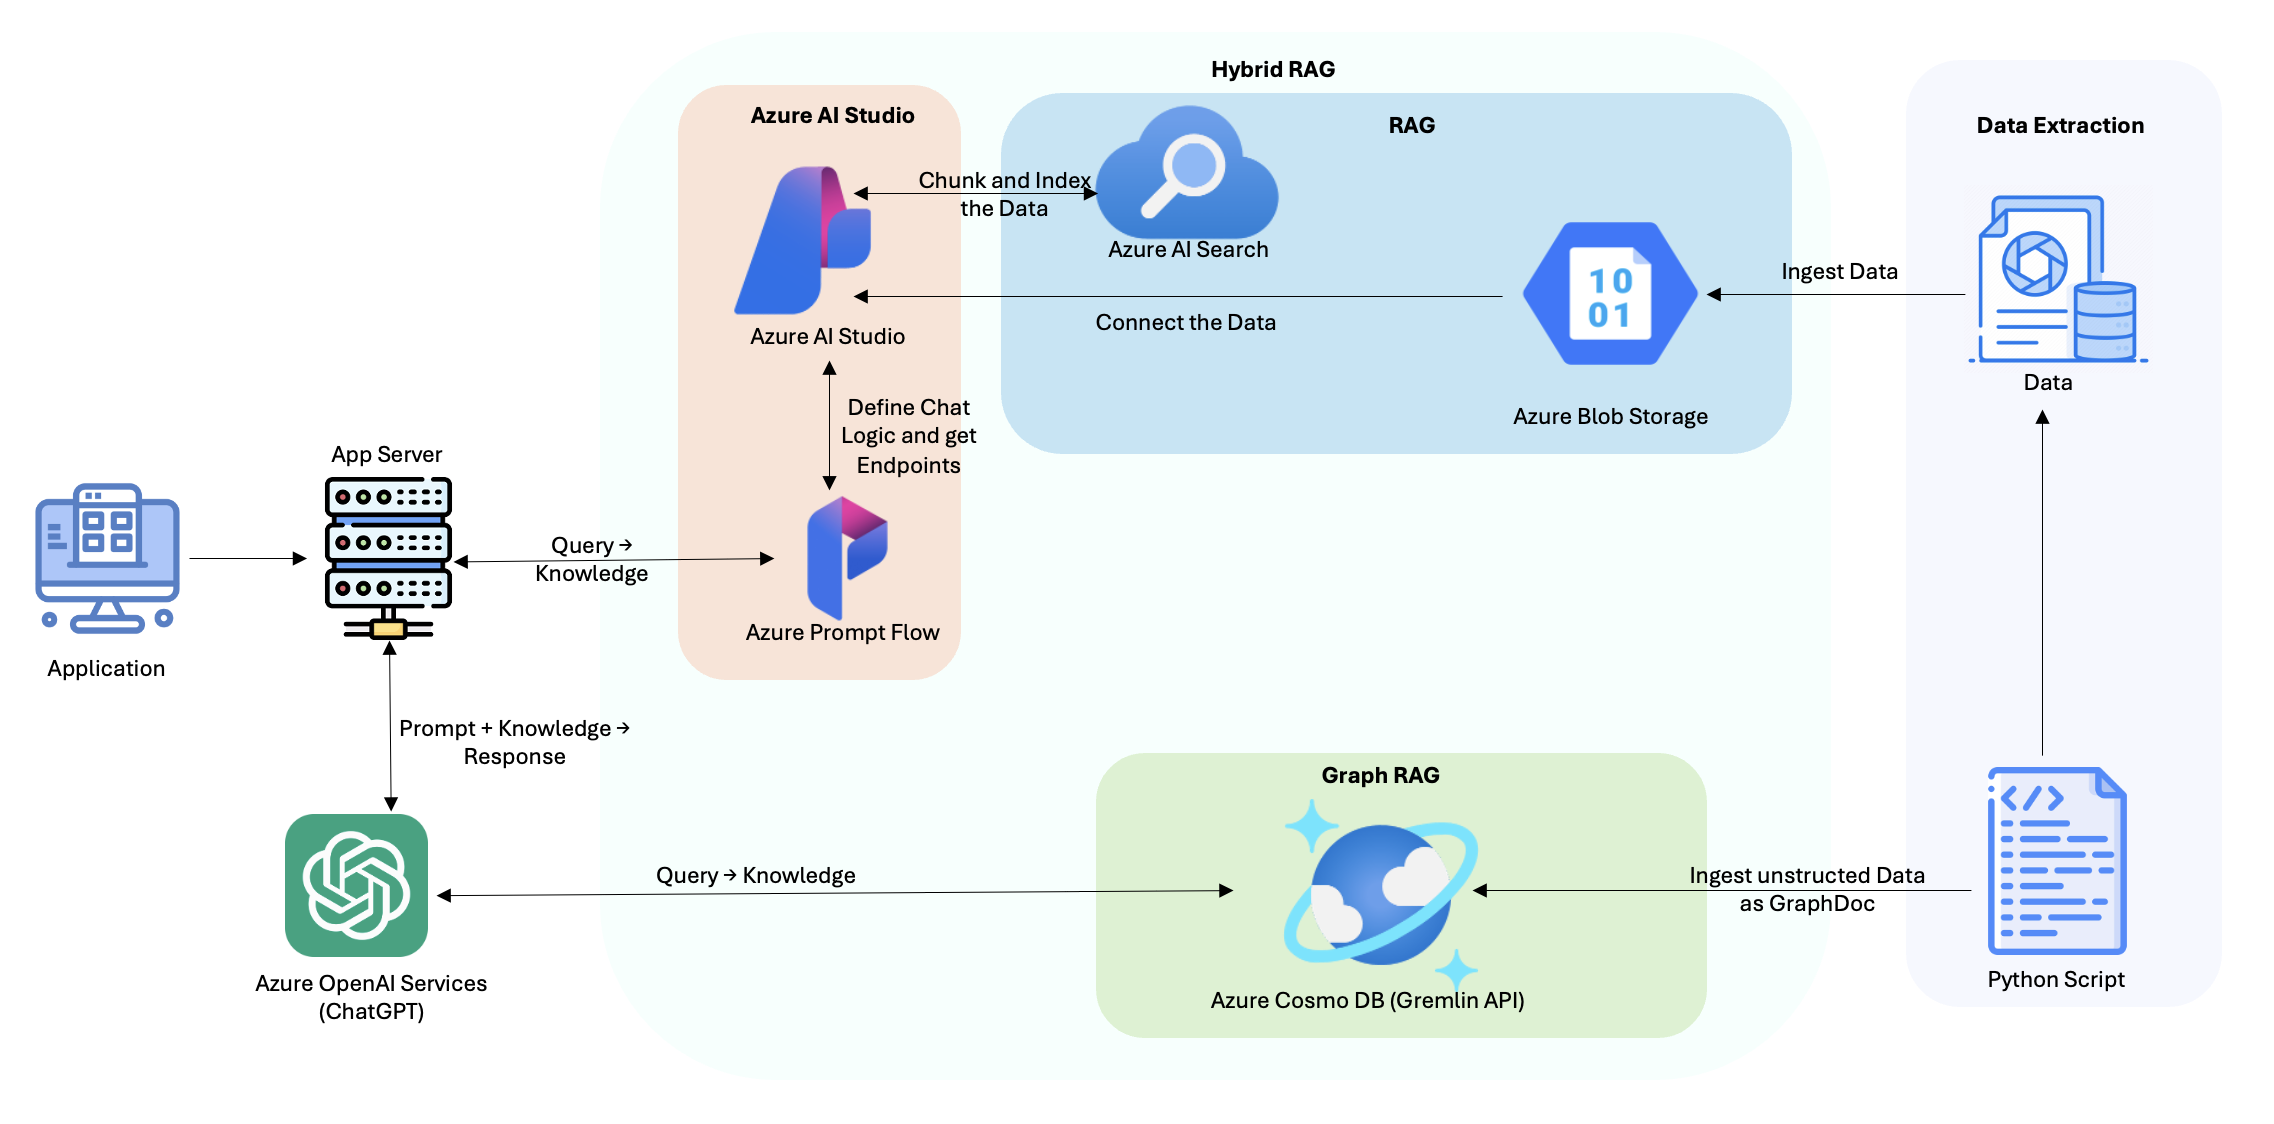
Fig.1 Architecture
MyFitnessBuddy uses a hybrid architecture combining Retrieval-Augmented Generation (RAG) and Graph Retrieval-Augmented Generation (GRAG). Data is extracted using a Python script and ingested into Azure Blob Storage for structured data and Azure Cosmos DB (Gremlin API) for unstructured data. Azure AI Search indexes the structured data, while the graph database manages complex relationships in the unstructured data.
The application utilizes Azure AI Studio and Prompt Flow to define chat logic and connect data sources. User queries are processed by the app server, retrieving relevant information from Azure AI Search and Cosmos DB, which is then sent to Azure OpenAI Services (ChatGPT) to generate personalized responses.
This hybrid approach ensures accurate, context-aware, and personalized fitness guidance for users.
Implementation Overview:
Data Extraction and Ingestion:
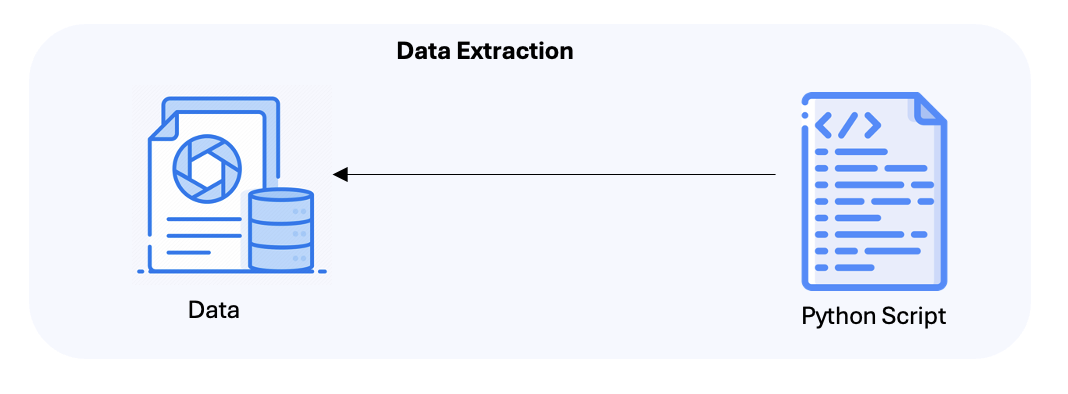
Fig 2. Data Extraction Architecture
The process begins with a Python script that extracts structured and unstructured data from various sources. This data is then ingested into two different storage systems:
Azure Blob Storage: Used for structured data, which is chunked and indexed.
Azure Cosmos DB (Gremlin API): Used for unstructured data, ingested as GraphDoc to enable graph-based retrieval.
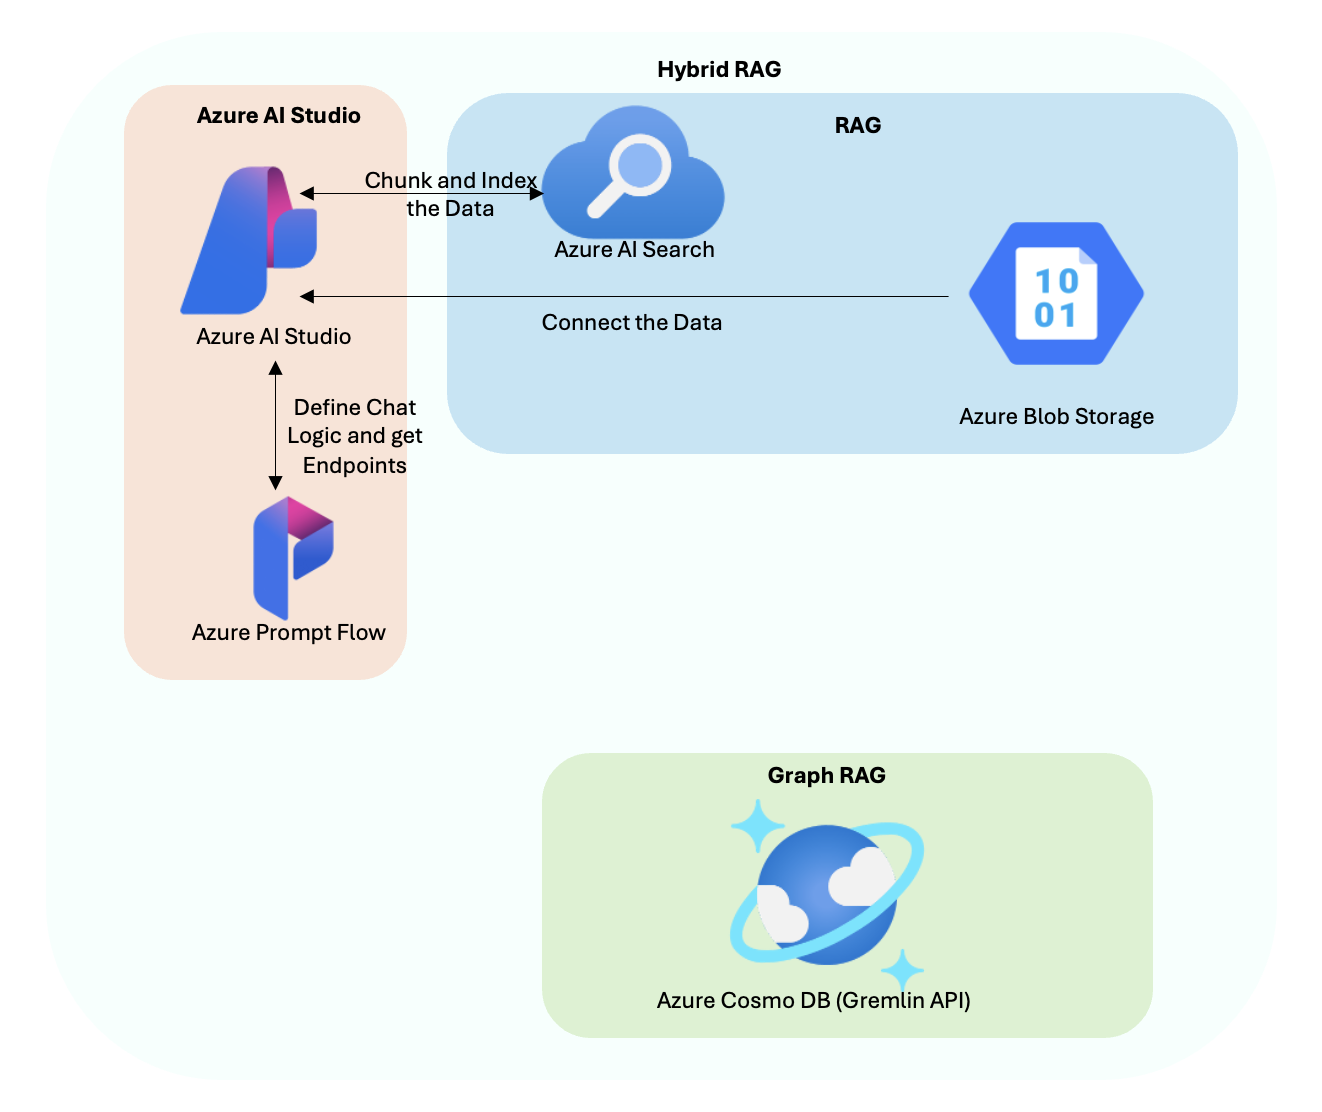
Hybrid RAG Approach:
Fig 3. Hybrid RAG Architecture
RAG (Retrieval-Augmented Generation):
The structured data ingested into Azure Blob Storage is connected to Azure AI Search for indexing and retrieval.
Azure AI Studio facilitates the chunking and indexing of data, defining chat logic, and generating endpoints using Azure Prompt Flow.
When a user query is received, Azure AI Search retrieves relevant information from the indexed data.
Graph RAG (Graph Retrieval-Augmented Generation):
Azure Cosmos DB stores the unstructured data in a graph format using the Gremlin API. This approach allows the application to understand complex relationships between entities such as food items, exercises, and user health metrics.
The Graph RAG retrieves contextually relevant knowledge from Azure Cosmos DB, which is then combined with structured data for enhanced response generation.
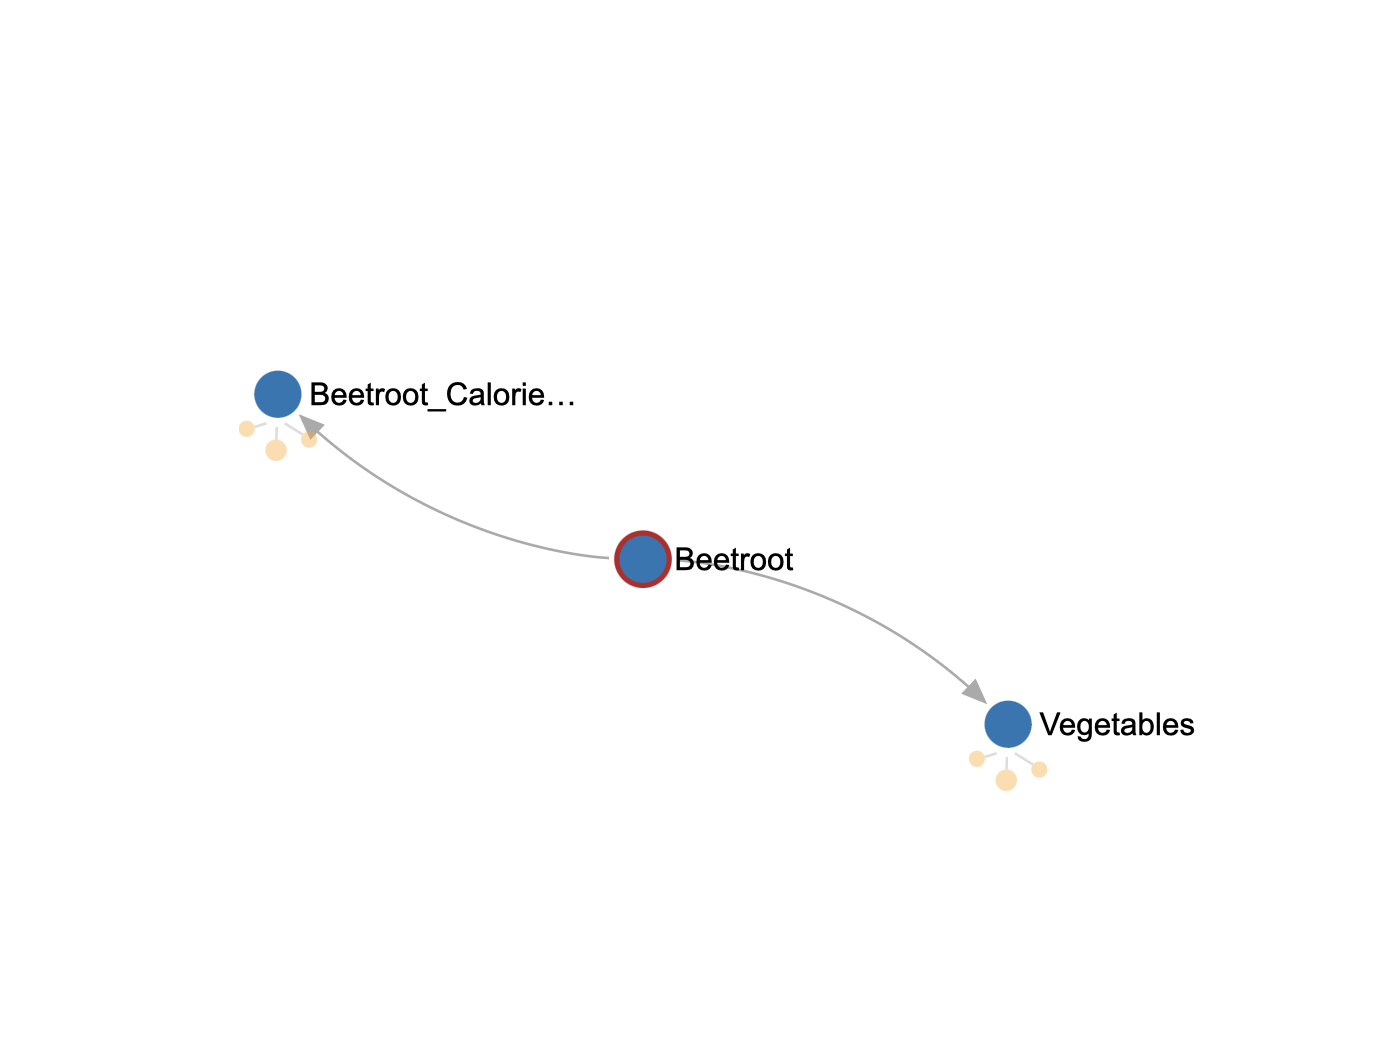
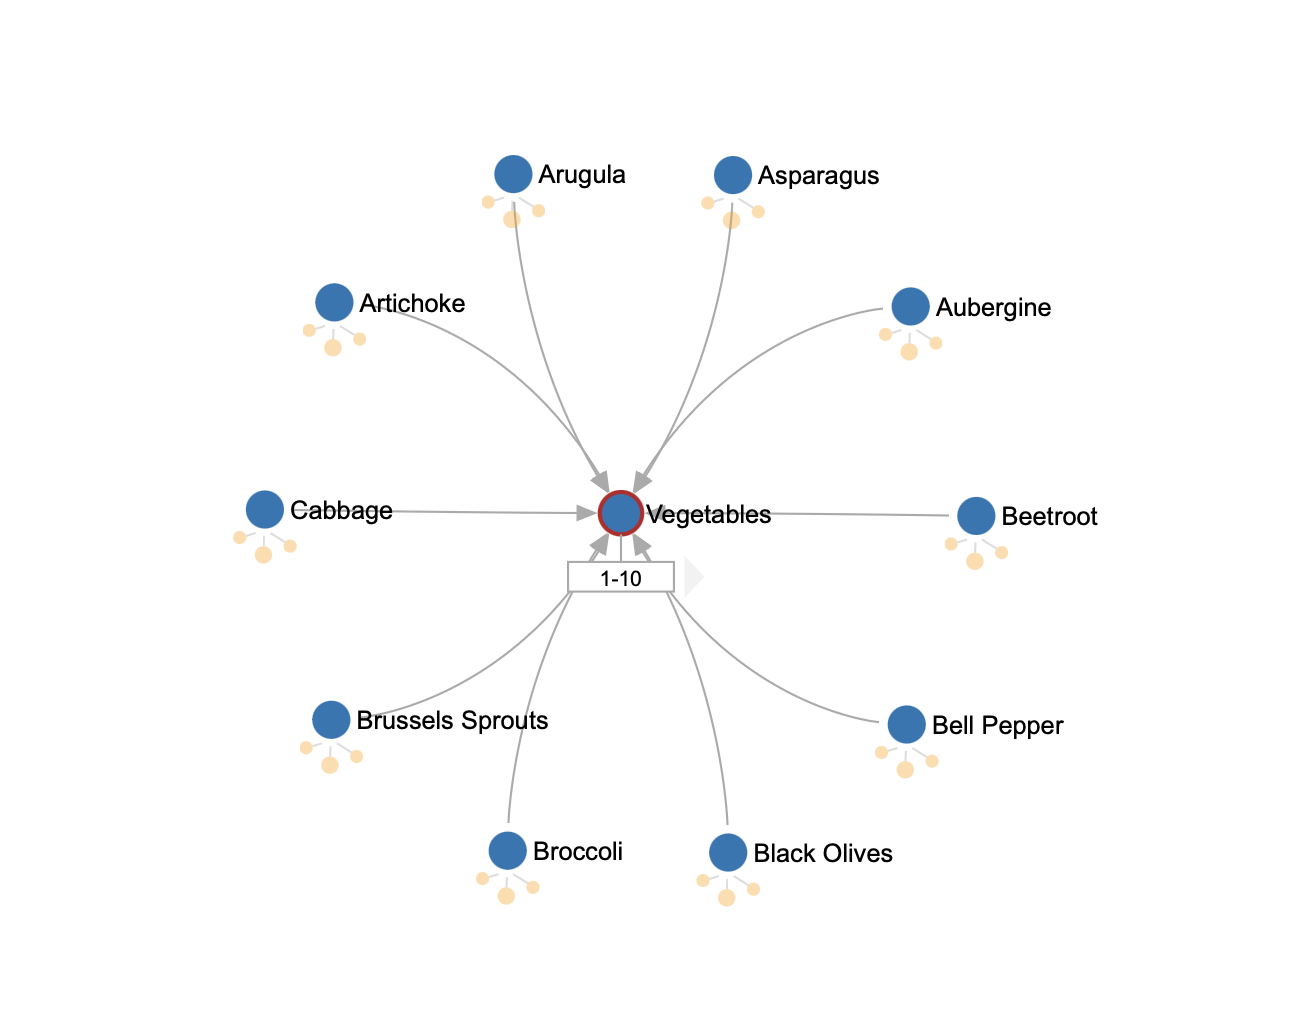
Fig 4. Example of how Unstructured Data is stored as Graph in Azure CosmoDB(Gremlin API)
Azure AI Studio:
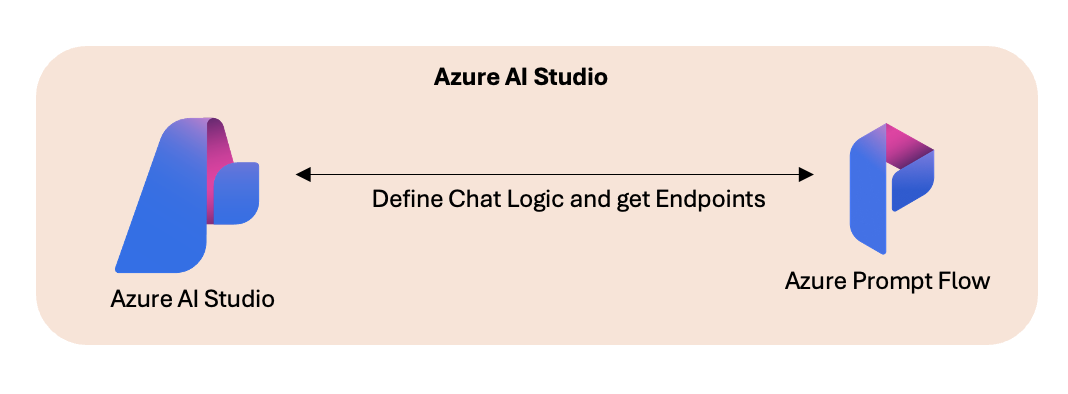
Fig 5. Azure AI Studio Architecture
Prompt Flow
We deployed two endpoints using Azure Prompt Flow. One is a rewrite intent endpoint, and the other is a My Fitness Buddy. These endpoints are designed to solve two different use cases: one focuses on optimizing document retrieval through query generation, while the other offers personalized fitness advice within predefined safe boundaries with the knowledge base of the RAG.
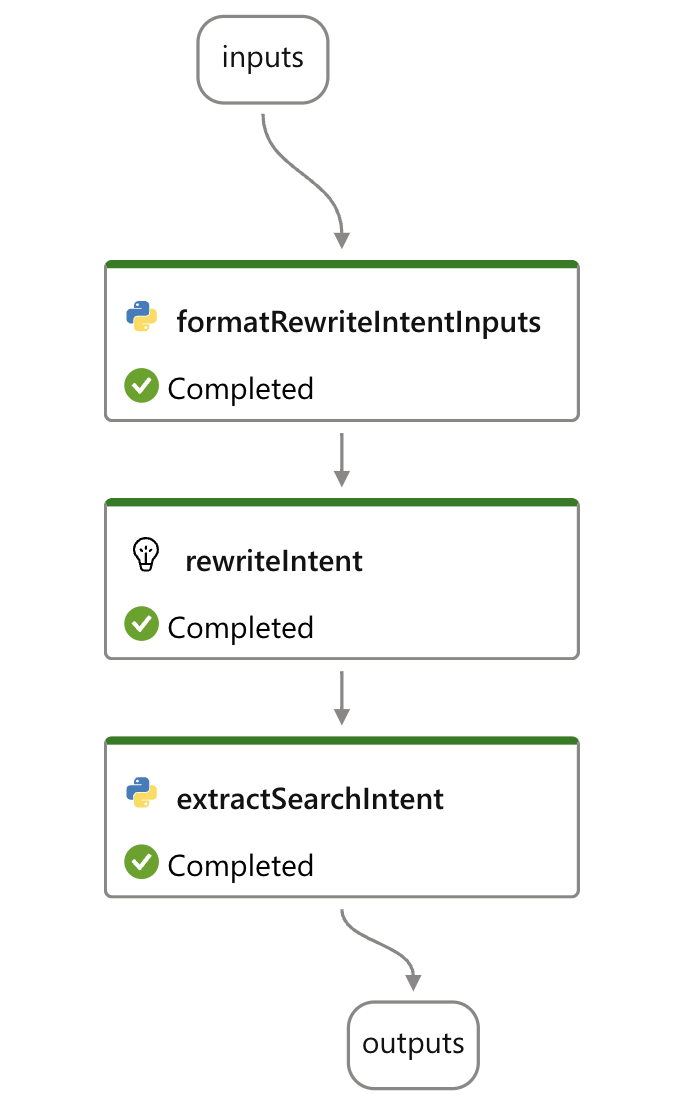
1. Rewrite Intent Endpoint
Purpose: This endpoint was designed to handle a specific task: generating search queries based on a user’s question and previous conversation history. By combining the “current user question” and prior context, the endpoint generates a single canonical query that includes all necessary details, without variants. This is employed for document retrieval systems, where generating these precise queries and intent leading to more accurate results.
Fig 6. Flow of Rewrite Intent endpoint
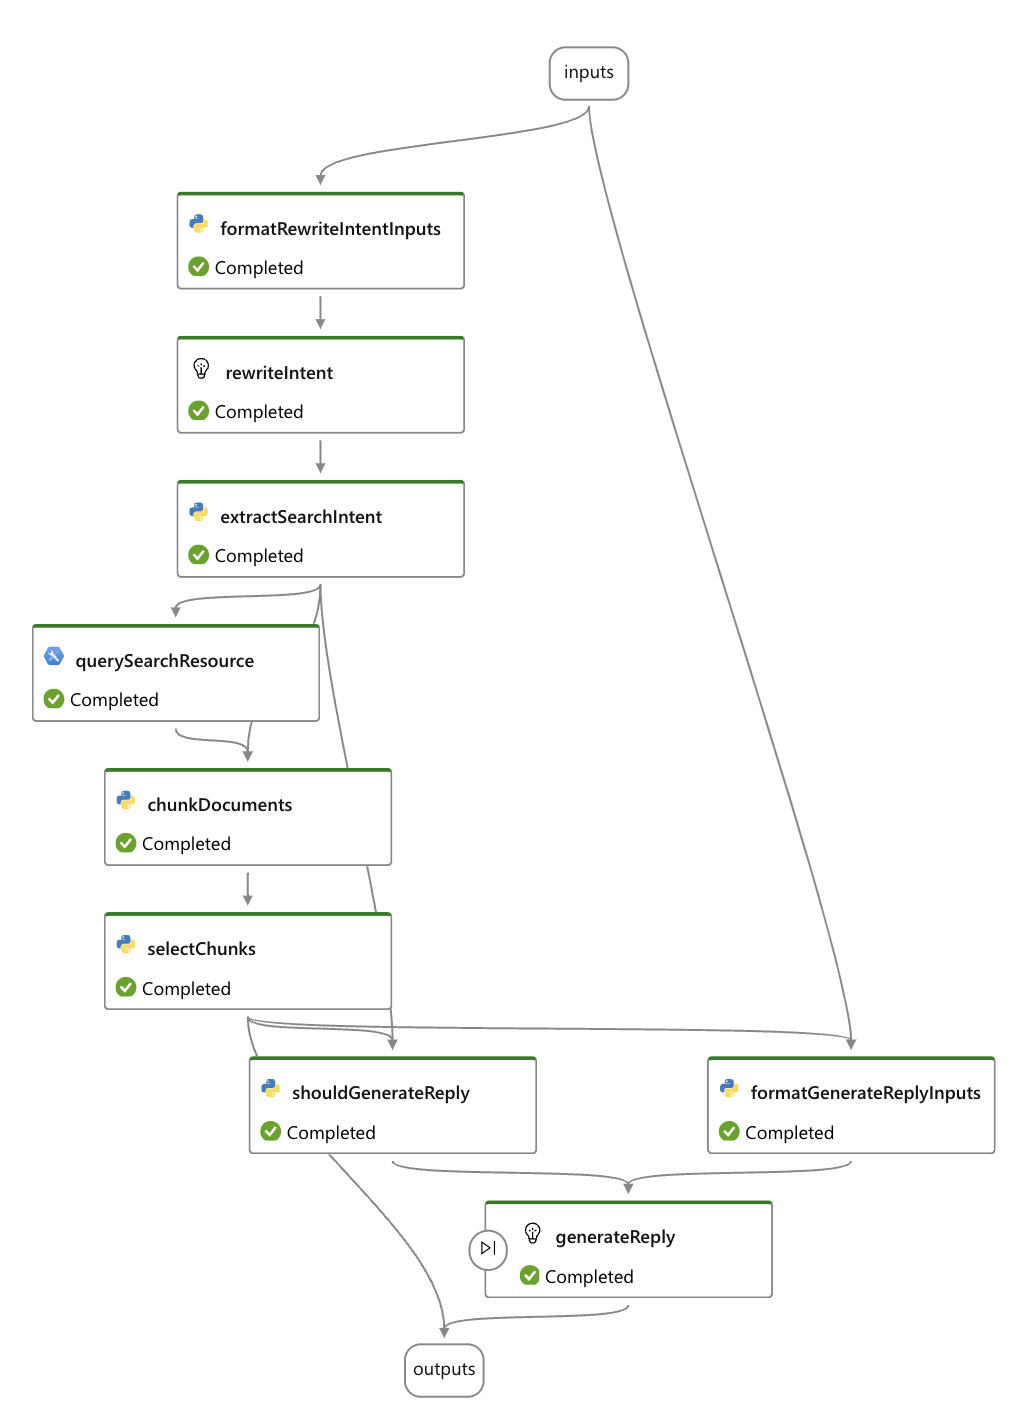
2. My Fitness Buddy endpoint
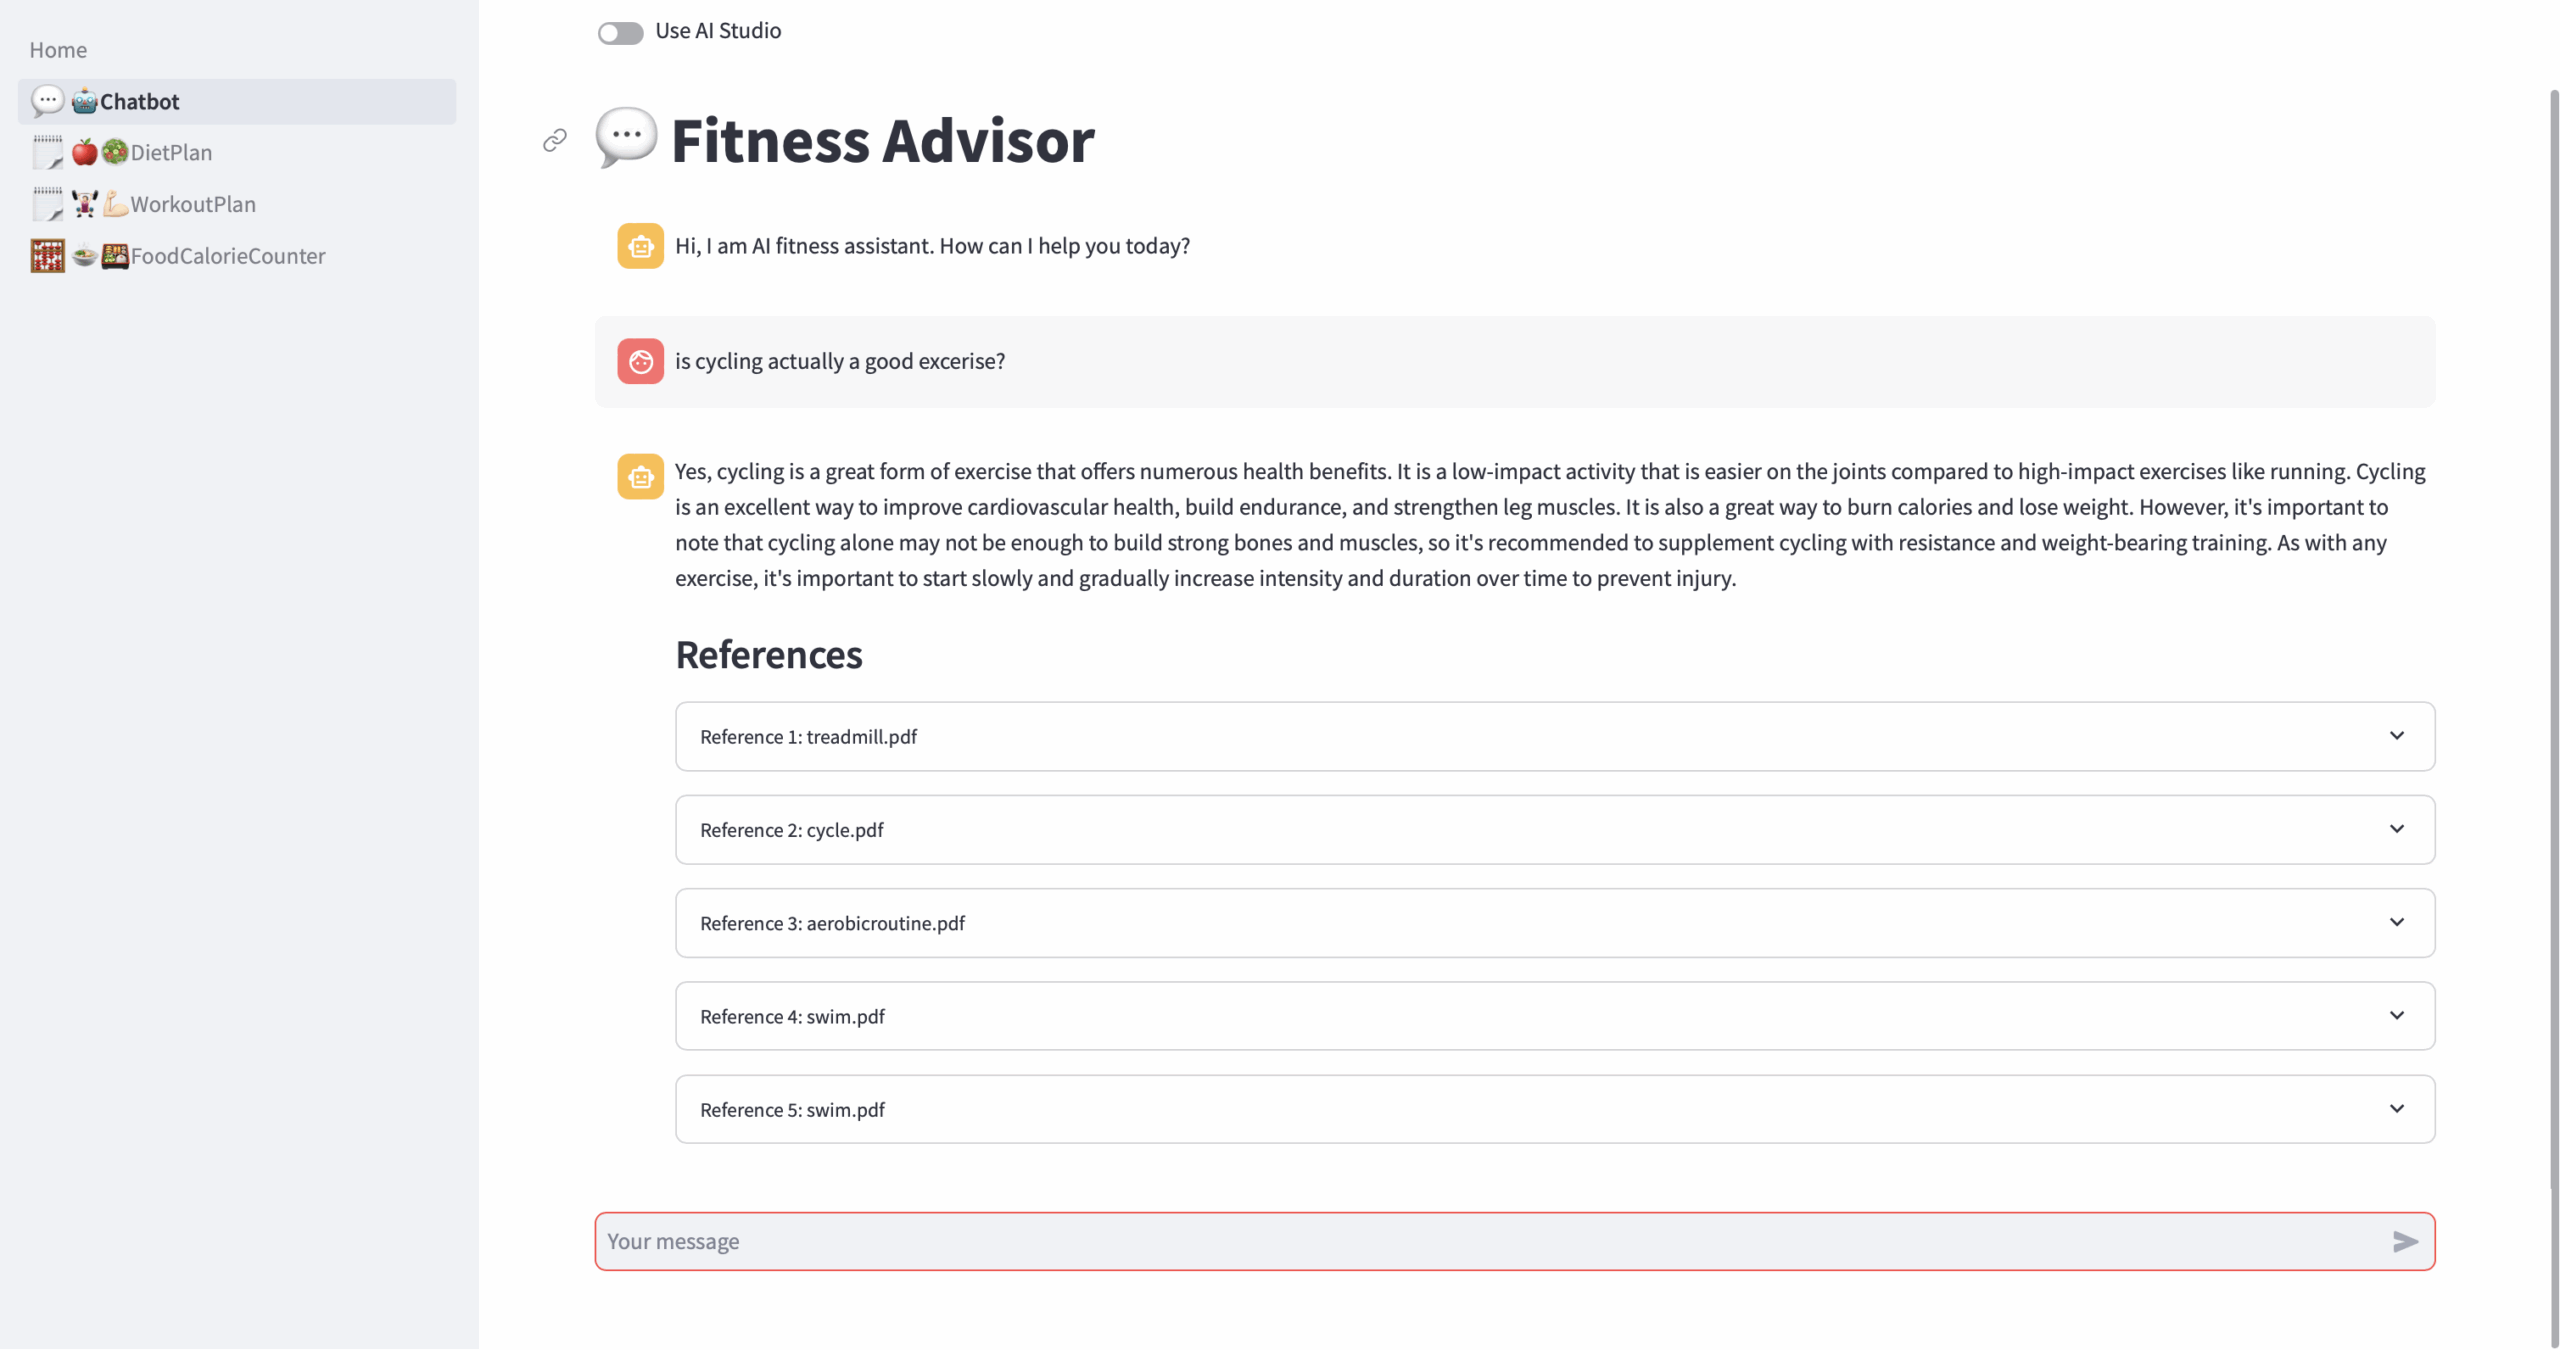
Purpose: The second endpoint is a My Fitness Buddy that offers personalized fitness advice, workout plans, and nutrition tips based on user input. The assistant is programmed to avoid medical advice and stick solely to the provided dataset to ensure that all recommendations are safe, motivational, and evidence-based and the knowledge base is retreived for the chuncks of documents configured as search indexes.
Fig 7. Flow of My Fitness Buddy endpoint
Application Flow:
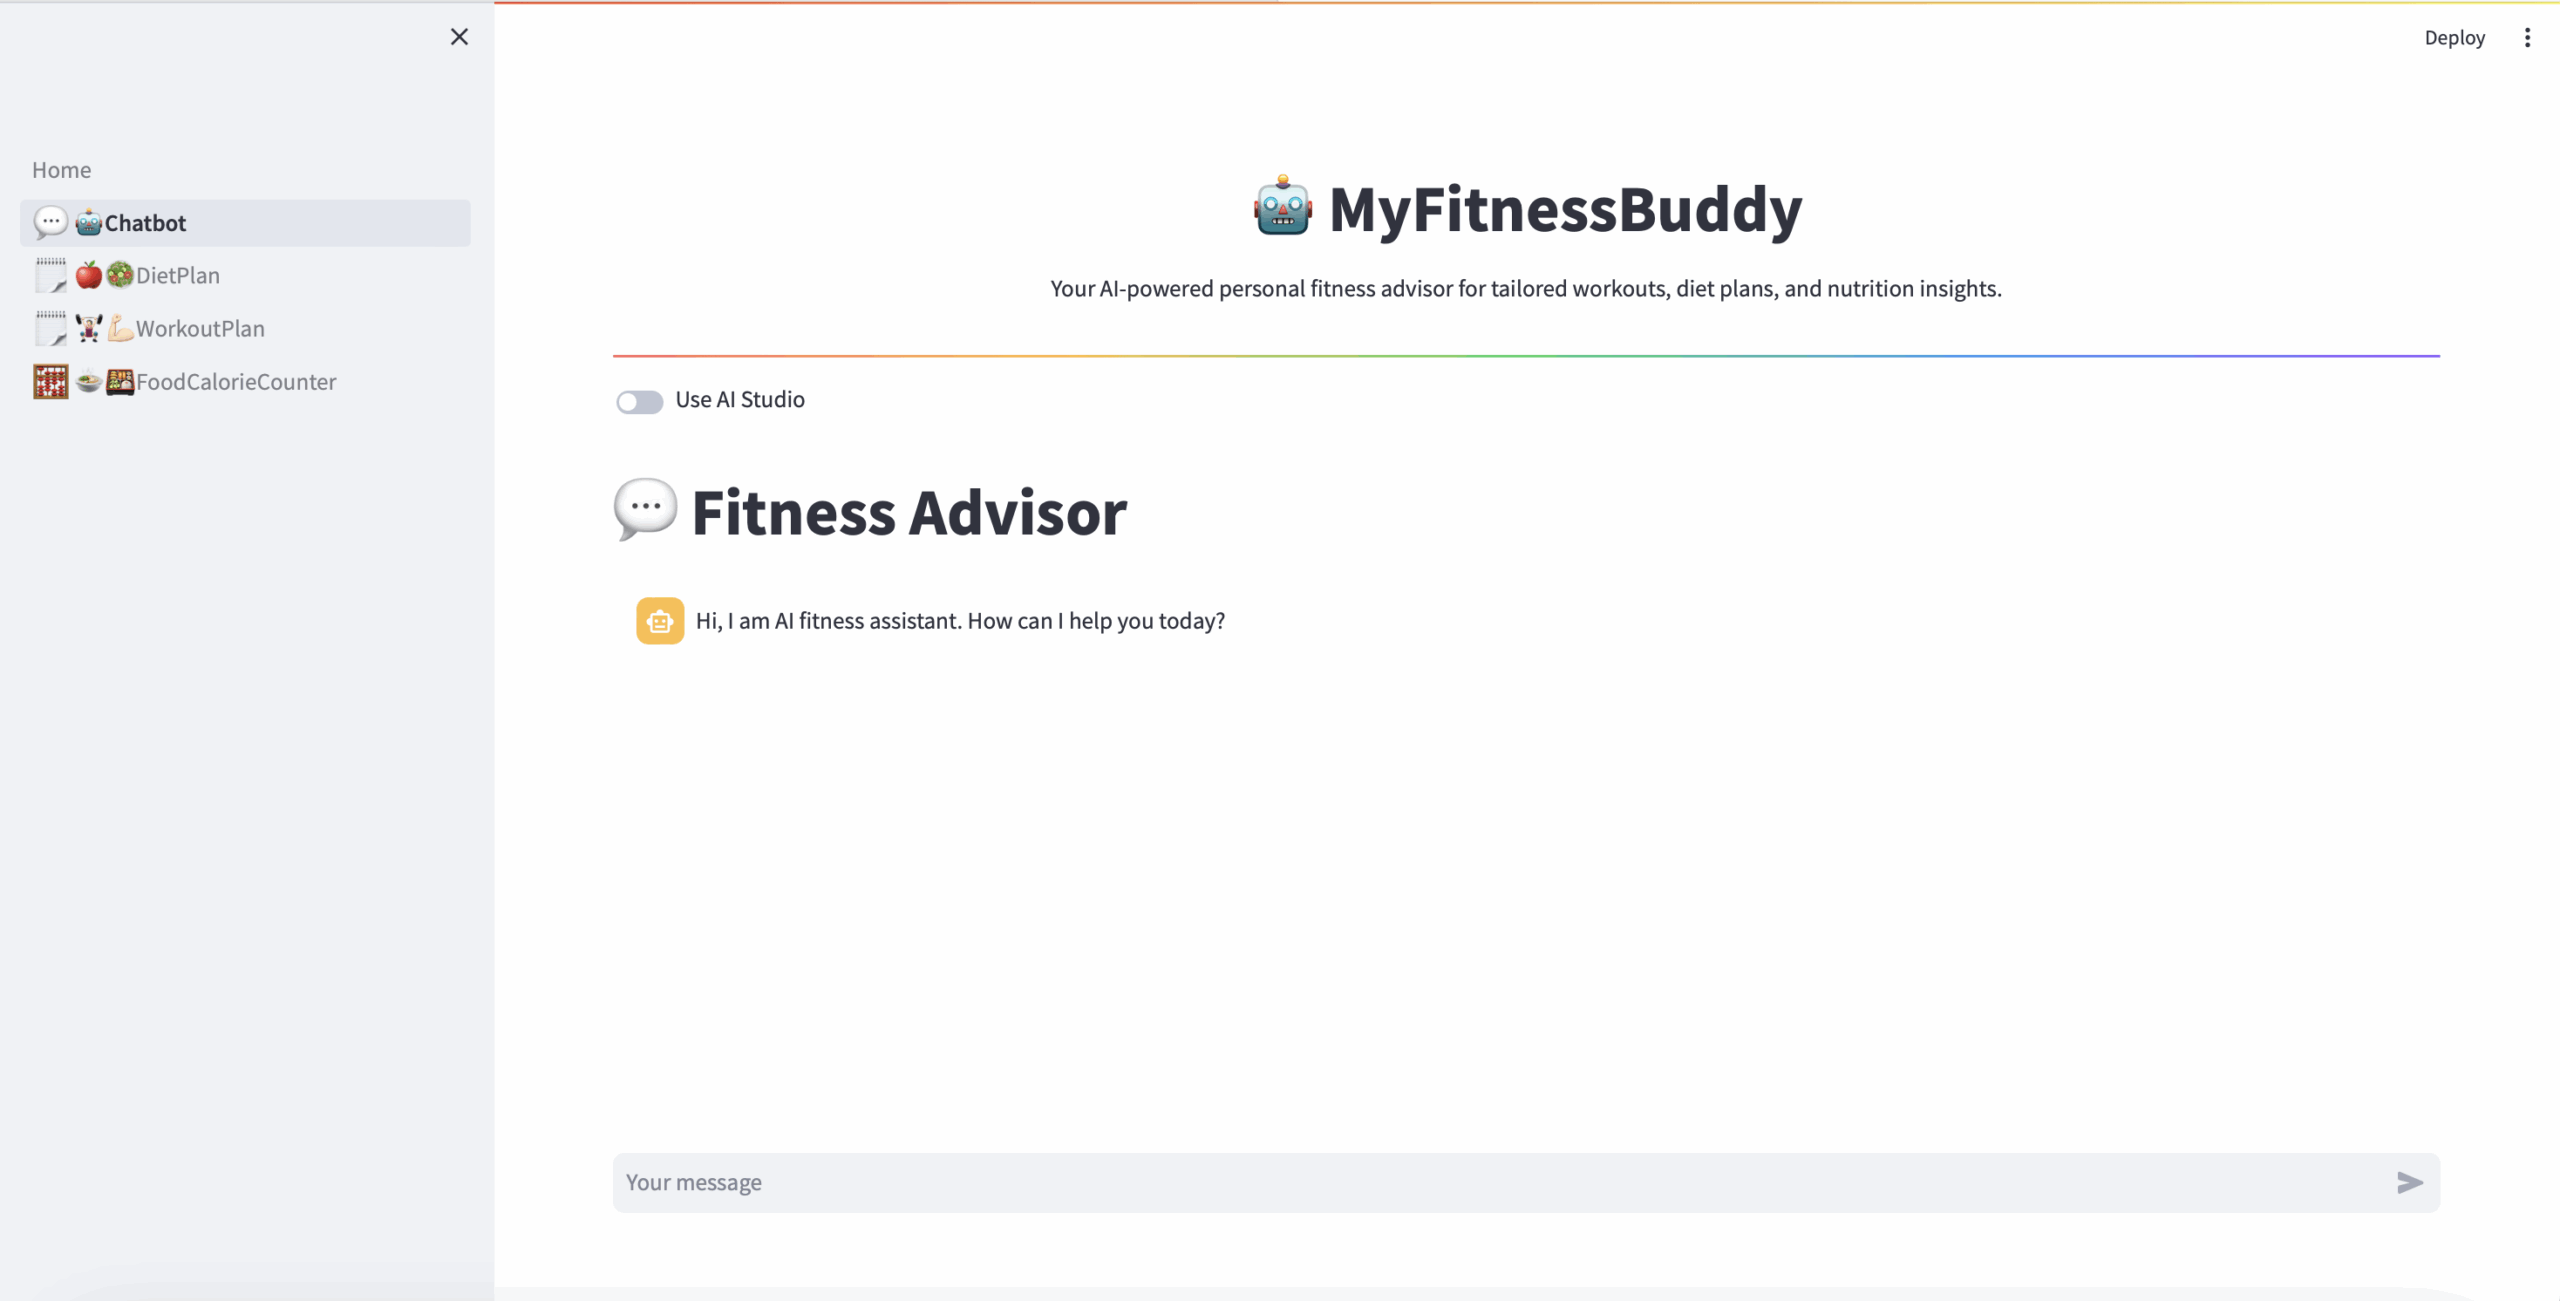
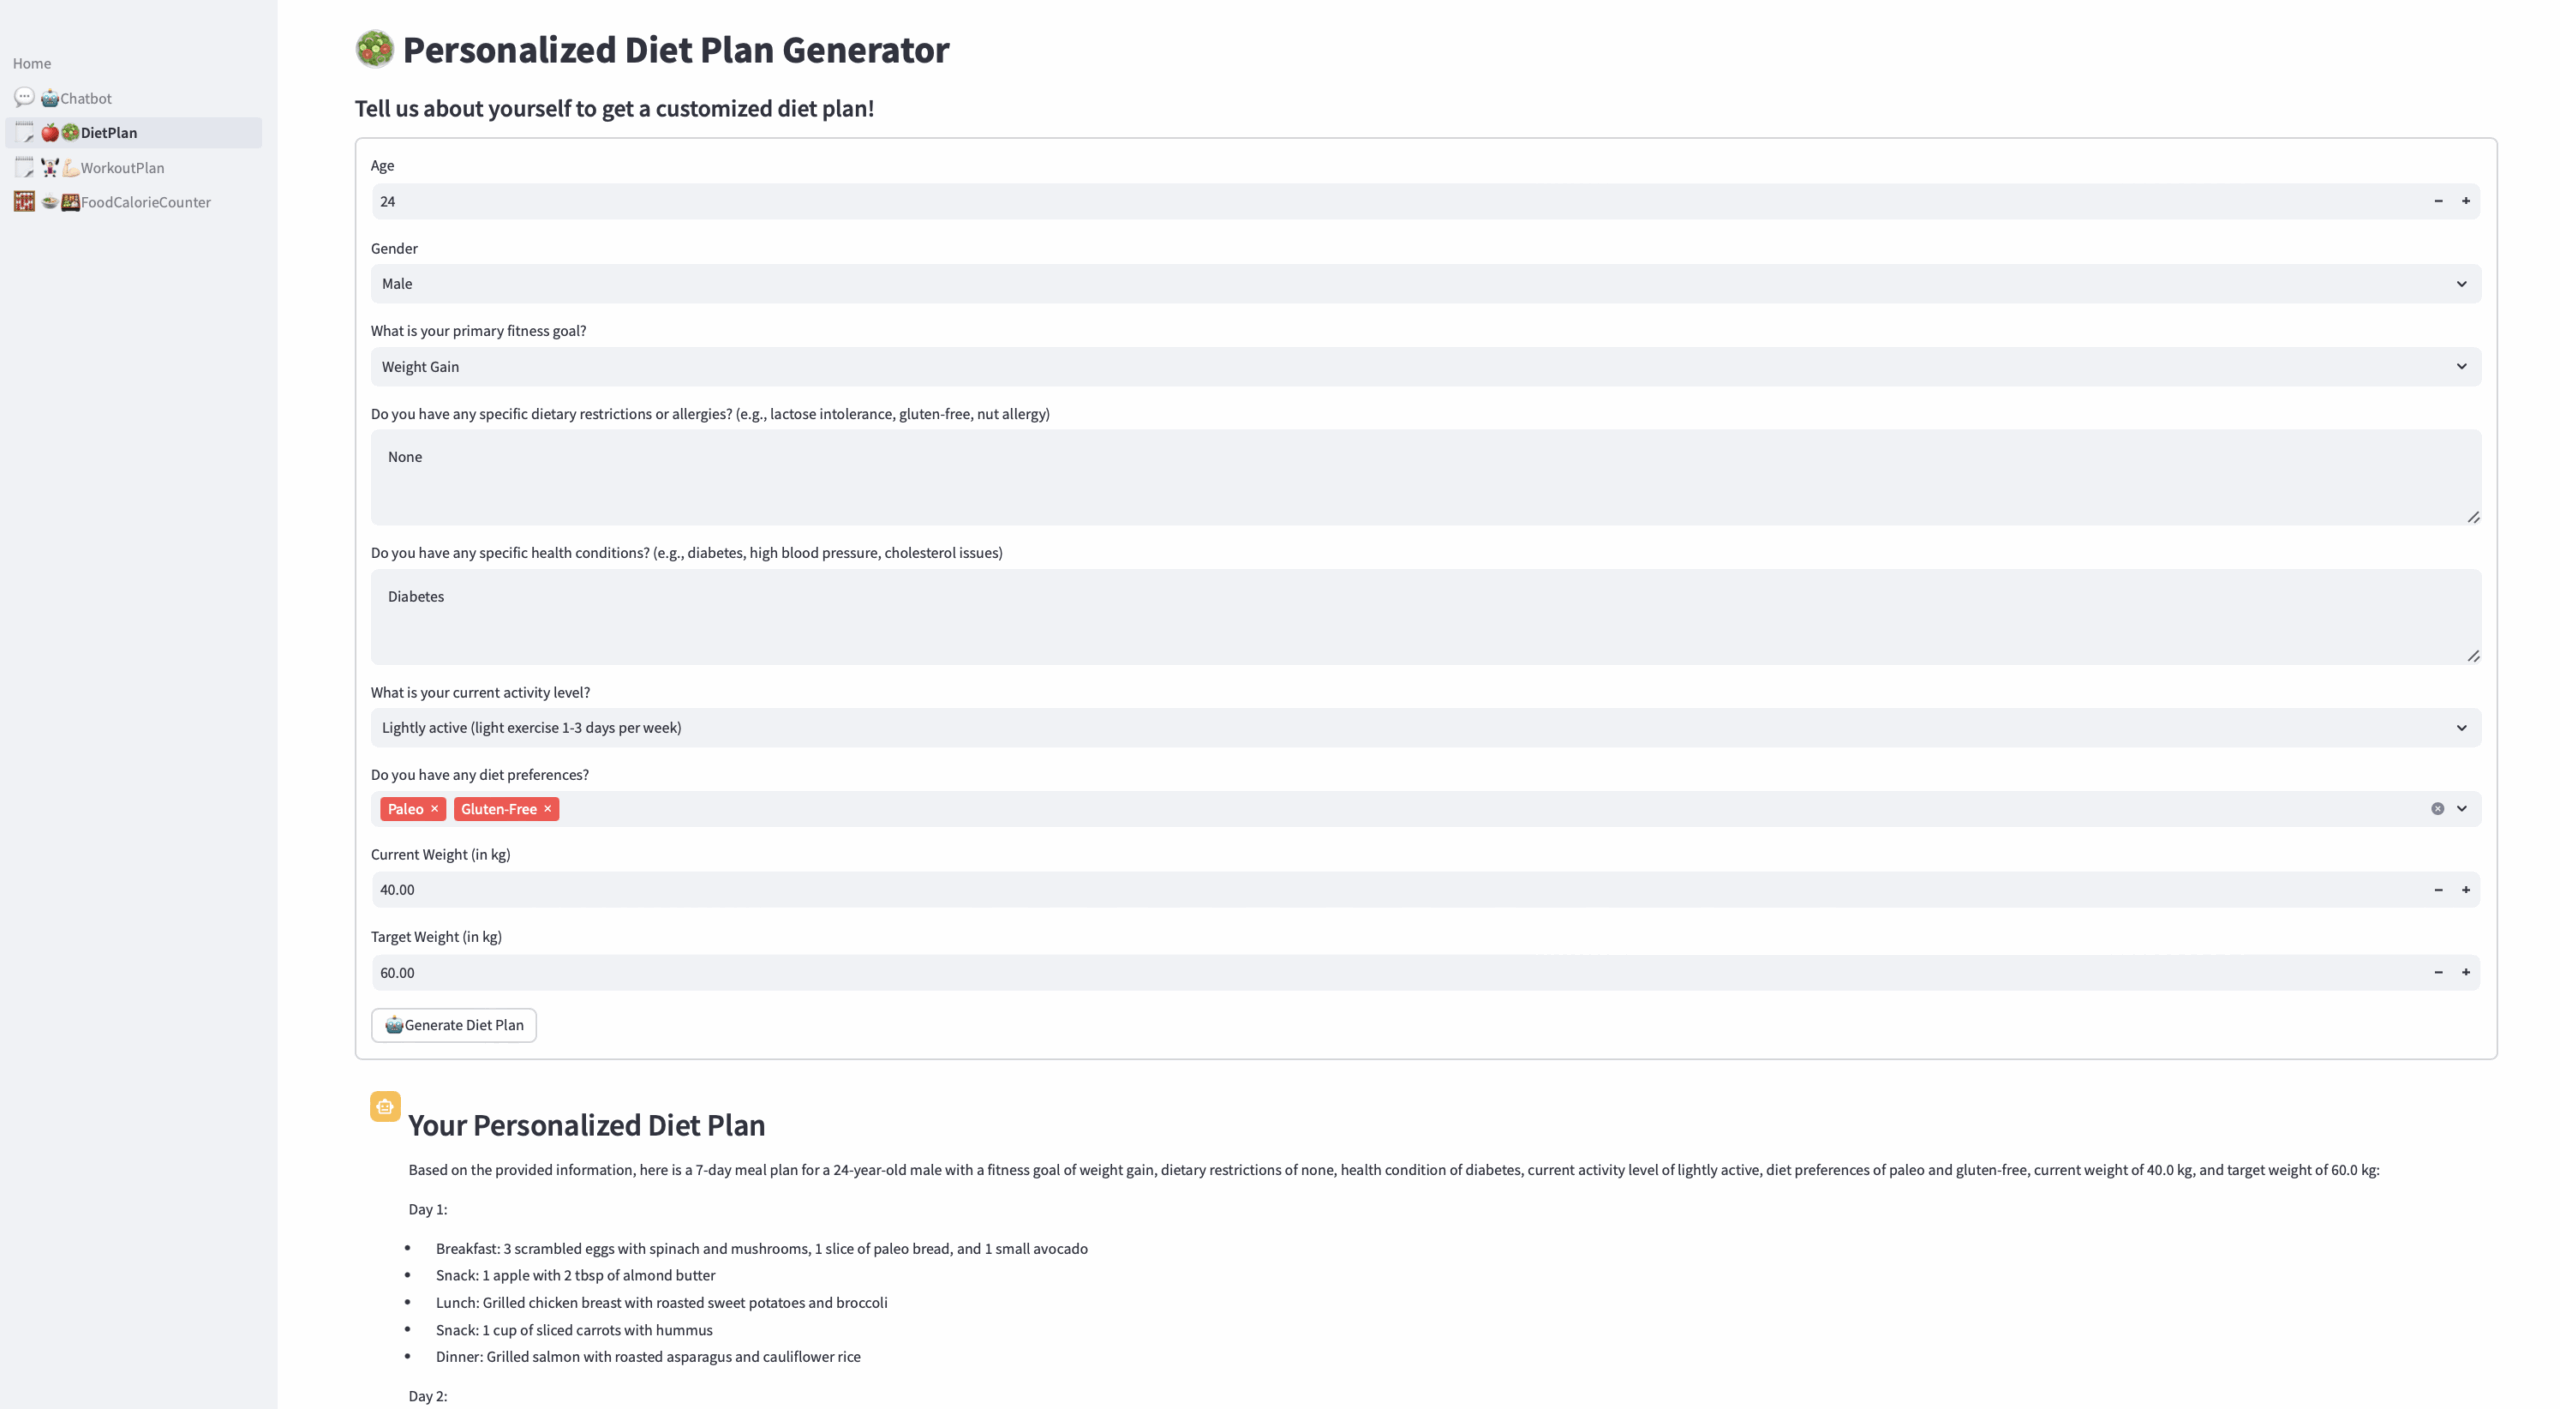
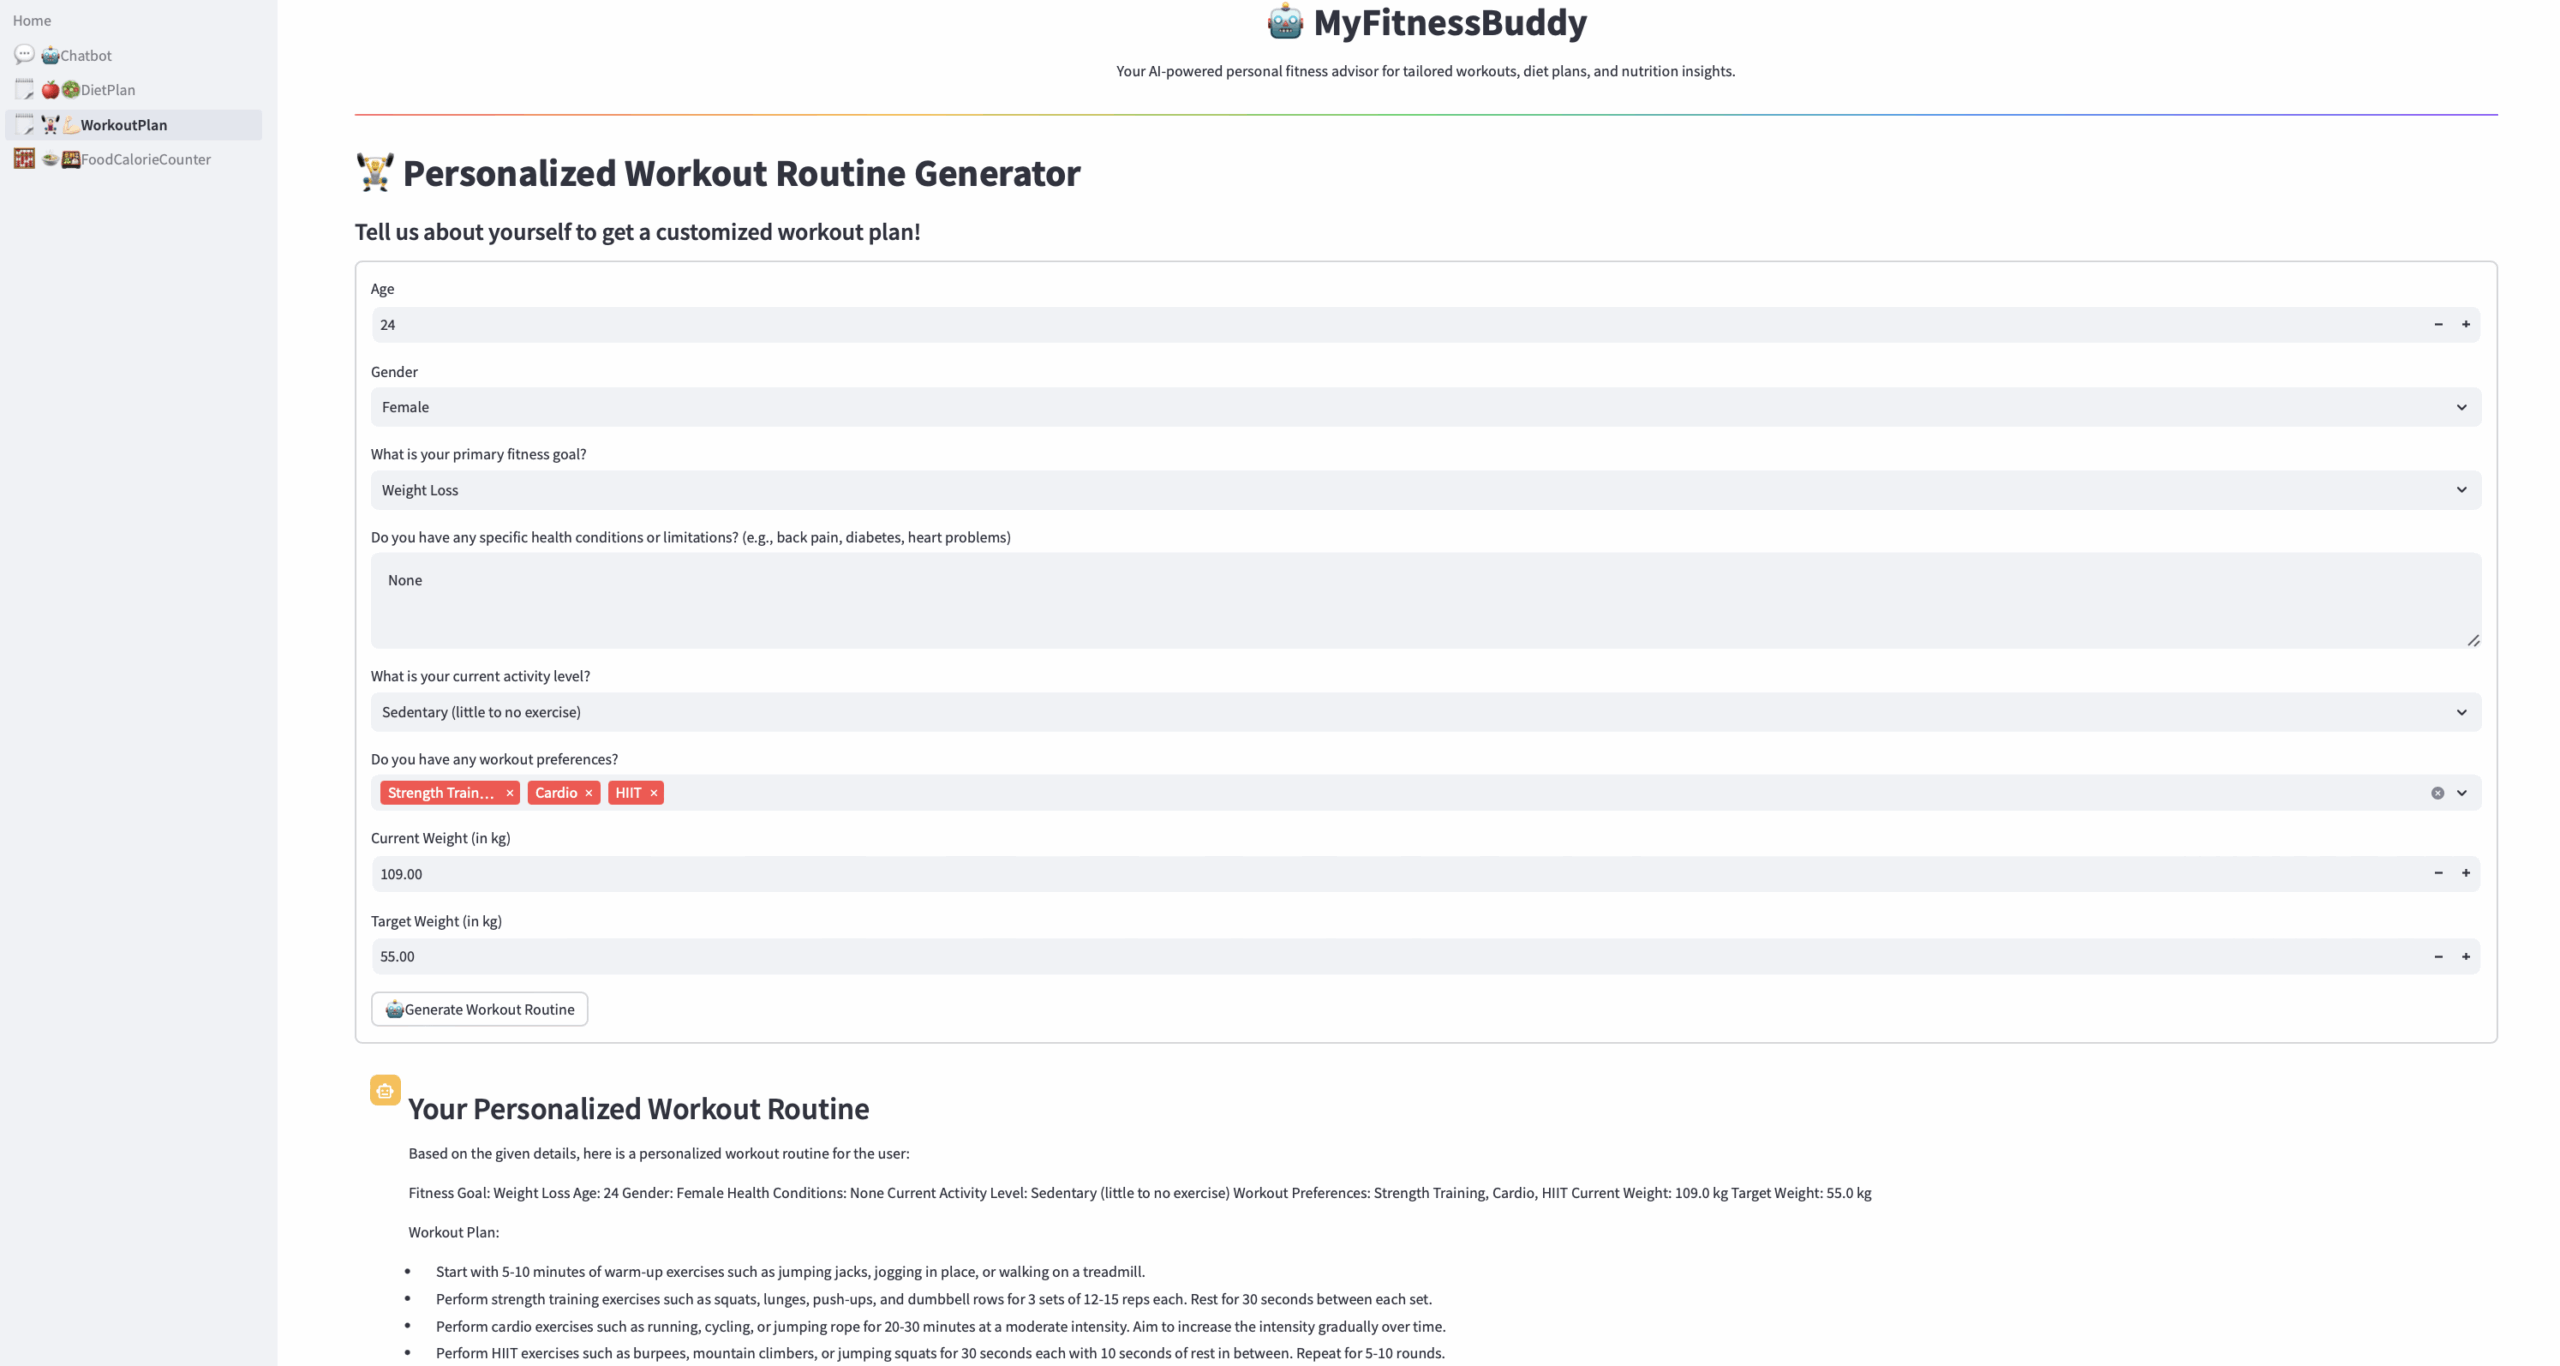
The user interacts with the MyFitnessBuddy app through a Python Streamlit-based chatbot interface.
The application server processes the user’s query and directs it to the appropriate retrieval system (Azure AI Search for structured data or Azure Cosmos DB for unstructured data) based on the query type.
Relevant information is retrieved from the selected data source and sent to Azure OpenAI Services (ChatGPT) along with a crafted prompt to generate a personalized response.
The final response, enriched with contextually relevant information, is returned to the user via the Streamlit app, providing tailored fitness advice and recommendations.
Fig 8. Application
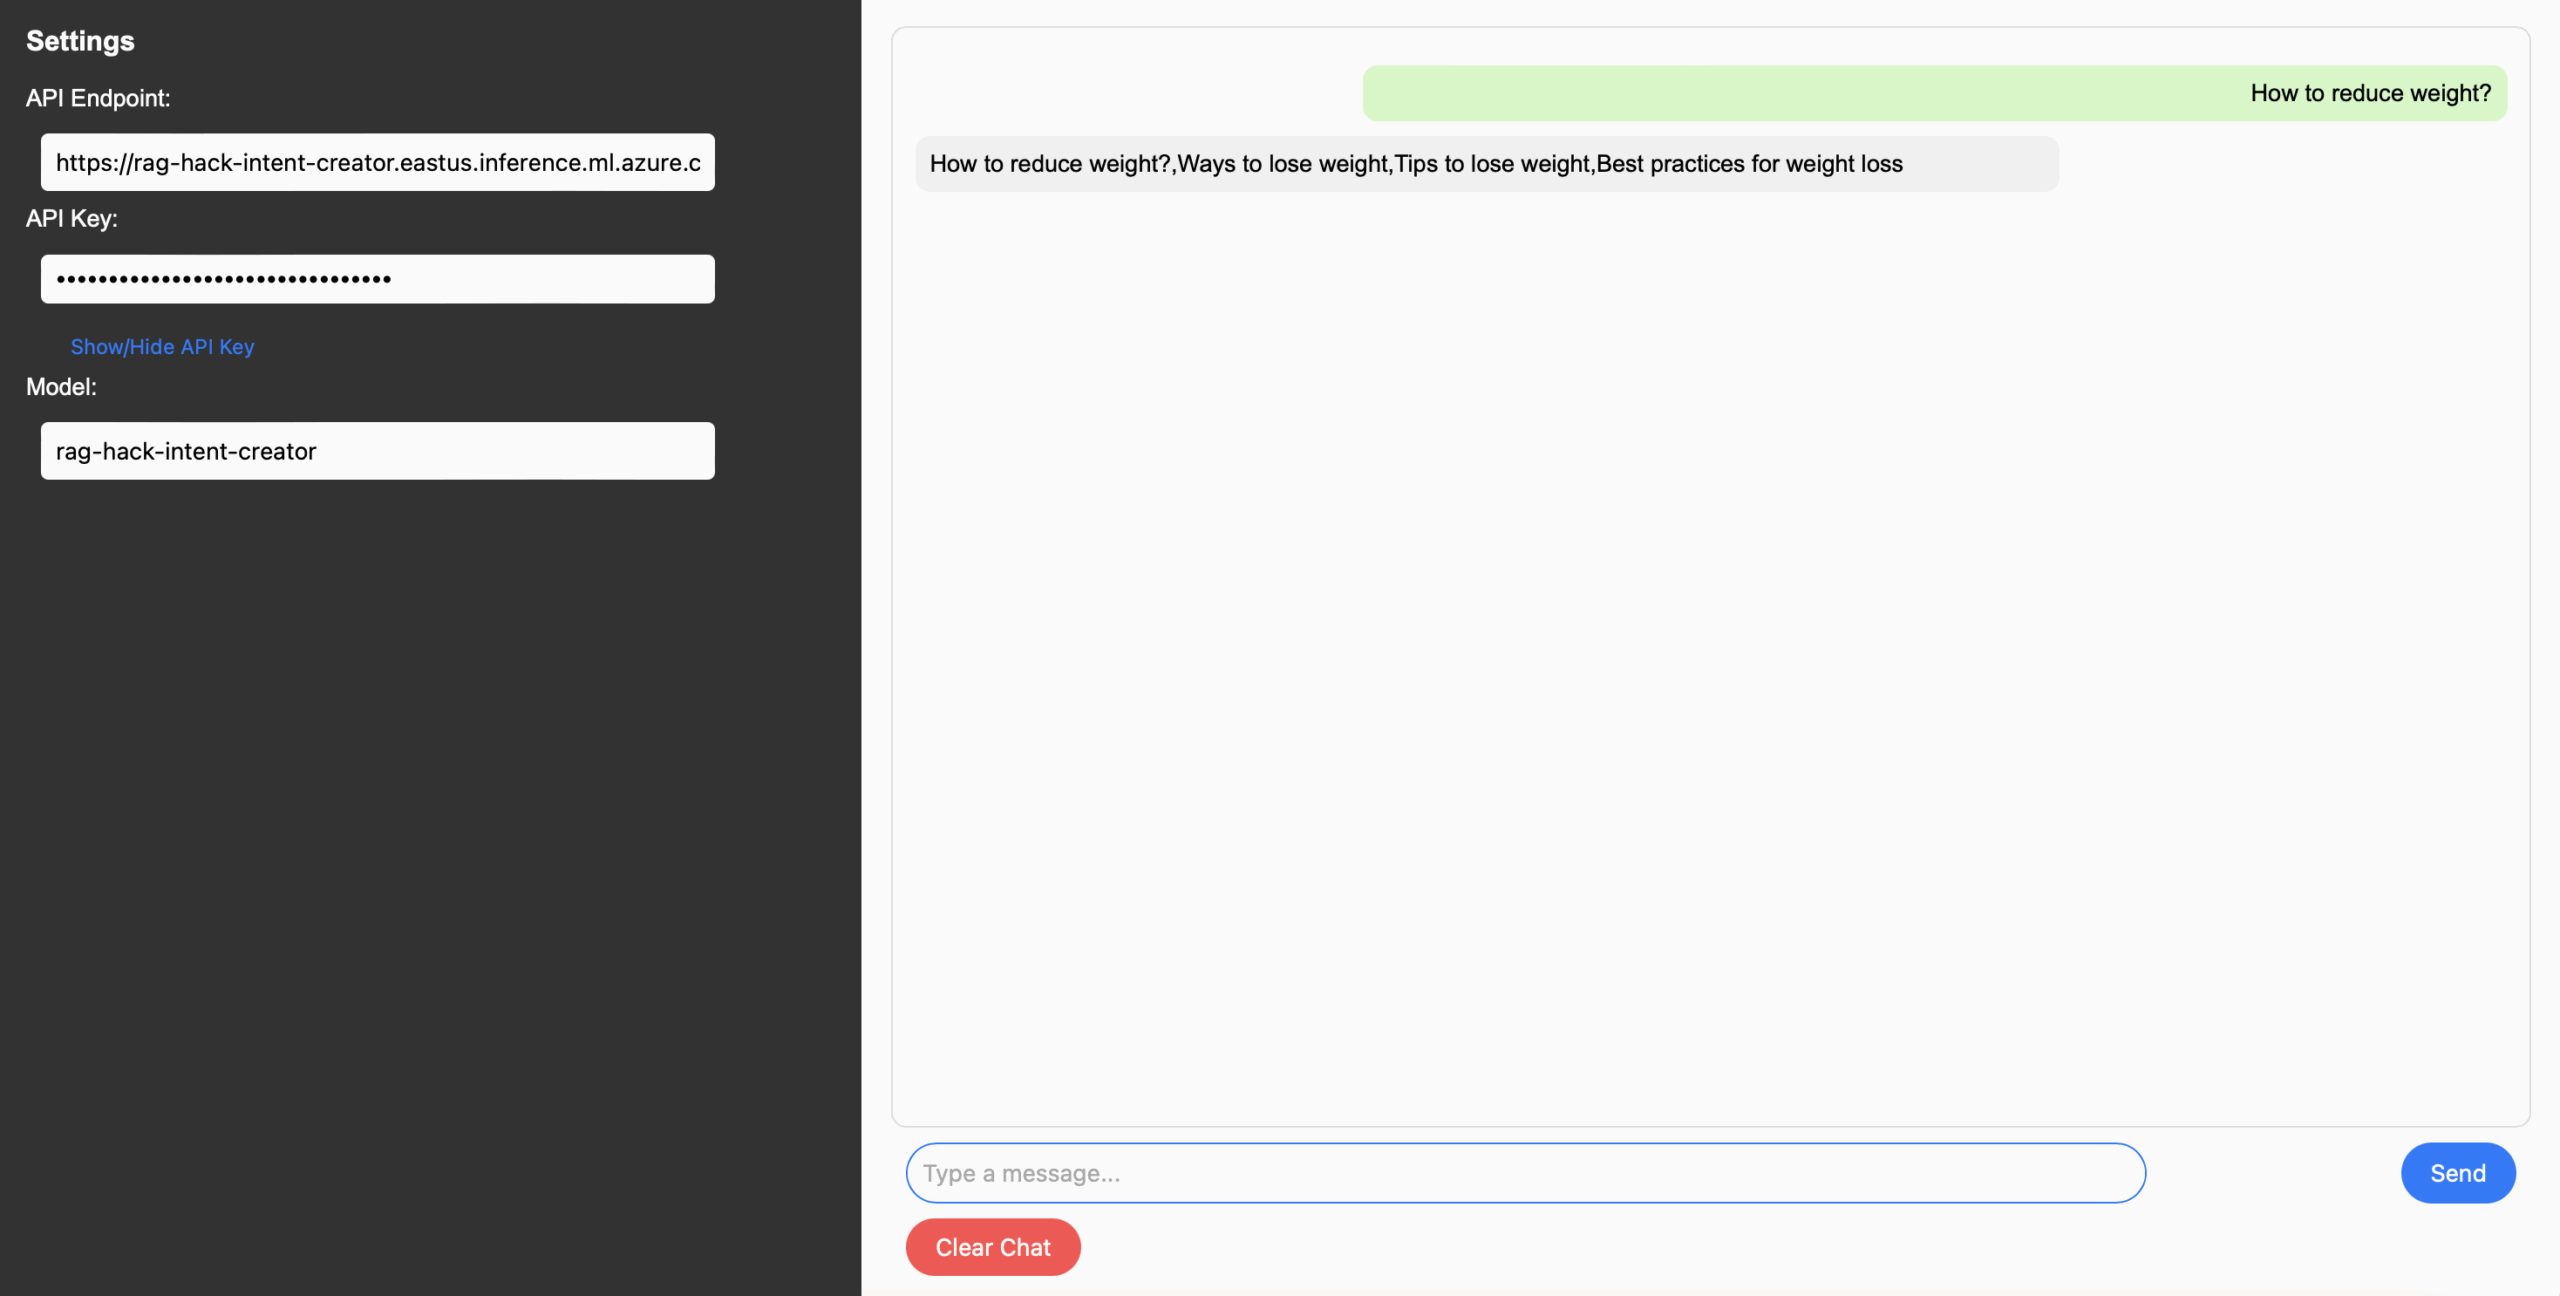
Fig 9. Testing tool for endpoints
Technologies Used:
Data Storage and Retrieval: Azure Blob Storage, Azure Cosmos DB (Gremlin API), Azure AI Search.
AI and Language Models: Azure OpenAI Services (ChatGPT).
Data Processing and Logic Flow: Azure AI Studio, Azure Prompt Flow.
Backend and Application Server: Python for data extraction and preprocessing, with multiple integration points for data ingestion and retrieval.
Target Audience:
Fitness Enthusiasts: Individuals who are passionate about fitness and are looking for personalized workout routines and diet plans to optimize their fitness journey.
Health-Conscious Individuals: People who prioritize a healthy lifestyle and want easy access to accurate nutritional information, calorie tracking, and tailored dietary advice.
Beginners in Fitness: Newcomers who need guidance on starting their fitness journey, including basic workout routines, dietary recommendations, and answers to common fitness-related questions.
Busy Professionals: Users with limited time for fitness planning who seek convenient, on-demand access to customized fitness guidance and quick answers to health-related queries.
Individuals with Specific Health Goals: Those with unique fitness goals or health conditions who require personalized plans and advice that consider their specific needs and preferences.
Conclusion and Future Works:
Conclusion
MyFitnessBuddy demonstrates the potential of combining advanced AI techniques like Retrieval-Augmented Generation (RAG) and Graph Retrieval-Augmented Generation (GRAG) to create a highly personalized and context-aware fitness advisor. By leveraging Azure AI’s capabilities and integrating multiple data sources, the app provides customized workout routines, dietary plans, and accurate responses to user queries. This approach enhances user engagement and satisfaction by delivering tailored and relevant fitness guidance.
Future Work
Enhanced Personalization: Further refine the models to provide more granular customization based on user feedback, behavior, and preferences.
Multilingual Support: Implement multilingual capabilities to reach a broader audience globally.
Advanced Analytics: Develop advanced analytics features to provide users with deeper insights into their fitness progress, habits, and trends.
Expanded Data Sources: Incorporate additional data sources such as medical databases and user-generated content to enhance the app’s knowledge base and improve recommendation accuracy.
Purpose : Generate coverage report for spring boot application Controller Service and Util class methods.
Reason : Increase code coverage ratio.
Local run steps
1- Add jacoco-maven-plugin into pom.xml .
2- Generate coverage report index.html file under target/jacoco-report directory.
3- Before starting the application run mvn clean install to generate mapstruct mapper class.
4- If generated mapstruct mapper class is not recognized by IntelliJ IDE then reload all maven projects.
5- Start Spring Boot REST API by running main method containing class CustomerInfoApplication.java in your IDE.
6- Alternatively you can start your Docker container by following the commands below.
NOT : Execute maven command from where the pom.xml is located in the project directory to create Spring Boot executable jar.
$ mvn clean install -U -X

$ mvn spring-boot:run
Generated code coverage report file is placed under “target/jacoco-report/” directory
Java 11
H2 Database Engine
spring boot
spring boot starter data jpa
spring boot starter web
spring boot starter test
spring boot starter aop
spring boot starter actuator
spring security web
springdoc openapi ui
springfox swagger ui
querydsl-jpa
querydsl-apt
hibernate
logback
mapstruct
mapstruct-processor
hikari connection pool
mockito-core
mockito-junit-jupiter
mockito-inline
Docker
maven
maven-surefire-plugin
maven-failsafe-plugin
jacoco-maven-plugin
Docker build run steps
NOT : Execute docker commands from where the DockerFile is located.
NOT : Tested on Windows 10 with Docker Desktop Engine Version : 20.10.11
$ docker system prune -a --volumes

$ docker build . --tag demo

$ docker images

  REPOSITORY   TAG       IMAGE ID       CREATED         SIZE

  demo         latest    9d4a0ec3294e   6 minutes ago   288MB

$ docker run -p 8443:8443 -e "SPRING_PROFILES_ACTIVE=dev" demo:latest
This repo contains two minimum viable products that will import a 6 million record .csv file into PostgreSQL.
The first method I created to achieve this uses Stateless Sessions to stringify the data and loop through the data file, while the second method uses Spring Batch processing.
Average runtime for the batch processor with a ThreadPoolTaskExecutor is 2 minutes 33 seconds. Average runtime for the stateless sessions parser/processor is 40 minutes.
Both of these methods will be improved upon in the future by incorporating a MultiResourcePartitioner within the Spring Batch Configuration file, as well as splitting the large dataset into smaller sets, so that multiple threads may operate on different files at a given time.
This project:
Uses Spring Boot service uses Spring Batch with Spring Data JPA-Hibernate.
Imports data from a CSV file (about 6 million records) to a PostgreSQL database.
Improved batch processing performance from implementing a ThreadPoolTaskExecutor to achieve data chunking and multithreaded code.
Based on this data, a fraud detection model is built using python machine learning libraries.
Is intended to be launched through an API Gateway server (linked below).
Instructions to run:
1. Clone this repository to your local machine.2. Download the financial data from Kaggle. Add this data to “resource/data” and be sure to include the .csv file in your .gitignore!3. Within main/java/com there are two distinct packages, “batch” and “session”, which are the batch processor and sessions processor respectively.4. Each package has it’s own main file that can be ran5. Once the application is launched without issues, head over to Postman and test on your configured port and the route “/load”
Technologies Used
Java
Spring Boot for REST API
Spring Batch Processing (Open Source Data Processing Framework)
Maven
Factory Design Pattern within Batch Processor
Hibernate
Java Persistence API (JPA)
PostgreSQL
Gateway Server Communication. Gateway Server can be found here.
Livecodable real-time fractal flames in the browser.
Flam3’s are a type of Iterated Function System that
generate fractals that can look similar to flames.
This is a very computationly expensive operation that can be tricky to
parallelize. Thanks to Orion Sky Lawlor
and Juergen Wothke we can build and run flames in
real-time in the browser.
The goal is to provide a framework to for accelerate exploration of and performance
with fractal flames.
Guide
Flames configs can be built by calling the flame function, and setting various properties
of the flame:
flame()
    .colorful(.4)
    .exposure(3)
Flames are essentially a set of transforms applied recursively to an initial state. These
transforms apply some affine transformation on the coordinate system using the x, y, and o
vector properties and a wvar scalar. The result of this affine transformation is fed into
the a function based on the variation, which further alters the coordinate system.
For example, if you wanted to add a linear (just the affine part) transform to a flame you could do:
This is only a subset of the standard flam3 variations
due to limitations around running on the GPU. If you can come up with the inverse for
any of these variation functions, please submit a PR!
Device Functional Role ID via Machine Learning and Network Traffic Analysis
Overview
NetworkML is the machine learning portion of our Poseidon project. The model in networkML classifies each device into a functional role via machine learning models trained on features derived from network traffic. “Functional role” refers to the authorized administrative purpose of the device on the network and includes roles such as printer, mail server, and others typically found in an IT environment. Our internal analysis suggests networkML can achieve accuracy, precision, recall, and F1 scores in the high 90’s when trained on devices from your own network. Whether this performance can transfer from IT environment to IT environment is an active area of our research.
NetworkML can be used in a “standalone” mode from the command line interface. For more background and context on the macro project, please check out the Poseidon project page on our website. This repository specifically covers the output, inputs, data processing, and machine learning models we deploy in networkML.
While this repository and resulting docker container can be used completely independently, the code was written to support the IQT Labs Poseidon project. See:
This repository contains the components necessary to build a docker container that can be used for training a number of ML models using network packet captures (PCAPs). The repository includes scripts necessary to do training, testing, and evaluation. These can be run from a shell once networkml is installed as a package or run in a Docker container using the networkml script.
Feel free to use, discuss, and contribute!
Model Output
NetworkML predicts the functional role of network-connected device via network traffic analysis and machine learning.
Admittedly subjective, the term “role” refers to the authorized administrative purpose of the device on the network. NetworkML in its default configuration has twelve roles: active directory controller, administrator server, administrator workstation, confluence server, developer workstation, distributed file share, exchange server, graphics processing unit (GPU) laptop, github server, public key infrastructure (PKI) server, and printer. This typology reflects the network-connected devices in the data we used to train the model. Other networks will lack some of these roles and might include others. Consequently, organizations that wish to use networkML might have to adapt the model outputs for their specific organization.
Model Inputs
NetworkML’s key input is the network traffic for a single device. By network traffic for a single device, we mean all packets sent and received by that device over a given time period. For reliable results, we recommend at least fifteen minutes of network traffic. Poseidon, the larger project of which networkML is only a part, performs the necessary packet pre-processing to produce pcap’s containing all network traffic to and from a single device. If you are using networkML in a standalone manner, the pcap files must all follow a strict naming convention: DeviceName-deviceID-time-duration-flags.pcap. For example, ActiveDirectoryController-labs-Fri0036-n00.pcap refers to a pcap from an active directory controller taken from a user named labs on a Friday at 00:36. The flag field does not currently have any significance.
It is worth noting that networkML uses only packet header data in its models. NetworkML does not use data from the packet payload. Relying only on packet header data enables networkML to avoid some privacy-related issues associated with using payload data and to create (hopefully) more generalizable and more performant models.
Data Processing
Algorithms
NetworkML uses a feedforward neural network from the scikit-learn package. The model is trained using 5-fold cross validation in combination with a simple grid-search of the hyper-parameter space.
Installation/Run
Our models can be executed via Docker and in a standalone manner on a Linux host. We recommend deployment via Poseidon if you are running an SDN (software-defined network). Otherwise, we recommend using Docker.
See the README file included in the networkml/trained_models folder for specific instructions on deployment.
Develop/Standalone Installation
Note: This project uses absolute paths for imports, meaning you’ll either need to modify your PYTHONPATH to something like this from the project directory:
export PYTHONPATH=$PWD/networkml:$PYTHONPATH
Alternatively, simply running pip3 install . from the project directory after making changes will update the package to test or debug against.
This package is set up for anaconda/miniconda to be used for package and environment
management if desired. Assuming you have the latest install (as of this writing, we have been using
conda 4.5.12), set up the environment by performing the following:
Ensure that the CONDA_EXE environment variable has been set. If echo $CONDA_EXE
returns empty, resolve this by export CONDA_EXE=$_CONDA_EXE in your bash shell.
Run make dev to set up the environment
Run conda activate posml-dev to begin.
You can remove the dev environment via standard conda commands:
Run conda deactivate
Run conda env remove -y -n posml-dev
For more information about using conda, please refer to their
user documentation.
" You can pick your favorite strategies.letg:eft_index_function= {
\ 'head': function('eft#index#head'),
\ 'tail': function('eft#index#tail'),
\ 'space': function('eft#index#space'),
\ 'camel': function('eft#index#camel'),
\ 'symbol': function('eft#index#symbol'),
\ }
" You can use the below function like native `f`letg:eft_index_function= {
\ 'all': { -> v:true },
\ }
DEMO
NOTE: This demo uses Ff, fmfc with this plugin’s default configuration.


 https://github.com/stefjen07/CodablePP