Blog

  • graalvm-native-image-pipeline

    graalvm-native-image-pipeline

    This was inspired by this tweet https://twitter.com/rauchg/status/1024013053153570816 and the accompanying code snippet https://t.co/vgHvdGqCy4 .

    Initially (as can be seen in the Jenkinsfile) I wanted the slave to be a GraalVM enabled slave capable of producing the native image that I could then copy into a scratch image. The problem with runnning the native image executable on the RHEL/Centos based slave is that the scratch image requires a statically linked executable (the scratch image is missing a lot of the dynamic libraries) and it seems that the native-image executable when run with the –static flag can’t find a number of dynamic libraries on RHEL/Centos (even after installing lots of stuff!), so I stuck with the Ubuntu Dockerfile example used in the links above.

    The inspiration above used multi stage docker builds which Openshift doesn’t support, so I followed https://blog.openshift.com/chaining-builds/ to work around this.

    Deploying

    After starting minishift execute

    oc create graalvm-native-image-ubuntu-is.yaml
    oc create graalvm-native-image-scratch-is.yaml
    oc create graalvm-native-image-ubuntu-bc.yaml
    oc create graalvm-native-image-scratch-bc.yaml
    oc create -f pipeline.yaml
    

    The first builds will fail, the pipeline build needs to be run…

    oc start-build graalvm-listdir-pipeline
    

    Or via the Jenkins browser application or via the Openshift browser application.

    Then the native image Java application built using GraalVM technology packaged as a minimal scratch based docker image can be deployed as a new app via

    oc new-app graalvm-native-image-scratch
    

    Visit original content creator repository
    https://github.com/petenorth/graalvm-native-image-pipeline

  • VoltRpc

    VoltRpc

    License NuGet NuGet Download Count Build Status Docs Status Discord

    VoltRpc – An RPC library which is designed to be both simple to use and fast.

    Features

    • Its fast (See the benchmarks)
    • Supports all built-in C# value types, including:
      • Bool
      • Byte
      • Char
      • Decimal
      • Double
      • Float
      • Int
      • Long
      • SByte
      • Short
      • UInt
      • ULong
      • UShort
    • Supports these built-in .NET types: (More to be added)
      • String
      • DateTime
      • TimeSpan
      • Uri
      • Guid
      • Vector2
      • Vector3
      • Vector4
      • Plane
      • Quaternion
      • Matrix3x2
      • Matrix4x4
    • Supports arrays for any type
    • Easily support custom types by implementing a TypeReadWriter<T>
    • Proxy generated by using a .NET Source Generator
    • Simple to use

    Getting Started

    Installation

    VoltRpc can be installed from NuGet. You will also need the proxy generator (also on NuGet).

    <ItemGroup>
        <PackageReference Include="VoltRpc" Version="3.2.0" />
        <PackageReference Include="VoltRpc.Proxy.Generator" Version="2.3.0" />
    </ItemGroup>

    Example

    For a more in-depth example, see the Overview or Setup.

    There is also a demo project included.

    [GenerateProxy(GeneratedName = "TestProxy")]
    public interface ITestInterface
    {
      public void DoSomethingCool();
      public int GetTheCoolValue();
    }
    
    public class TestInterface : ITestInterface
    {
      public void DoSomethingCool()
      {
        Console.WriteLine("Something Cool!");
      }
    
      public int GetTheCoolValue()
      {
        return 69;
      }
    }
    
    public class Program
    {
      IPEndPoint ip = new(IPAddress.Loopback, 7767);
    
      TestInterface test = new();
    
      //Host
      Host host = new TCPHost(ip);
      host.AddService<ITestInterface>(test);
      host.StartListening().ConfigureAwait(false);
    
      //Client
      Client client = new TCPClient(ip);
      client.AddService<ITestInterface>();
      client.Connect();
    
      //Now we can call to method like it was normal C#
      TestProxy proxy = new(client);
      proxy.DoSomethingCool();
    }

    Benchmarks

    BenchmarkDotNet=v0.13.1, OS=Windows 10.0.19044.1826 (21H2)
    Intel Core i5-10600KF CPU 4.10GHz, 1 CPU, 12 logical and 6 physical cores
    .NET SDK=6.0.302
      [Host]     : .NET 6.0.7 (6.0.722.32202), X64 RyuJIT
      Job-TDLHXN : .NET 6.0.7 (6.0.722.32202), X64 RyuJIT
    
    Jit=Default  Platform=AnyCpu  Runtime=.NET 6.0  

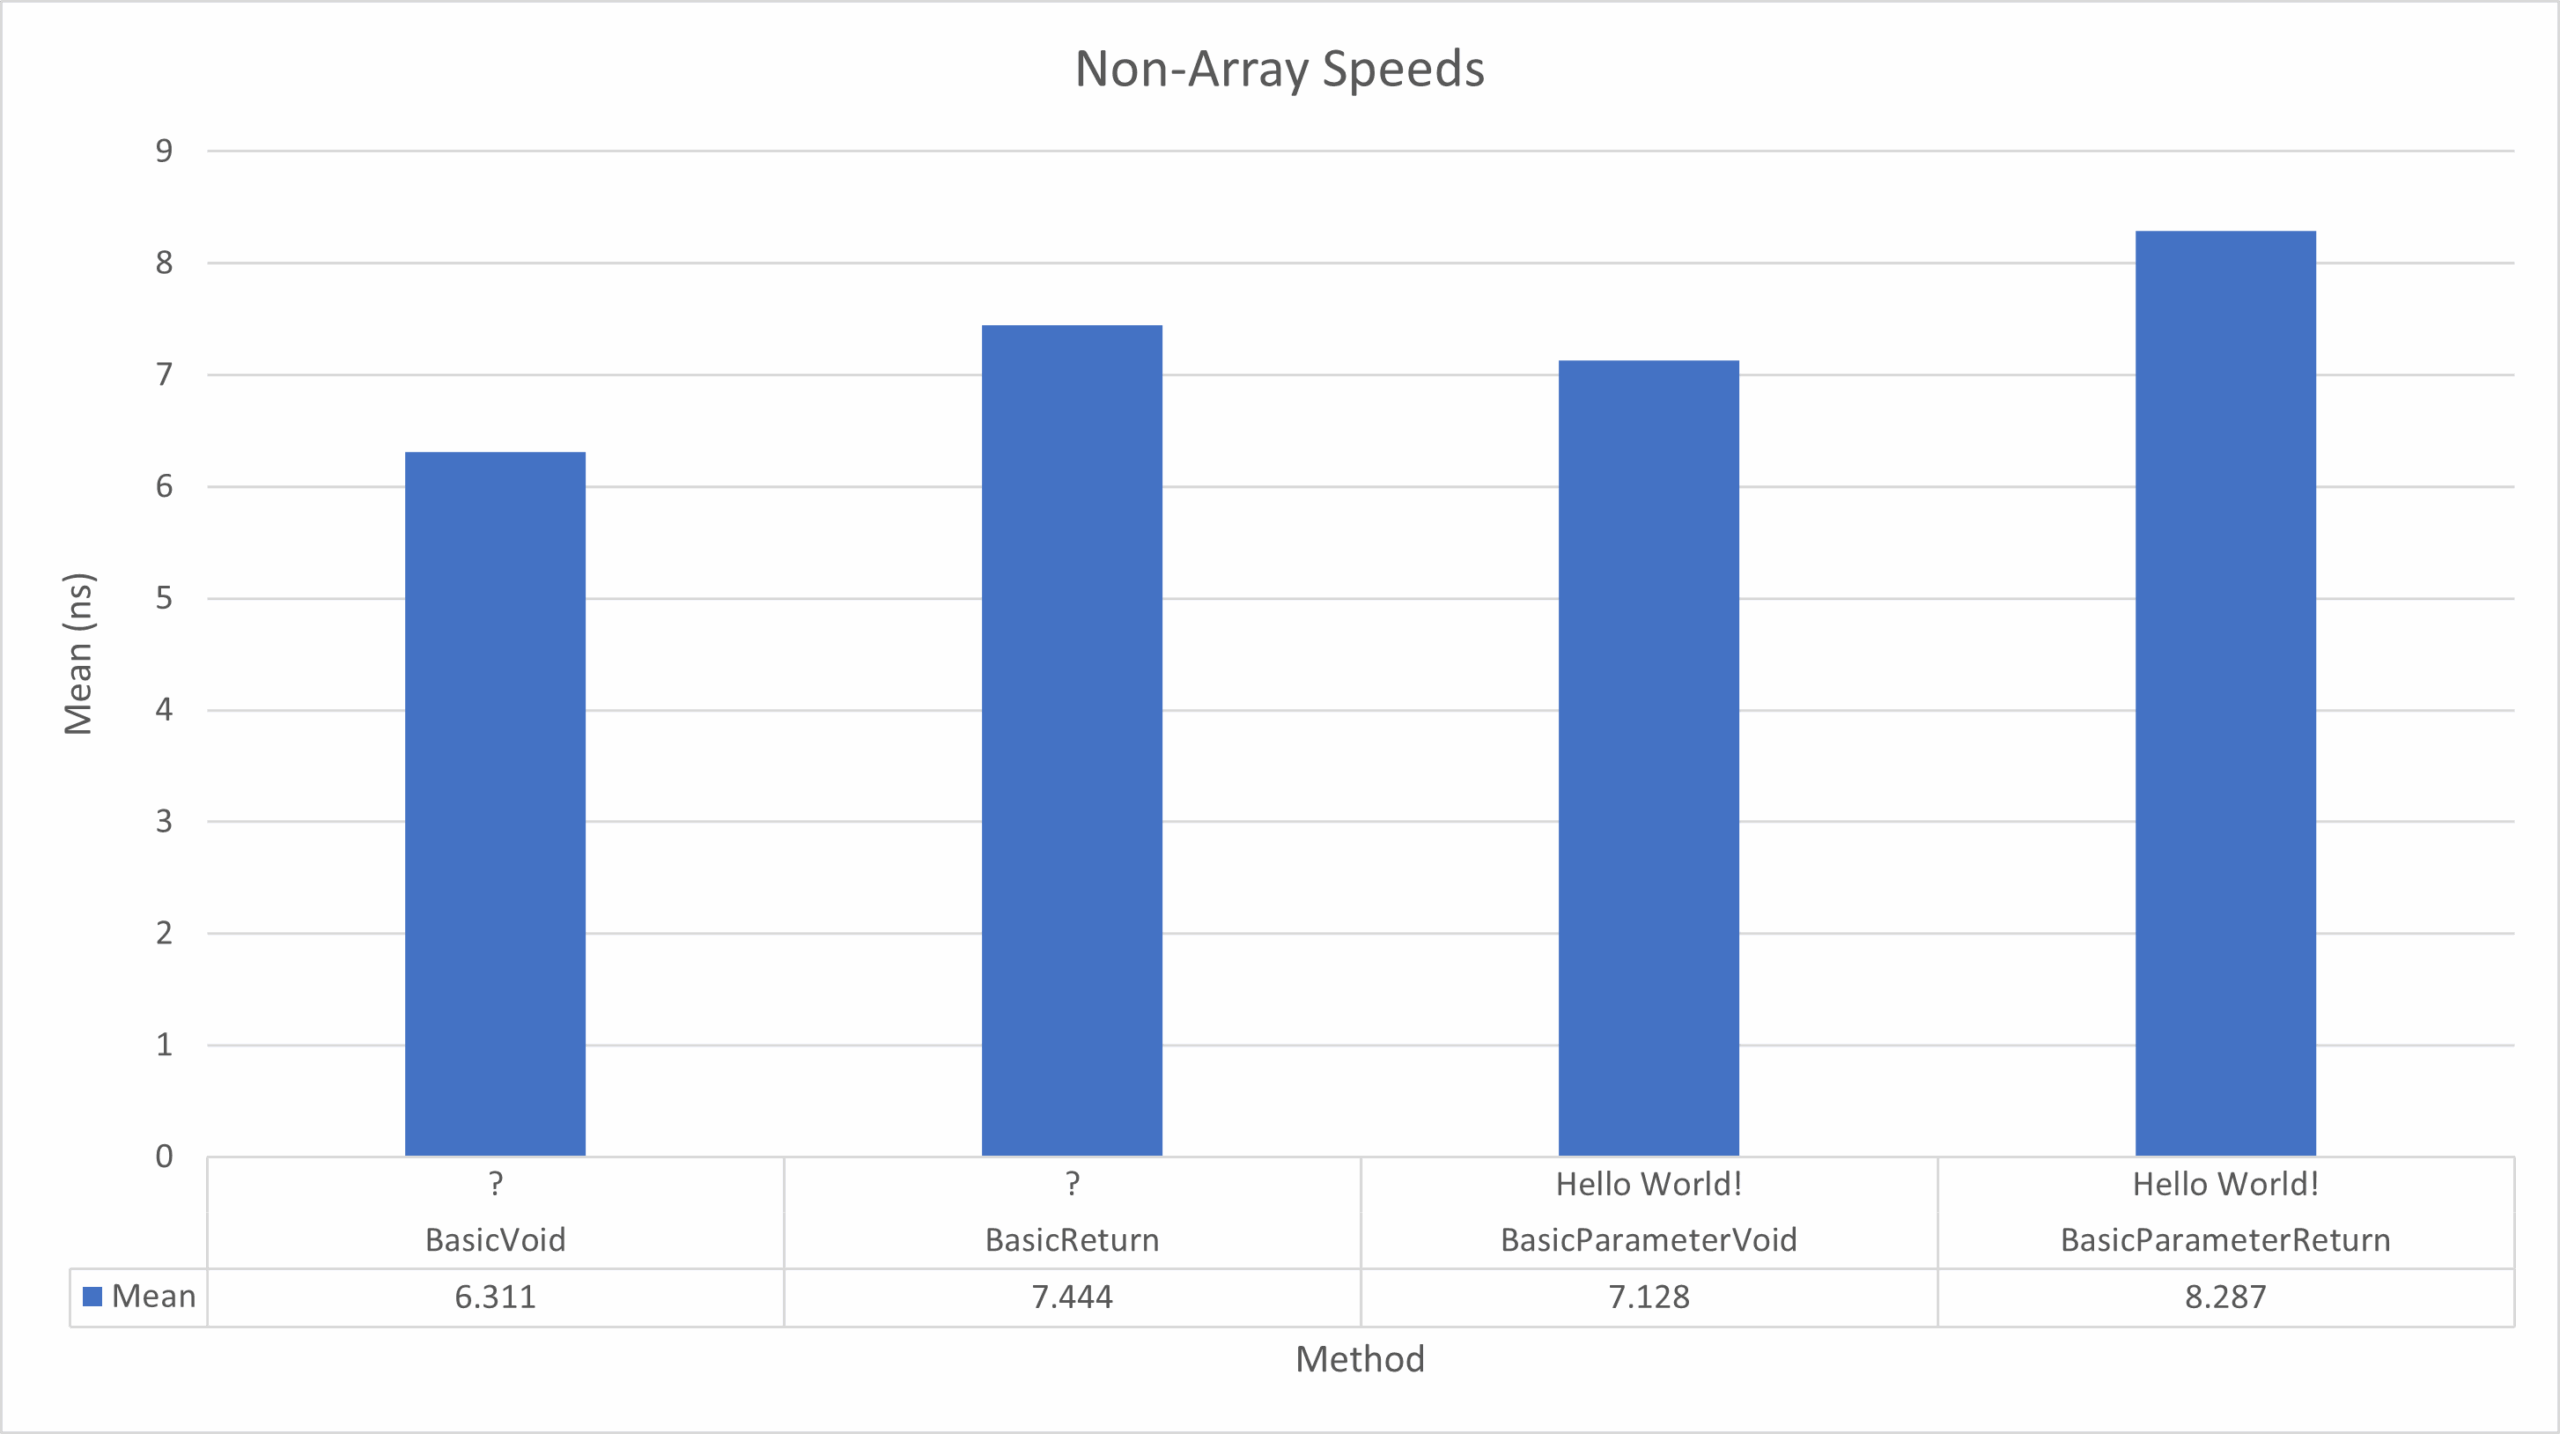
    Pipes Non-Array

    Pipes Non-Array

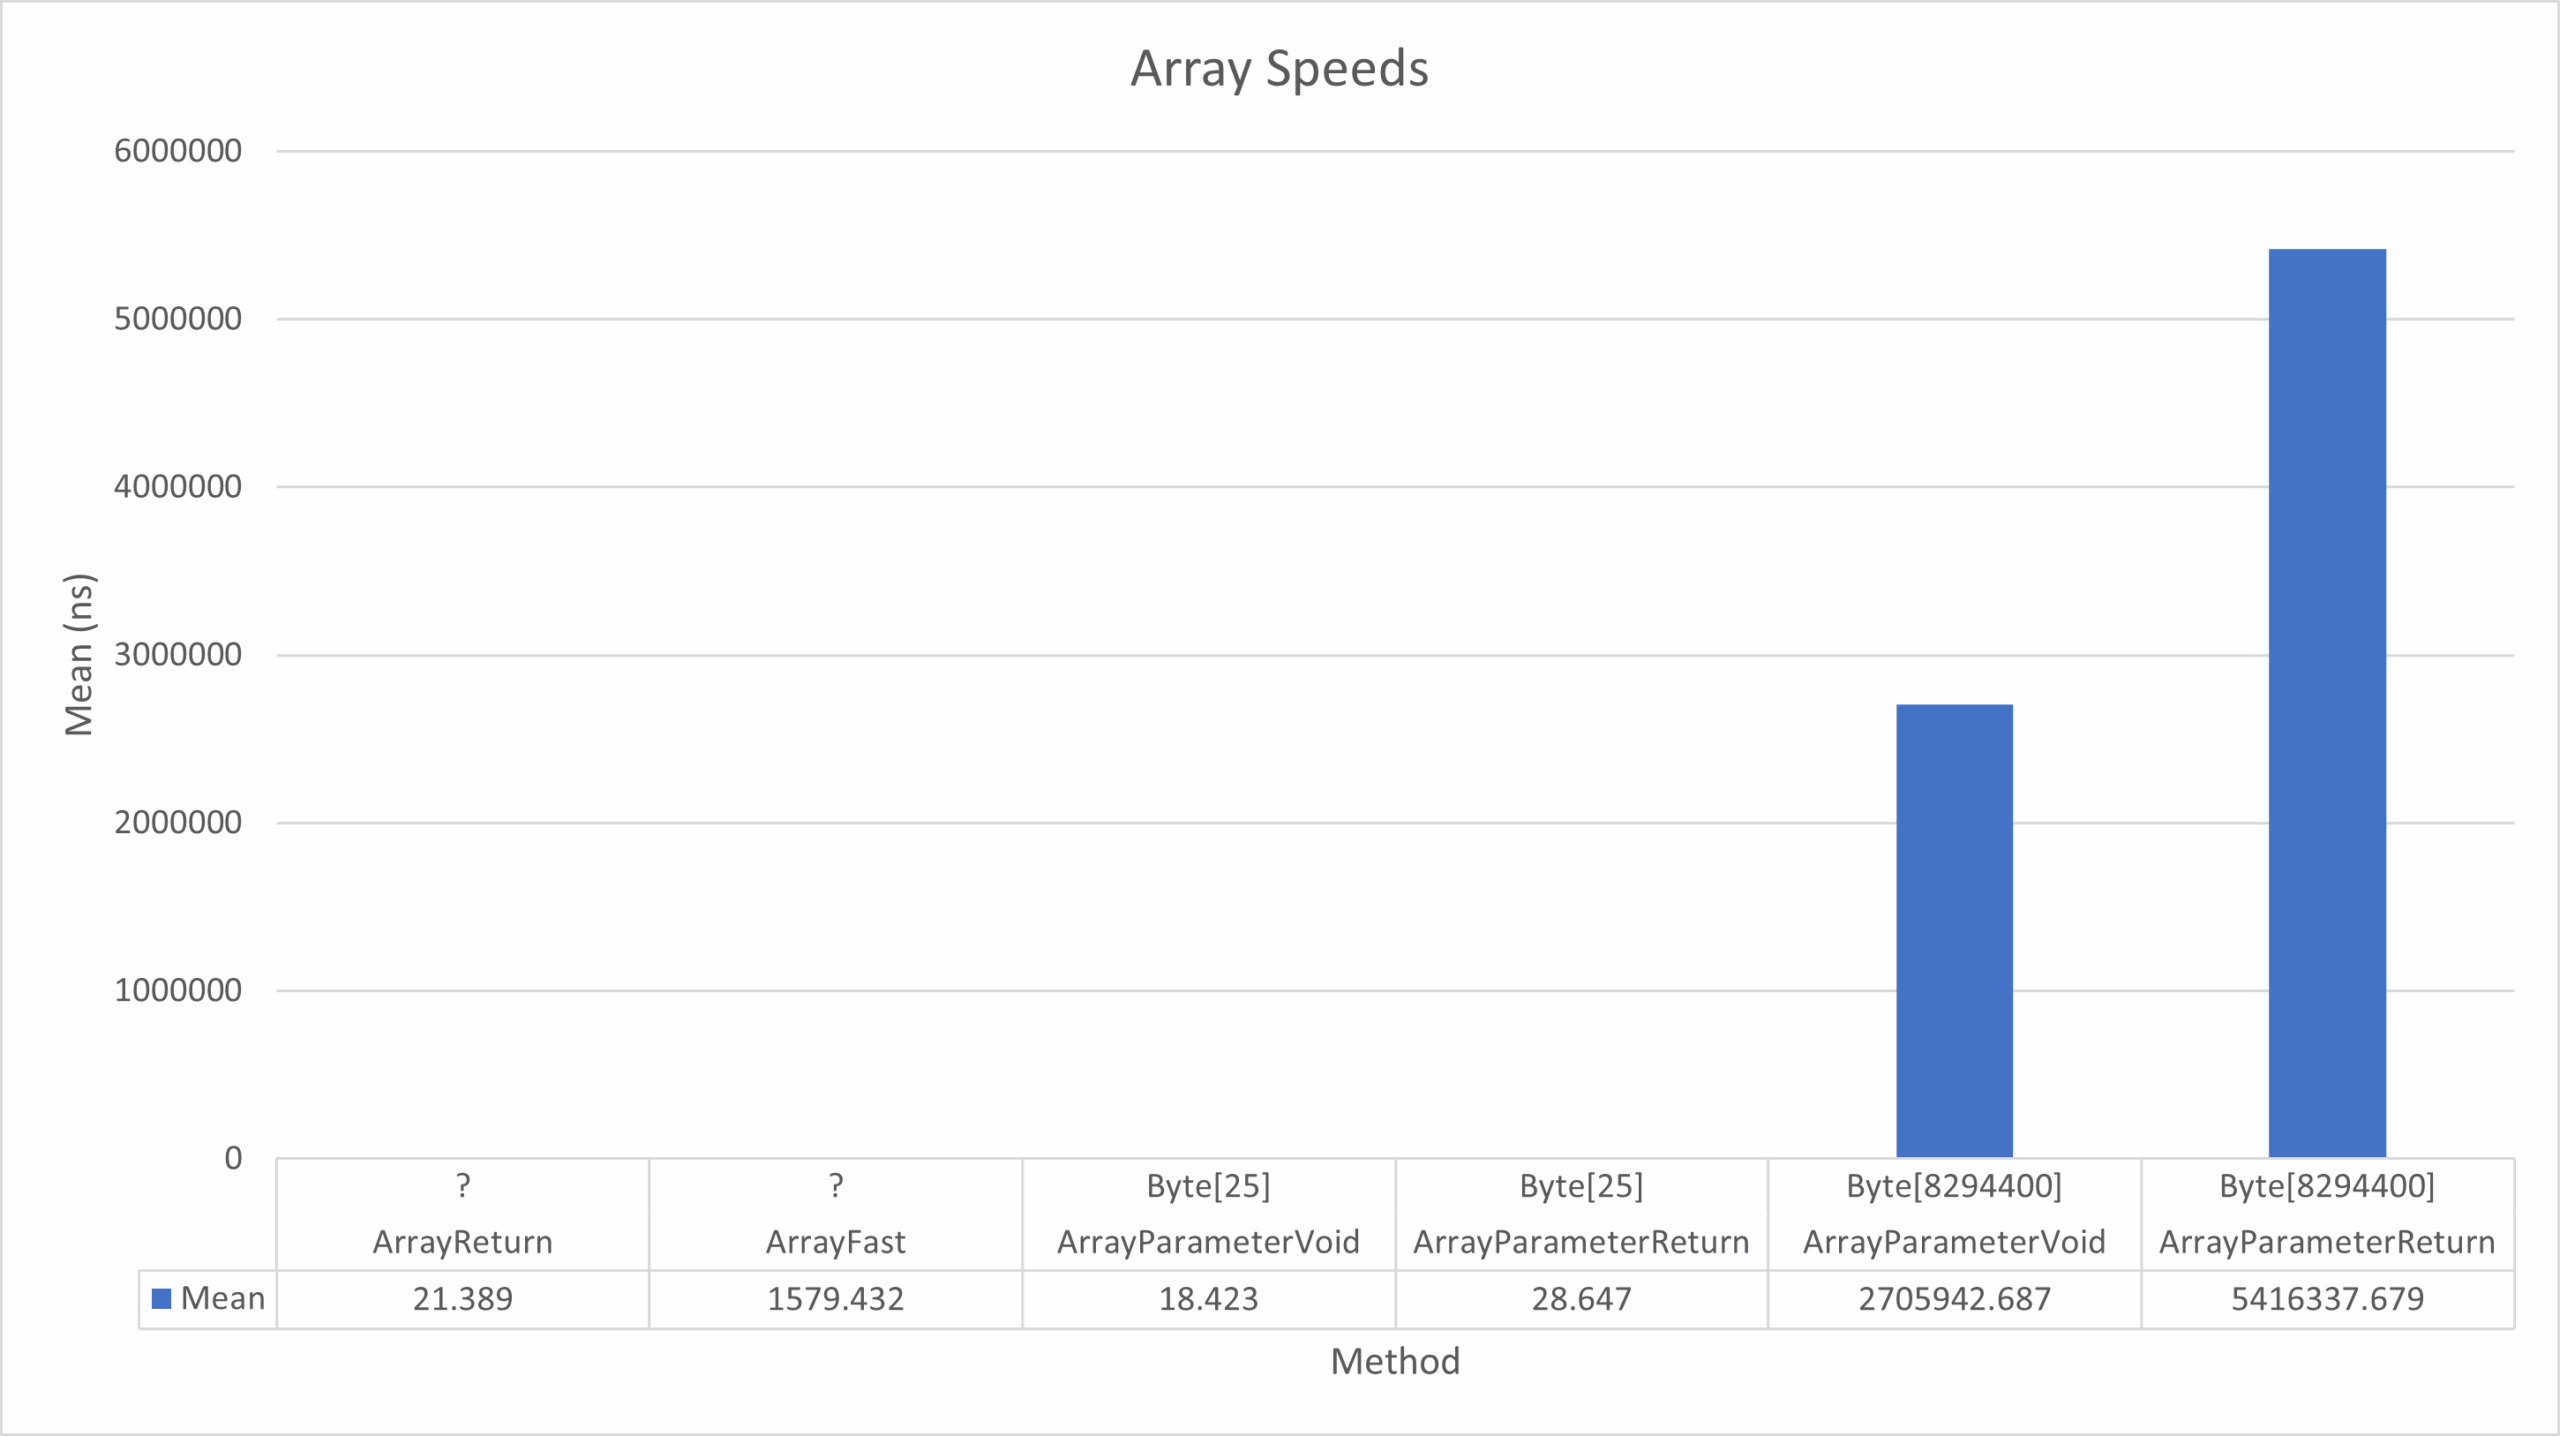
    (Currently, the in-built arrays are quite a lot slower, we are looking into fixing this in a later release)

    Method message array Mean Error StdDev
    BasicVoid ? ? 6.311 μs 0.0517 μs 0.0432 μs
    BasicReturn ? ? 7.444 μs 0.0589 μs 0.0551 μs
    ArrayReturn ? ? 21.389 μs 0.3943 μs 0.6695 μs
    ArrayFast ? ? 1,579.432 μs 10.1223 μs 9.4684 μs
    BasicParameterVoid Hello World! ? 7.128 μs 0.0390 μs 0.0346 μs
    BasicParameterReturn Hello World! ? 8.287 μs 0.0364 μs 0.0304 μs
    ArrayParameterVoid ? Byte[25] 18.423 μs 0.3675 μs 0.6140 μs
    ArrayParameterReturn ? Byte[25] 28.647 μs 0.5643 μs 0.9112 μs
    ArrayParameterVoid ? Byte[8294400] 2,705,942.687 μs 11,965.3253 μs 11,192.3727 μs
    ArrayParameterReturn ? Byte[8294400] 5,416,337.679 μs 21,036.1040 μs 18,647.9583 μs

    For more info on these benchmarks see Benchmarks.

    Authors

    VoltstroInitial workVoltstro

    License

    This project is licensed under the MIT license – see the LICENSE.md file for details.

    Credits

    Visit original content creator repository https://github.com/Voltstro-Studios/VoltRpc
  • OrphanageConceptApp-REACTNATIVE

    OrphanageConceptApp-REACTNATIVE

    Orphanage concept App – Simple CRUD without auth (REACT NATIVE – TYPESCRIPT)

    React Native Typescript MIT License LinkedIn


    Developed with Next Level Week event:

    Landing.tsx, CreateOrphanage.tsx, Orphanage.tsx, OrphanagesMap: layout, integration with map (leaflet), creation and sending of data, showing dynamic data. Sidebar.tsx component. Utils mapIcons.ts Routes component


    Table of Contents

    About The Project

    Product Name Screen Shot

    Happy is an application that connects people to institutional care homes to make many children’s day happier

    Built With

    Getting Started

    To get a local copy up and running follow these simple example steps.

    Prerequisites

    Make sure you have nodejs and npm installed on your machine

    • npm
    npm install npm@latest -g

    Installation

    1. Clone the repo
    git clone https://github.com/LeonardoDalessandro/OrphanageConceptApp-REACTNATIVE.git
    1. Install NPM packages
    npm install

    Roadmap

    See the open issues for a list of proposed features (and known issues).

    Contributing

    This project was created for educational purposes to experiment React.js features. Contributions are what make the open source community such an amazing place to be learn, inspire, and create. Any contributions you make are greatly appreciated.

    1. Fork the Project
    2. Create your Feature Branch (git checkout -b feature/AmazingFeature)
    3. Commit your Changes (git commit -m 'Add some AmazingFeature')
    4. Push to the Branch (git push origin feature/AmazingFeature)
    5. Open a Pull Request

    License

    Distributed under the MIT License. See LICENSE for more information.

    Contact

    Leonardo D’Alessandro – linkedin-url

    Acknowledgements

    Visit original content creator repository https://github.com/alessandrotraversi/OrphanageConceptApp-REACTNATIVE
  • pyyaml

    PyYAML

    A full-featured YAML processing framework for Python

    Installation

    To install, type python setup.py install.

    By default, the setup.py script checks whether LibYAML is installed and if
    so, builds and installs LibYAML bindings.
    To skip the check and force installation of LibYAML bindings, use the option
    --with-libyaml: python setup.py --with-libyaml install.
    To disable the check and skip building and installing LibYAML bindings, use
    --without-libyaml: python setup.py --without-libyaml install.

    When LibYAML bindings are installed, you may use fast LibYAML-based parser and
    emitter as follows:

    >>> yaml.load(stream, Loader=yaml.CLoader)
    >>> yaml.dump(data, Dumper=yaml.CDumper)
    

    If you don’t trust the input YAML stream, you should use:

    >>> yaml.safe_load(stream)
    

    Testing

    PyYAML includes a comprehensive test suite.
    To run the tests, type python setup.py test.

    Further Information

    License

    The PyYAML module was written by Kirill Simonov xi@resolvent.net.
    It is currently maintained by the YAML and Python communities.

    PyYAML is released under the MIT license.

    See the file LICENSE for more details.

    Visit original content creator repository
    https://github.com/yaml/pyyaml

  • Unicage-Benchmarks-2021-2022-Code

    Unicage-Benchmarks

    Repository for benchmarks with Unicage.
    This contains scripts for data generation and implementations of workloads.

    Documentation is available in here.

    An automated deployment of a local testing environment with Vagrant and VirtualBox is available in this repository.


    DISCLAIMERS & CREDITS:

    Data generators:

    Benchmarking and Monitoring:

    • All cluster monitoring and benchmarked resource usage metrics collection was achieved with Netdata. These make up +8GB, together with the logs of the benchmarks in this separate repository.

    Stream processing (Kafka and Twitter API):

    • There are some stream processing implementations in this folder. Tweets are fetched with Kafka + Twitter API and fed into Spark to be processed with Spark Streaming and Spark Structured Streaming. These implementations were not tested nor benchmarked in a cluster environment, and are not a part of the benchmark – they were purely exploratory.

    Benchmark Progress:

    The following table keeps track of what has been done:

    Legend:

    • ✓ – reliable output – output we are confident is correct, through verification
    • ✓* – reliable but unvalidated output – reliable output with no statistical vality (single runs)
    • ✓? – unreliable output – output that we have no way of verifying if it is correct
    • ✗ – incorrect output – output we are confident is incorrect, through verification

    Size
    Operation System 64 128 256 512 1024 2048 4096 8192
    Grep Generation &
    Loading
    Done Done Done Done Done Done Done Done
    Hadoop
    Spark
    Unicage
    Sort Generation &
    Loading
    Done Done Done Done
    Hadoop ✓*
    Spark
    Unicage
    Wordcount Generation &
    Loading
    Done Done Done Done Done Done Done Done
    Hadoop ✓*
    Spark
    Unicage
    Select Generation &
    Loading
    Done Done Done Done Done Done Done Done
    Hive
    Spark
    Unicage
    Join Generation &
    Loading
    Done Done Done Done Done Done Done Done
    Hive
    Spark
    Unicage
    Aggregation Generation &
    Loading
    Done Done Done Done Done Done Done Done
    Hive
    Spark
    Unicage

    The complete benchmark results can be found here.


    Known Bugs & TODOs:

    • The select Unicage workload aggregates results in leader node with no need, adding time to the workload. This aggregation should be moved to the verification script.

    • The data generators for aggregation and select should be adjusted to generate a single table with the desired volume, as opposed to two tables, with one of them not being used by the workloads.


    Links & References:

    BigDataBench 5.0:

    https://github.com/BenchCouncil/BigDataBench_V5.0_BigData_MicroBenchmark

    https://github.com/yangqiang/BigDataBench-Spark

    https://github.com/BenchCouncil/BigDataBench_V5.0_Streaming

    HiBench:

    https://github.com/Intel-bigdata/HiBench

    Install Hadoop 3.3.1 (pseudo-distributed):

    https://klasserom.azurewebsites.net/Lessons/Binder/2410#CourseStrand_3988

    https://www.youtube.com/watch?v=QDpA3A0MXJY&t=156s&ab_channel=ChrisDyck (and Part 2)

    Install Hive 3.1.2 (pseudo-distributed):

    https://hadooptutorials.info/2020/10/11/part-3-install-hive-on-hadoop/

    Install Spark 3.2.0 (pseudo-distributed):

    https://msris108.medium.com/how-to-setup-a-pseudo-distributed-cluster-with-hadoop-3-2-1-and-apache-spark-3-0-34406a85130f

    Streaming examples in Spark Streaming:

    https://spark.apache.org/docs/latest/streaming-programming-guide.html

    https://github.com/apache/spark/tree/master/examples/src/main/scala/org/apache/spark/examples/streaming

    https://jhui.github.io/2017/01/15/Apache-Spark-Streaming/

    Kafka Streams wordcount example:

    https://kafka.apache.org/documentation.html#quickstart

    Kafka generic non-JVM producer/consumer (may be useful for stream processing in Unicage BOA!)

    https://github.com/edenhill/kcat

    Kafka + TwitterAPI + Spark Streaming + Hive example:

    https://github.com/dbusteed/kafka-spark-streaming-example

    https://www.youtube.com/watch?v=9D7-BZnPiTY

    WARNING: This example uses Spark Streaming from Spark 2.4.0. Kafka no longer integrates with Spark Streaming, as of v2.4, instead it integrates with Spark Structured Streaming. How to integrate Kafka with Structured Streaming in Spark 3.2.0.

    Visit original content creator repository
    https://github.com/duartegithub/Unicage-Benchmarks-2021-2022-Code

  • remix-pwr-indicator

    remix-pwr-indicator

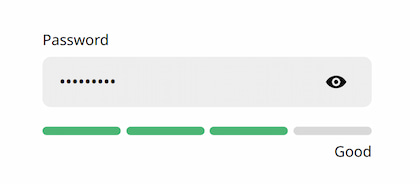
    Remix password strength indicator based on wasm

    NPM

    NPM

    Version Version code style: prettier License

    Info

    Remix iplementation password indicator component based on wasm.

    example_pwr

    Install

    $ npm install @bipboys/remix-pwr-indicator @bipboys/pwr-scoring
    

    Usage

    Add data route for work with wasm, like …/routes/pwr.tsx

    WASM are used to get the scoring value, but you can do use your own solution. Scoring get with zxcvbn rust package. Function scoring(password: string) return a value from 0 to 4. If you want to get all of the entropy data from zxcvbn package please use entropy(password: string) function.

    import { LoaderArgs, json } from "@remix-run/node";
    
    import { scoring } from "@bipboys/pwr-scoring";
    
    export async function loader({ request }: LoaderArgs) {
      const url = new URL(request.url);
      const query = url.searchParams.get("query");
    
      let scoringValue: number | null = null;
    
      if (typeof query === "string") {
        if (query.length > 0) {
          scoringValue = scoring(query);
        }
      }
    
      return json({
        scoring: scoringValue,
      });
    }

    Add fetcher in your component, where you want to use it and return score from wasm package

      // Fetch data from .../route/pwr.tsx
      let fetcherPWR = useFetcher();
    
      // Get value from onChange callback in password input 
      function handleChange(value: any) {
        fetcherPWR.load(`/pwr?query=${value}`);
      }
    
      const pwrScore = fetcherPWR.data?.scoring;

    Add password strength indicator with props

       <PasswordStrengthIndicator
         score={pwrScore}
         strengthTitle={{
           weak: "To short",
           bad: "Bad",
           good: "Good",
           strong: "Strong",
         }}
         strengthColor={[
           "#000",
           "#D44333",
           "#FFC043",
           "#21A453",
           "#21A453",
         ]}
       />

    Component Props

    type StrengthTitleT = {
      weak?: string;
      bad?: string;
      good?: string;
      strong?: string;
    };
    
    interface PasswordStrengthIndicatorI {
      score: number;
      strengthColor?: string[];
      strengthTitle?: StrengthTitleT;
      showLabel?: boolean;
      styleLabel?: React.CSSProperties;
      styleIndicator?: React.CSSProperties;
    }

    Remix support

    Tested with 1.7.2 version.

    License

    the MIT license.

    Visit original content creator repository https://github.com/bipboy/remix-pwr-indicator
  • utils-define-configurable-read-only-property

    About stdlib…

    We believe in a future in which the web is a preferred environment for numerical computation. To help realize this future, we’ve built stdlib. stdlib is a standard library, with an emphasis on numerical and scientific computation, written in JavaScript (and C) for execution in browsers and in Node.js.

    The library is fully decomposable, being architected in such a way that you can swap out and mix and match APIs and functionality to cater to your exact preferences and use cases.

    When you use stdlib, you can be absolutely certain that you are using the most thorough, rigorous, well-written, studied, documented, tested, measured, and high-quality code out there.

    To join us in bringing numerical computing to the web, get started by checking us out on GitHub, and please consider financially supporting stdlib. We greatly appreciate your continued support!

    Configurable Read-Only

    NPM version Build Status Coverage Status

    Define a configurable read-only property.

    Installation

    npm install @stdlib/utils-define-configurable-read-only-property

    Alternatively,

    • To load the package in a website via a script tag without installation and bundlers, use the ES Module available on the esm branch (see README).
    • If you are using Deno, visit the deno branch (see README for usage intructions).
    • For use in Observable, or in browser/node environments, use the Universal Module Definition (UMD) build available on the umd branch (see README).

    The branches.md file summarizes the available branches and displays a diagram illustrating their relationships.

    To view installation and usage instructions specific to each branch build, be sure to explicitly navigate to the respective README files on each branch, as linked to above.

    Usage

    var setConfigurableReadOnly = require( '@stdlib/utils-define-configurable-read-only-property' );

    setConfigurableReadOnly( obj, prop, value )

    Defines a configurable read-only property.

    var obj = {};
    
    setConfigurableReadOnly( obj, 'foo', 'bar' );
    
    obj.foo = 'boop';
    // throws <Error>

    Notes

    • Configurable read-only properties are enumerable.

    Examples

    var setConfigurableReadOnly = require( '@stdlib/utils-define-configurable-read-only-property' );
    
    function Foo( name ) {
        if ( !(this instanceof Foo) ) {
            return new Foo( name );
        }
        setConfigurableReadOnly( this, 'name', name );
        return this;
    }
    
    var foo = new Foo( 'beep' );
    
    try {
        foo.name = 'boop';
    } catch ( err ) {
        console.error( err.message );
    }

    See Also


    Notice

    This package is part of stdlib, a standard library for JavaScript and Node.js, with an emphasis on numerical and scientific computing. The library provides a collection of robust, high performance libraries for mathematics, statistics, streams, utilities, and more.

    For more information on the project, filing bug reports and feature requests, and guidance on how to develop stdlib, see the main project repository.

    Community

    Chat


    License

    See LICENSE.

    Copyright

    Copyright © 2016-2025. The Stdlib Authors.

    Visit original content creator repository https://github.com/stdlib-js/utils-define-configurable-read-only-property
  • volsung-toy-models

    Volsung Toy Models

    Simple finite element, heat- and mass-transfer models designed to teach geothermal reservoir physics.

    Models developed by Irene Wallis, Cubic Earth https://www.cubicearth.nz/

    Flow State Solutions sponsored a licence of Volsung (v 1.14.0) for this project https://www.flowstatesolutions.co.nz/

    Model Descriptions

    1) Conduction

    Illustrates a conductive thermal gradient of 40 degC/km (model 1a)

    List of rock thermal conductivities:
    https://pubs.usgs.gov/of/1988/0441/report.pdf

    All rock types have permeability of 0.001 mD (i.e., below the limit for convection).

    grid 1 A 10/10 km model with with 1000 m Voronoi grid elements in the horizontal with 250 m thick blocks to 8 km depth.

    2) Single Fault

    A single fault with high vertical permeability within a relatively low permeability host rock. A conductive thermal gradient of XXX degC/km is implemented without additional upflow elements (i.e., there is no additional injection of heat and mass into the fault zone). Subsequently, the convection cell, both upward and downward components, form inside the fault.

    model 2a single fault in one rock medium, but the fault does not go to surface

    6) Cap

    Licence

    Apache 2.0

    https://choosealicense.com/licenses/apache-2.0/

    Development

    Models and associated teaching materials were developed by Irene Wallis. Peter Franz (Flow State Solutions) is acknowledged for providing technical support for the Volsung package. Bill Cumming (Cumming Geoscience) is acknowledged for conceptual discussions that contributed to the refinement of this teaching resource.

    Visit original content creator repository
    https://github.com/ICWallis/volsung-toy-models

  • nestjs-blog-app

    NestJS Blog Application

    This project is a blog application developed using NestJS, TypeORM, PostgreSQL, and JWT for authentication. It serves as a practical application to learn NestJS while integrating various concepts and features.

    Project Structure

    • src/
      • app.controller.ts: Main application controller.
      • app.service.ts: Main application service.
      • auth/: Contains authentication-related modules, guards, and configurations.
      • common/: Common utilities, interceptors, and filters.
      • config/: Application and database configuration files.
      • meta-options/: Module for managing meta options.
      • posts/: Contains post-related modules, entities, and services.
      • tags/: Contains tag-related modules and entities.
      • users/: Contains user-related modules, entities, and services.

    Technologies Used

    • NestJS: Framework for building efficient and scalable server-side applications.
    • TypeORM: ORM for TypeScript and JavaScript.
    • PostgreSQL: Relational database for data storage.
    • JWT: For user authentication and authorization.
    • Swagger: For API documentation.
    • Compodoc: A documentation tool for generating API documentation in a static site.

    ##Environment Variables

    DATABASE_PORT=
    DATABASE_HOST=
    DATABASE_USER=
    DATABASE_PASSWORD=
    DATABASE_NAME=
    DATABASE_SYNCHRONIZE=
    
    PROFILE_API_KEY=
    
    JWT_SECRET=
    JWT_TOKEN_AUDIENCE=
    JWT_TOKEN_ISSUER=
    JWT_ACCESS_TOKEN_TTL=
    JWT_REFRESH_TOKEN_TTL=
    API_VERSION=

    Getting Started

    To get started with this project, follow these steps:

    Prerequisites

    Make sure you have the following installed:

    • Node.js
    • PostgreSQL

    Installation

    1. Clone the repository:

      git clone <repository-url>
      cd nestjs-intro
    2. Install dependencies:

      npm install
        cd nestjs-intro
    3. Set up your environment variables in a .env.development file based on the Environment Variables section above.
    4. Run the application:
      npm run start

    Note: This project is based on a course taken on Udemy to enhance skills in NestJS, and it includes detailed notes taken during the development process.

    Visit original content creator repository
    https://github.com/GulsumStc/nestjs-blog-app

  • cookies

    @ngx-utils/cookies

    npm version npm downloads

    Manage your cookies on client and server side (Angular Universal)

    Example in @ngx-utils/universal-starter shows the way in which CookiesService is used to get access token from cookies on client and server side, and then set Authorization headers for all HTTP requests.

    Table of contents:

    Prerequisites

    This package depends on @angular v9.0.0.

    Getting started

    Installation

    Install @ngx-utils/cookies from npm:

    npm install @ngx-utils/cookies --save

    browser.module.ts

    Add BrowserCookiesModule to your browser module:

    import { NgModule } from '@angular/core';
    import { BrowserModule } from '@angular/platform-browser';
    import { BrowserCookiesModule } from '@ngx-utils/cookies/browser';
    ...
    import { AppModule } from './app/app.module';
    import { AppComponent } from './app/app.component';
    ...
    @NgModule({
      imports: [
        BrowserModule.withServerTransition({appId: 'your-app-id'}),
        BrowserCookiesModule.forRoot(),
        AppModule
        ...
      ],
      bootstrap: [AppComponent]
    })
    export class BrowserAppModule { }

    server.module.ts

    Add ServerCookiesModule to your server module:

    import { NgModule } from '@angular/core';
    import { BrowserModule } from '@angular/platform-browser';
    import { ServerModule } from '@angular/platform-server';
    import { ServerCookiesModule } from '@ngx-utils/cookies/server';
    ...
    import { AppModule } from './app/app.module';
    import { AppComponent } from './app/app.component';
    ...
    @NgModule({
      imports: [
        BrowserModule.withServerTransition({ appId: 'your-app-id' }),
        ServerModule,
        ServerCookiesModule.forRoot(),
        AppModule
        ...
      ],
      bootstrap: [AppComponent]
    })
    export class ServerAppModule { }

    Cookies options

    You can preset cookies options:

    BrowserCookiesModule.forRoot({
      path: "https://github.com/",
      domain: 'your.domain',
      expires: '01.01.2020',
      secure: true,
      httpOnly: true
    })
    ...
    ServerCookiesModule.forRoot({
      path: "https://github.com/",
      domain: 'your.domain',
      expires: '01.01.2020',
      secure: true,
      httpOnly: true
    })

    API

    CookieService has following methods:

    • put(key: string, value: string, options?: CookiesOptions): void put some value to cookies;
    • putObject(key: string, value: Object, options?: CookiesOptions): void put object value to cookies;
    • get(key: string): string get some value from cookies by key;
    • getObject(key: string): { [key: string]: string } | string get object value from cookies by key;
    • getAll(): { [key: string]: string } get all cookies ;
    • remove(key: string, options?: CookiesOptions): void remove cookie by key;
    • removeAll(): void remove all cookies;

    Example of usage

    If you’re using express as server then add following code to your server.ts:

    import { renderModuleFactory } from "@angular/platform-server";
    import { provideModuleMap } from "@nguniversal/module-map-ngfactory-loader";
    import * as cookieParser from "cookie-parser";
    
    app.use(cookieParser("Your private token"));
    
    app.engine("html", (_, options, callback) => {
      renderModuleFactory(AppServerModuleNgFactory, {
        document: template,
        url: options.req.url,
        extraProviders: [
          provideModuleMap(LAZY_MODULE_MAP),
          {
            provide: "REQUEST",
            useValue: options.req
          },
          {
            provide: "RESPONSE",
            useValue: options.req.res
          }
        ]
      }).then(html => {
        callback(null, html);
      });
    });

    Then just import CookiesService from @ngx-utils/cookies and use it:

    import { Component, OnInit } from "@angular/core";
    import { CookiesService } from "@ngx-utils/cookies";
    
    @Component({
      selector: "app-root",
      templateUrl: "./app.component.html",
      styleUrls: ["./app.component.scss"]
    })
    export class AppComponent implements OnInit {
      constructor(private cookies: CookiesService) {}
    
      ngOnInit() {
        this.cookies.put("some_cookie", "some_cookie");
        this.cookies.put("http_only_cookie", "http_only_cookie", {
          httpOnly: true
        });
        console.log(this.cookies.get("some_cookie"), " => some_cookie");
        console.log(this.cookies.get("http_only_cookie"), " => undefined");
        console.log(this.cookies.getAll());
      }
    }

    If you’re using another framework you need to overrride ServerCookiesService.

    For example for koa you need add following code to your server:

    app.use(async (ctx: Context) => {
      ctx.body = await renderModuleFactory(AppServerModuleNgFactory, {
        document: template,
        url: ctx.req.url,
        extraProviders: [
          provideModuleMap(LAZY_MODULE_MAP),
          {
            provide: "KOA_CONTEXT",
            useValue: ctx
          }
        ]
      });
    });

    Then create server-cookies.service.ts:

    import { Context } from "koa";
    import { Inject, Injectable } from "@angular/core";
    import {
      CookiesService,
      CookiesOptionsService,
      CookiesOptions
    } from "@ngx-utils/cookies";
    
    @Injectable()
    export class ServerCookiesService extends CookiesService {
      private newCookies: { [name: string]: string | undefined } = {};
    
      constructor(
        cookiesOptions: CookiesOptionsService,
        @Inject("KOA_CONTEXT") private ctx: Context
      ) {
        super(cookiesOptions);
      }
    
      get(key: string): string {
        return this.newCookies[key] || this.ctx.cookies.get(key);
      }
    
      protected cookiesReader() {
        return {};
      }
    
      protected cookiesWriter(): (
        name: string,
        value: string | undefined,
        options?: CookiesOptions
      ) => void {
        return (name: string, value: string | undefined, options?: any) => {
          this.newCookies[name] = value;
          this.ctx.cookies.set(name, value, { httpOnly: false, ...options });
        };
      }
    }

    And add server-cookies.service.ts to app.server.module.ts:

    {
      provide: CookiesService,
      useClass: ServerCookiesService,
    },

    License

    The MIT License (MIT)

    Visit original content creator repository https://github.com/ngx-utils/cookies